A caution, C. battery removal and replacement, A warning – Troy-Bilt 8 HP User Manual
Page 59: Warning, Ailtelalce and service
Attention! The text in this document has been recognized automatically. To view the original document, you can use the "Original mode".
■AilTElAlCE AND SERVICE
2. C lean the battery, if needed. If
the battery is extrem ely cold, allow
it to w arm to betw een 60°F— 80°F.
3. R em ove all filler caps. Leave
saps off w hile filling and charging.
C arefully check the electrolyte
level. If, and only if, the electrolyte
level is low , add distilled or dem in-
sralized w ater (D O N O T U S E B A T
TER Y A C ID ) to adjust the electro-
yte level to the correct height (see
‘A . B attery care in service” on
page 56 for filling instructions.
^void overfilling.
5. C harge the battery until all of
the cells are gassing freely. (To
sheck for gassing, W E A R SA FETY
B O G G LES and use a flashlight to
bok dow n into each cell w hile the
battery is being charged. W hen
gassing freely, the surface of the
¡quid electrolyte should be covered
[W ith tiny bubbles). U se one of the
follow ing procedures:
[a) R ecom m ended M ethod:
C harge the battery at a rate of
1 to 2 am peres until all cells
are gassing freely. The total
charging tim e should not ex
ceed 24 hours.
[b) First A lternative:
C harge the battery at a rate of
4 to 6 am peres until all cells
are gassing freely. The total
charging tim e should not ex
ceed 8 hours.
[c) S econd A lternative:
C harge the battery at a rate of
6 to 12 am peres until all cells
are gassing freely. The total
charging tim e should not ex
ceed 4 hours.
A CAUTION
D o not charge the battery at a rate
higher than 12 am peres. A charge
rate of m ore than 12 am peres
generates excessive heat and gas
sing and w ill perm anently dam age
the battery.
level in each cell. If necessary, add
distilled or dem ineralized w ater
(D O N O T A D D B A TTER Y A C ID ) to
adjust the electrolyte level to the
correct height. Then reconnect the
charger cables to the battery and
charge the battery for an additional
one hour.
7. R eplace the filler caps and w ash
off any spilled electrolyte w ith a
baking soda and w ater solution.
8. S tore the battery in a cool, dry
place aw ay from heat ducts, radia
tors, and direct sunlight. A void
freezing tem peratures. A battery
loses voltage in storage, m ore so
in hot w eather than in cold. A n
ideal storage tem perature is 50°F.
C. Battery removal and
replacement
A WARNING
To help avoid personal injury, stop
the engine, rem ove the electric
start key, disconnect the spark
plug w ire, and let the engine and
m uffler cool before rem oving or
replacing the battery.
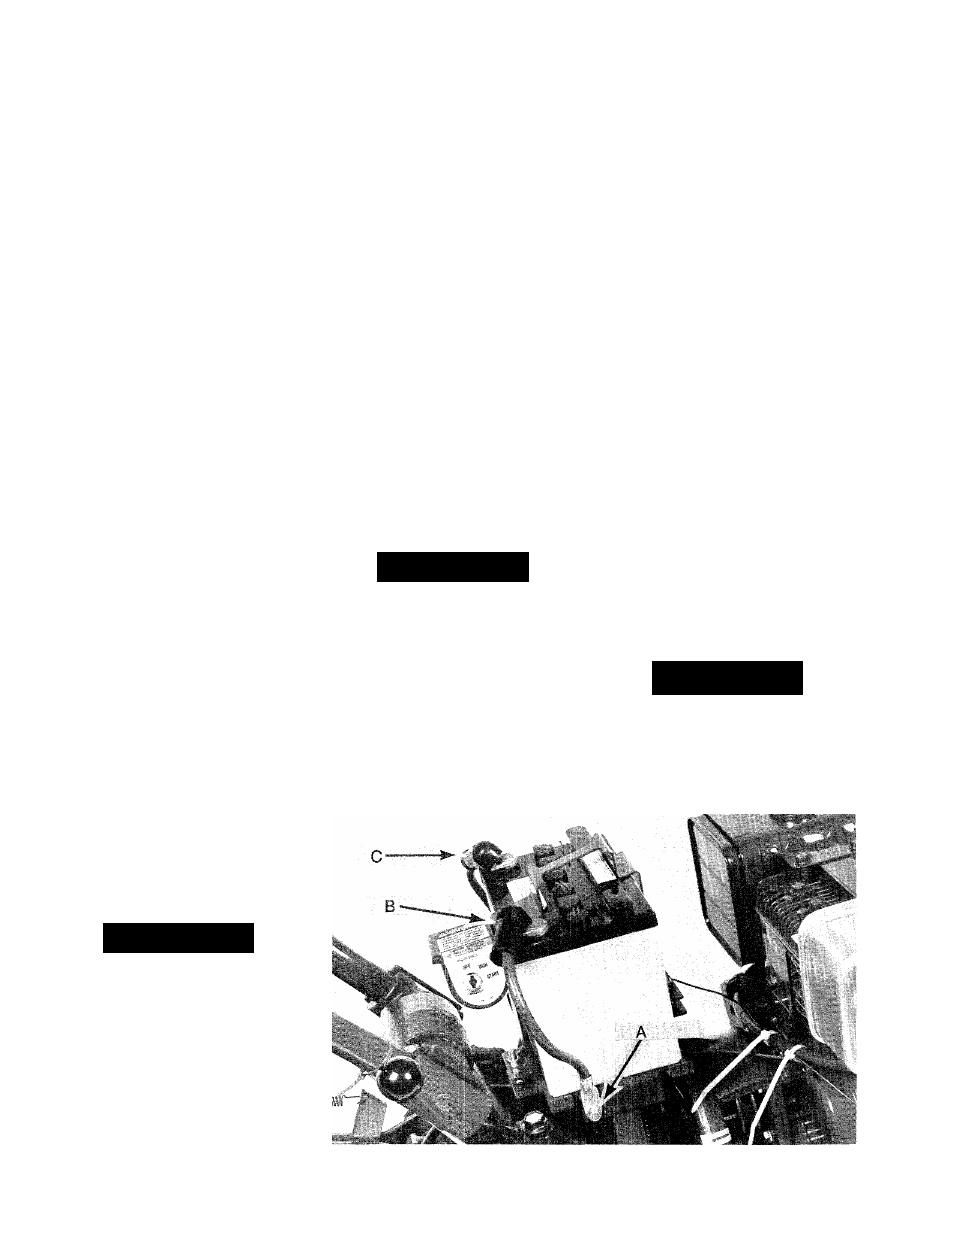
1. D isconnect the negative (-)
cable from the grounding screw
located on the right side of the
battery bracket (“A ” in P hoto 6-64)
and bend the cable safely aw ay
from any m etal parts.
2. D isconnect the negative (-)
cable from the negative battery
post (“B ” in P hoto 6-64) and re
m ove the cable.
3. D isconnect the positive (+)
cable from the positive battery post
(“C ” in P hoto 6-64) and bend it
safely aw ay from any m etal parts.
C over the cable term inal w ith the
rubber boot.
4. R em ove the battery hold-dow n
clam p and rem ove the battery.
5. R everse the previous steps
w hen replacing the battery. B e very
careful that you place the battery
on the bracket so that its posts are
facing to the rear (tine end) of the
tiller. The positive (+) post m ust be
on the left side as you face for
w ard from the handlebars.
6. Insert the vent tube (on positive
(+) side of battery) into the vent
tube shield. B e sure that the tube
is not crim ped, pinched, or folded
anyw here along its length.
A
WARNING
W hen rem oving the battery, alw ays
disconnect the negative (-) cable
first, follow ed by the positive (+)
cable. R everse this procedure
w hen reinstalling the battery.
B . W hen the battery is fully
charged, turn off the charging
equipm ent and then disconnect
the cables. C heck the electrolyte
6-64: Follow removal and replacement instructions carefully.
57