Sears 113.298141 User Manual
Page 28
Attention! The text in this document has been recognized automatically. To view the original document, you can use the "Original mode".
RESAWING
RESAWING is known as ripping a piece of wpdd through
its thickness. Do not attempt to resaw BOWED or
WARPED material. NOTE: To RESAW a piece of wood
wider than 3-3/8 in. ... it will be necessary to remove the
blade guard ... and use the AUXILIARY FENCE/WORK
SUPPORT. (See "Work Helpers"). .
Clamp
it
to
the
table
so
that
the
workpiece
will
SLIDE
EASILY
but
not
TILT
or
MOVE
SIDEWAYS
without
BINDING
between the
two
fenceSi
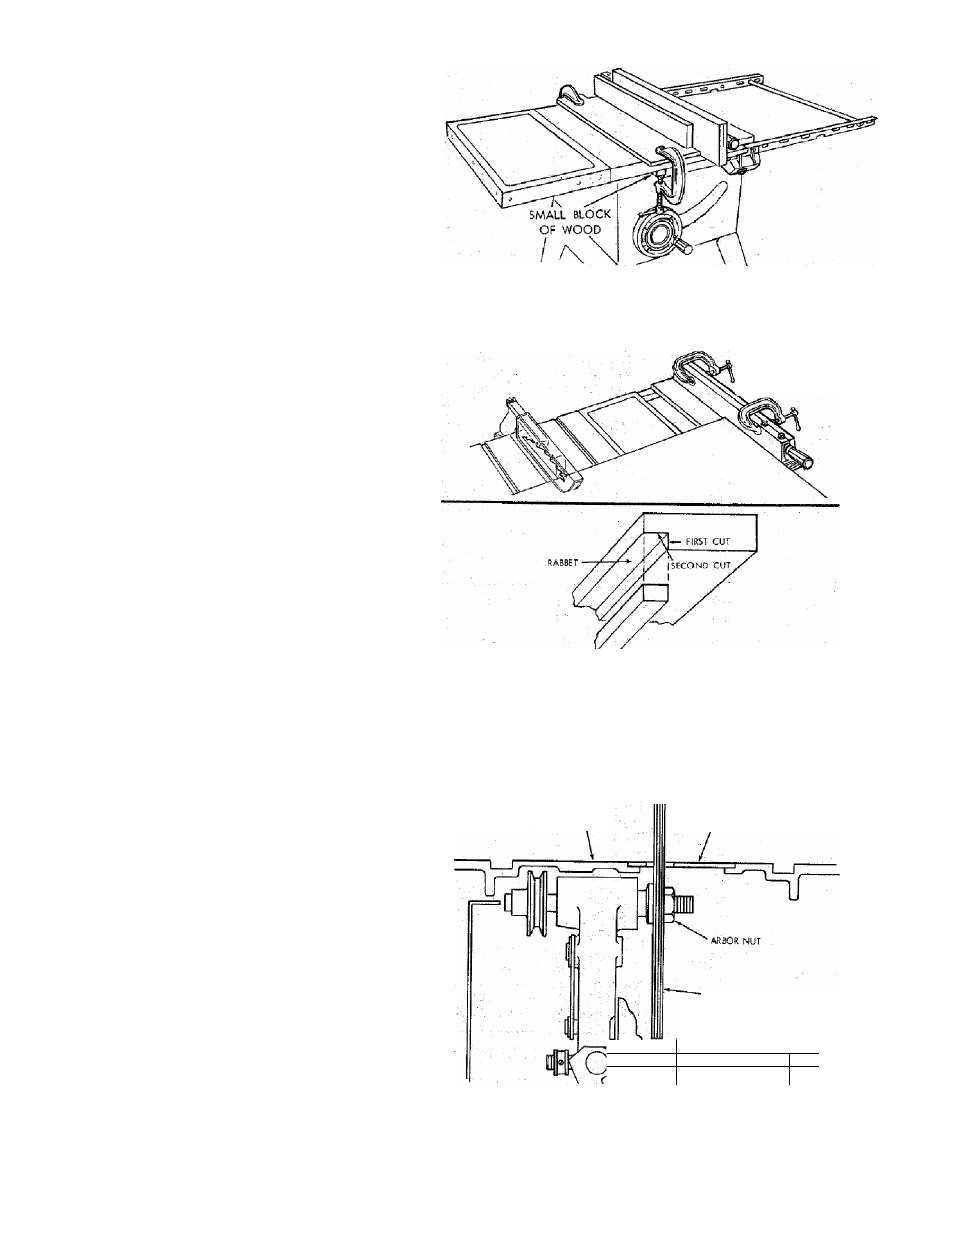
Do not clamp directly to the bottom edge of the table
because the "swivel" of the clamp will not grip properly.
Place a small block of wood between the bottom edge of
the table and the "C" clamp.
WARNING: FOR YOUR OWN SAFETY . - -
1. DO NOT "BACK UP" (REVERSE FEEDING) WHILE
RESAWING BECAUSE THIS COULD CAUSE A
KICKBACK.
INSTALL
BLADE
GUARD
IMMEDIATELY
UPON
COMPLETION OF THE RESAWING OPERATION.
CUTTING PANELS
When cutting panels (whenever fence is positioned outside
of
table
surface),
ALWAYS
use
the
AUXILIARY
FENCE/WORK SUPPORT.
1. Unlock fence and raise rear end.
2. Position A U X I L I A R Y FENCE/WORK SUPPORT as
shown and attach it with two "C" clamps.
RABBETING
Rabbeting is known as cutting out a section of the corner
of a piece of material, across an end or along an edge.
To make a RABBET requires cuts which do not go all the
way through the material. Therefore the blade guard must
be removed.
Í. Remove blade guard.
For rabbeting along an edge (long way of workpiece) as
shown, add facing to rip fence (see 5. RIP FENCE, p.
21) approximately as high as the workpiece is wide.
Adjust rip fence and blade to required dimensions; then
make first cut with board fiat on table as any rip (type)
cut; make second cut with workpiece on edge. Follow
all precautions, safety instructions, and operational
instructions as for ripping, or rip type operations,
including feather boards and push stick, etc.
For rabbeting across an end, for workpiece 1014" and
AUXILIARY FENCE/
WORK SUPPORT
/
2
.
3.
narrower make the rabbet cut with the board flat on
operations, including feather boards and push stick, etc.
the table using the miter gage fitted with a facing (per
"6. MITER GAUGE" on p.21). DO NOT use the rip
fence.
4. INSTALL BLADE G U A R D IMMEDIATELY UPON
COMPLETION OF RABBETING OPERATION.
Rabbet cuts can also be made using the dado head or
molding head
DADOING
Instructions for operating the Dado Head are contained in
booklet furnished with the Dado Head.
The R e c o m m e n d e d D a d o H e a d i s l i s t e d under
Recommended Accessories in this manual.
The arbor on the saw, is only Jong enough so that the:
widest cut that can be made is 13/16" wide.
It is not necessary to install the outside loose collar before
screwing
on the arbor nut. Make sure the arbor nut is tight.
A L W A Y S
U S E
D A D O
I N S E R r
LISTED
UNDER
RECOMMENDED ACCESSORIES.
When using-the dado head it will be necessary to remove
the Blade Guard and Spreader. USE CAUTION USE
FEATHERBOARDS AND PUSH STICKS AS REQUIRED.
A L W A Y S
R E P L A C E
THE
BLADE,
GUARD
AND
SPREADER WHEN YOU ARE FINISHED DADOING.
MOLDING CUTTING
Instructions for operating the Molding Head are contained
in a booklet furnished With the Molding Head.
The r e c o m m e n d e d m o l d i n g head is listed under
Recommended Accessories in this marrual.
Always use Molding Insert Listed Under Recommended
Accessories.
SAW TABLE
DADO INSERT
DAiX> HEAD
Í^llllllllllllííir
mmm
CP-
^ 1
When using the molding heat it will be necessary to remove
the Blade Guard and Spreader. USE CAUTION. USE
FEATHERBOARDS
AND
P U S H
S T I C K S ,
e t c .
AS
REQUIRED.
A L W A Y S
R E P L A C E
T H E
BLADE
G U A R D
AND
SPREADER WHEN YOU ARE FINISHED MOLDING.
2a