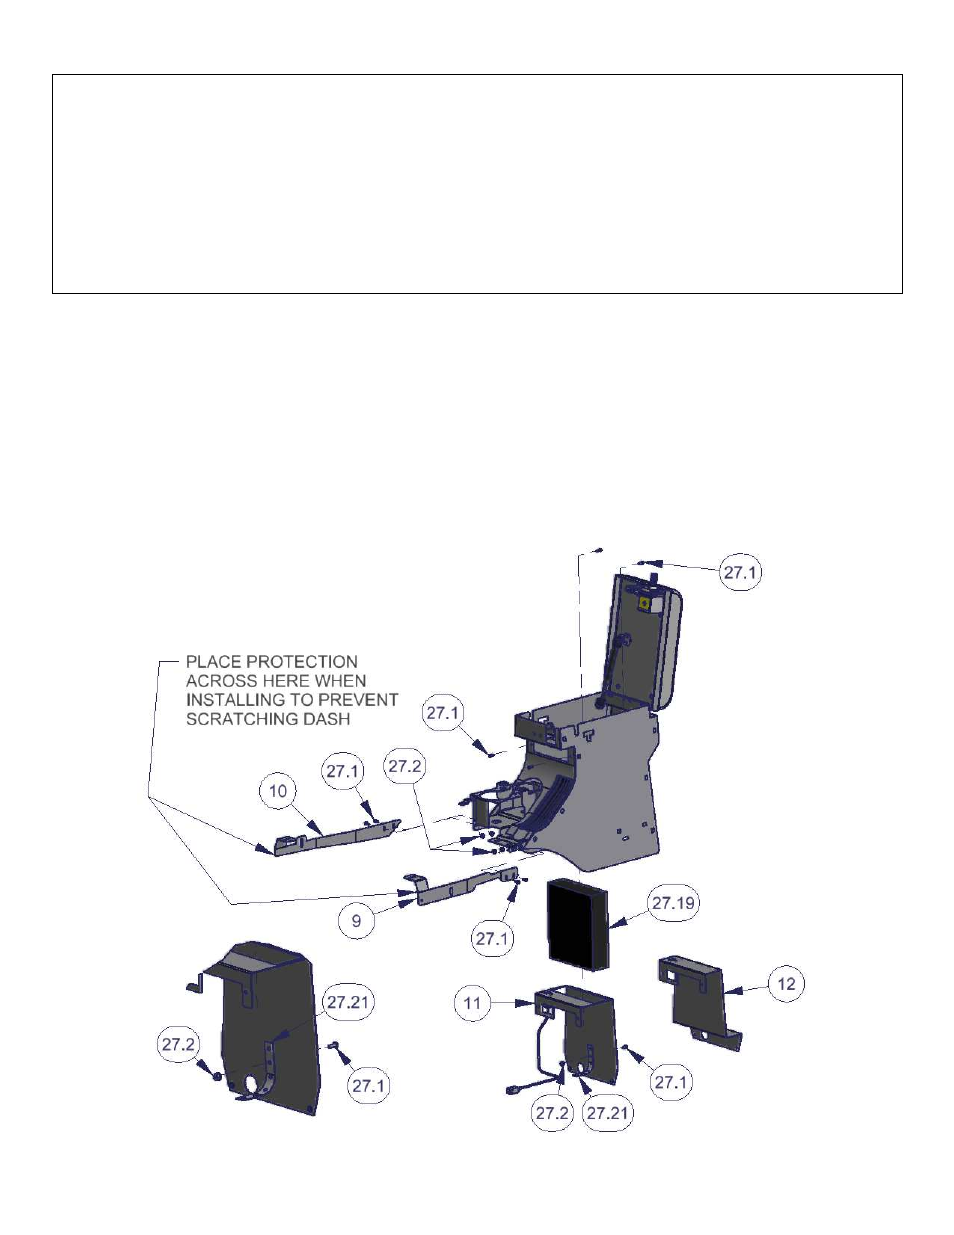
Figure 4 – Tuffy Security 274 User Manual
Page 6
Page 6 of 10 - 3/14/2011 – Rev10/15/2012
If a Stereo, CB, or other electronic equipment will be mounted in the console:
30. Install the electronics (Illustrated #27.19 – Fig 4) in the Electronics mounting bracket (#11 – Fig 4) by using the stereo
support strap included with your stereo or CB (Illustrated #27.21 – Fig 4). (If you do not have a stereo support strap,
plumber strap may be substituted.) Be sure the body on the electronics is not extending more than 7 13/16”
behind the Electronics Mounting Bracket or it will hit the emergency brake assembly.
31. Install the Electronics mounting bracket (#11 – Fig 4) in the console with (4) #10-32 X ½” Phillips screws (#27.1).
Check to make sure the lid will still close and latch without causing any problems.
NOTE: Leave the mounting hardware loose for this bracket; it can make installation easier in a later step to
unfasten this bracket and gain access under the console (The bracket cannot be removed completely after the
console is installed but it can be loosened and moved to the side).
32. If electronic equipment will not be installed using the Electronics mounting bracket (#11 – Fig 4), install the Divider
bracket (#12 – Fig 4) in the console with (4) #10-32 X ½” Phillips screws. Do not tighten the hardware at this time.
33. To make installation easier, one or both Front Mounting Brackets (#9 and #10) can be pre-installed to the front of the
console using the #10-32 X ½” Phillips screws (#27.1) and #10-32 hexwasher nuts (#27.2). If the driver’s seat was
removed, pre-install the right (passenger) side Front Mounting Bracket (#10), conversely, if the passenger’s seat was
removed, pre-install the left (driver) side Front Mounting Bracket (#9). Do not tighten the hardware at this time. (Fig 4)
34. Put a protection barrier (like cardboard) between the bottom of the vertical plastic dash console and the front
of the Tuffy console when installing to prevent scratches on the dash. (See Fig 4)
FIGURE 4