Top Flite TOPA0150 User Manual
Page 36
workbench. Measure the distance from the tip of the
other panel down to the workbench. The distance
should be 6-11/16", plus or minus 1/8", as measured
from the bottom main spar at rib 12. If necessary, make
adjustments so this measurement can be achieved.
❏
4. Once the correct dihedral has been confirmed,
and any other adjustments have been made for a
good fit, permanently join both wing panels with 30-
minute epoxy. Make certain the epoxy you are using
provides enough working time to join all the parts
and position your clamps. For the strongest bond,
coat all contacting surfaces with epoxy (both sides of
the spar web and the correct side of the forward wing
joiners). Make certain the root rib W-1 of the panels
are in alignment.
❏
5. Use fuelproof paint or epoxy thinned with
alcohol to coat and fuelproof the landing gear area.
If you prefer to do this at a later time, make sure it is
done
before the covering is applied, otherwise the
paint may soak through the top sheeting and blemish
iron-on coverings. You can use brush-on paint, but
you will have the most uniform coverage and the best
results if you apply the paint with an airbrush. Mix a
drop or two of blue to an ounce of yellow to get the
light shade of green resembling chromate green
used to protect aluminum in aircraft.
❏
6. Test fit, then glue the die-cut 1/8" plywood
aft wing
joiner and the die-cut 1/8" plywood ribs W-2B to the
wing (these parts can be seen in following photos).
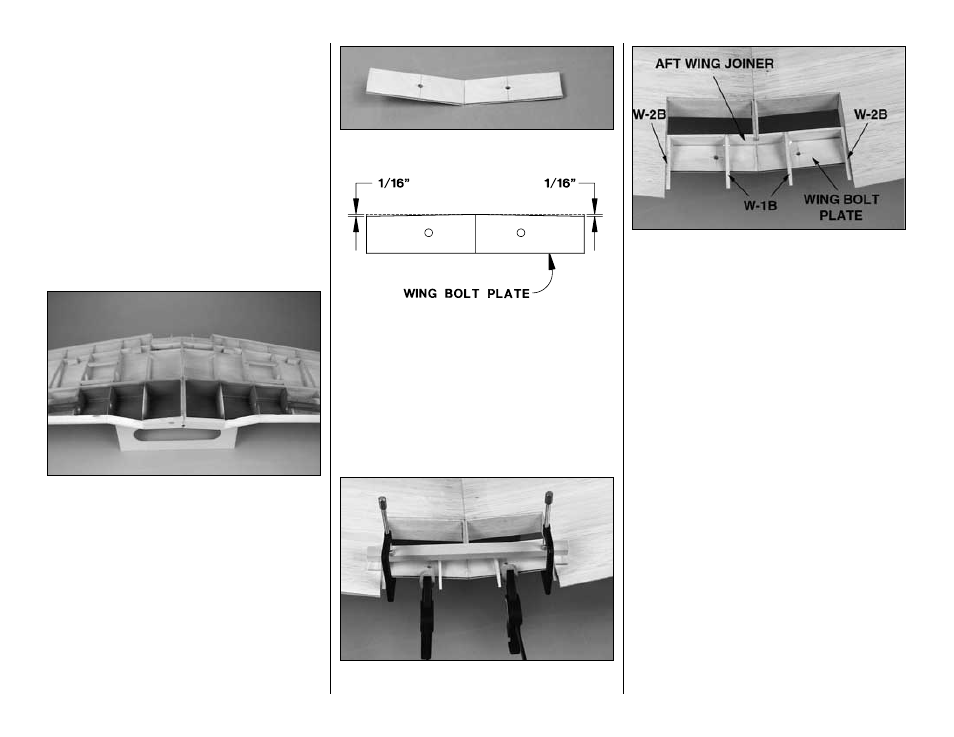
❏
7. Drill #7 (or 13/64") holes through the 1/8" x
1-1/4" x 7" plywood
wing bolt plate where shown on
the plan. Trim one edge of the wing bolt plate as
shown in the sketch. This will now be the front. Cut
partway through both sides of the center of the wing
bolt plate. Bend the wing bolt plate to the same angle
as the wing, trying not to break it. If you do, glue it
together at the same angle as the aft wing joiner.
This photo gives you an idea of how to clamp the
wing bolt plate into position.
❏
8. Test fit the wing bolt plate to the wing. Trim the
ends as necessary for a good fit. Use 30-minute
epoxy to glue the wing bolt plate to the aft wing
joiner. Glue ribs W-1B to the assembly.
Sheet the bottom of the wing
If you haven’t done so already, make four 6" x 30"
wing skins from eight 1/16" x 3" x 30" balsa sheets.
❏
1. Plan the routing of the aileron and flap servo
cords. They can be installed in the wing after the
model is finished, though some may prefer to do it
now. Cut a hole in rib 1 so the cords can be
connected inside the wing, then passed through a
hole cut in the top sheeting.
❏
2. With the wing upside-down on a stand or a
cradle, trim two of the 6" x 30" sheets to make the
forward skins for both sides of the bottom of the
wing. Do not glue the skins to the wing yet.
❏
3. Use the other two 6" x 30" balsa sheets to make
the aft skins. For now, cut the aft skins oversize to
allow for trimming and positioning after the forward
skins have been glued into position.
❏
4. Sand the skins flat, smooth and even.
-36-