Top Flite TOPA0150 User Manual
Page 22
do not round the tip of the fin until instructed to do so.
Fill the gap between the fuse sheeting and the fin
fillet block with balsa filler.
Note: From some viewpoints, the aft end of the fuse
where it joins the fin features some “funny” angles.
Due to the added fuse section, this represents the
actual shape of the full-size Fw 190D. In truth, your
model probably looks better than the real one!
Hey,
they didn’t build ‘em pretty, they just had to get the
job done!
Build the fuse bottom
❏
1. Reinforce the glue joint inside the fuse between
the bottom of the stab and the stab bases with a
small fillet of 30-minute epoxy. For additional
strength, mix in milled glass fibers.
❏
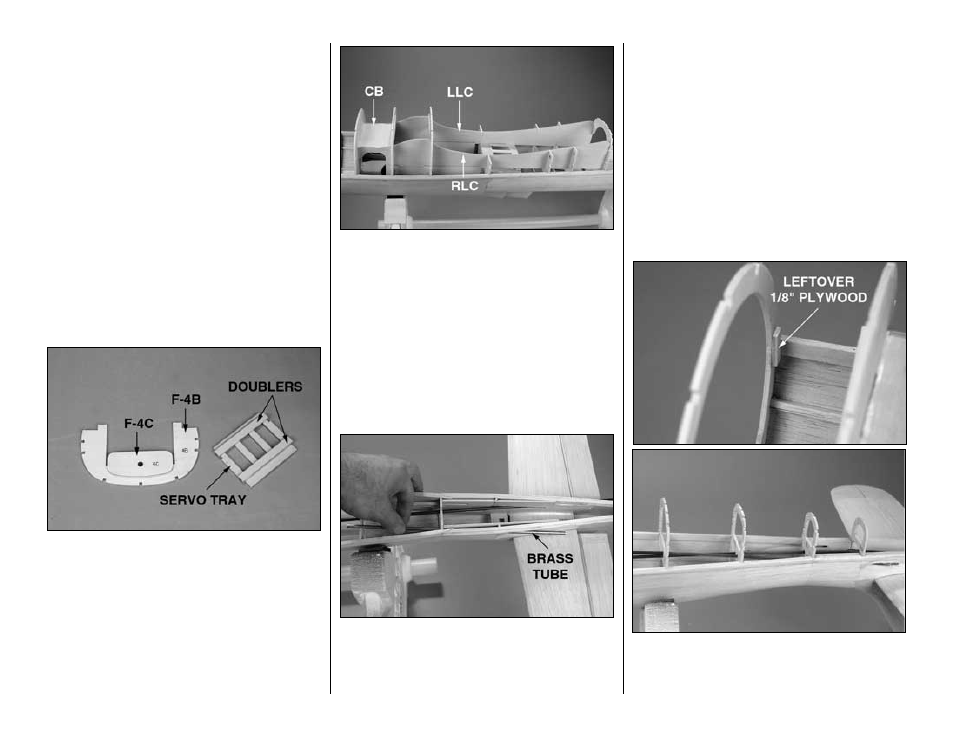
2. Test fit your servos in the die-cut 1/8" plywood
servo tray. If necessary, make adjustments to the tray
so your servos will fit. Glue the two
doublers to the
bottom of the servo tray for the servo screws. Drill a
5/16" hole through the punchmarks in the laser-cut 1/8"
ply former
F-4C, then glue it to the front of F-4B so the
holes align. Remove glue from inside the holes before
it hardens.
Do you enjoy puzzles? If you do, you’ll enjoy the next
few steps.
❏
3. All of the parts in this step are die-cut 1/8"
plywood. Fit but do not glue the
right and left lower
crutches (RLC, LLC), the crutch bottom (CB), one
of the firewall laminations
F-1, the servo tray and
F-2B through F-8B. Inspect all joints for a good fit
and make adjustments where necessary.
❏
4. Once you are satisfied with the fit of all the
parts, permanently glue everything
except for F-1B
into position.
❏
5. Cut elevator and rudder pushrod exit slots in the
aft end of the fuse sheeting.
Hint: Use a 3/16" brass
tube sharpened on the end to cut the slots. Slide the
tube through the holes in the formers so the slots will
be in the correct position and at the correct angle.
❏
6. Cut two 3/16" pushrod guide tubes to a length
of 29" and 31". Scuff the guide tubes with coarse
sandpaper so glue will adhere.
❏
7. Install the tubes and glue them to F-11A with
CA and to the sheeting where they exit the fuse with
epoxy mixed with microballoons. The tubes will be
sanded even with the sheeting after the rest of the
fuse is sheeted.
❏
8. Glue
F-1B and F-9B through F-12B to the main
fuse stringers and to their respective formers. Glue a
small strip of leftover 1/8" plywood across the glue
joint between both sides of F-1A and F-1B.
-22-