Top Flite TOPA0150 User Manual
Page 31
❏ ❏
9. Cut the remainder of the shaped LE to the
correct length, then glue it to ribs 2 and 3.
❏ ❏
10. Cut the 1/2" x 1-1/4" x 7"
center LE into two
3-1/2" pieces. Use the dihedral gauge to mark the
angle on one end of the center LE to match the angle
of W-1. Cut the center LE at the line you marked and
glue the center LE to the wing.
❏ ❏
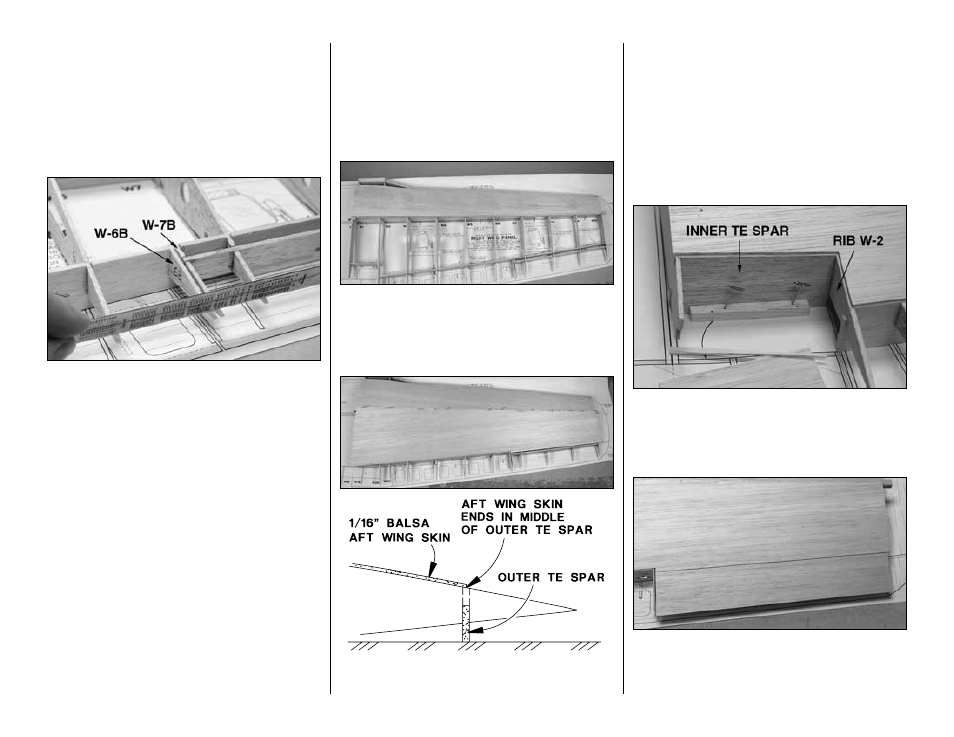
11. Add the die-cut 3/32" balsa
rib tips W-2C,
W-6B and W-7B to the outer TE spar. While gluing
the ribs into position, use a straightedge to align
them with the other ribs on the wing.
❏ ❏
12. Use a bar sander with 80-grit sandpaper to
sand the tops of the ribs and spars even.
Now the wing is ready for the top sheeting. But first,
you have to make the wing skins.
❏
13. Glue together the wing skins the same as you
did the stab and fin skins. Start by making eight 6" x
30" balsa sheets from sixteen 1/16" x 3" x 30" balsa
sheets. (You can make all the skins in an
assembly-
line fashion now, or make them as you need them.)
❏ ❏
14. The top and bottom of both wing halves will
be sheeted with two of the 6" x 30" balsa sheets you
just made. The seam between the two pieces will be
centered over the main spars. Make a
forward wing
skin for the top of the wing by trimming one of the 6"
x 30" sheets to fit between the LE and the middle of
the top spar. The grain direction is
parallel with the
LE. The gap between the front of the skin and the LE
between ribs 1 and 3 (as seen in the following photo)
will be filled in later.
❏ ❏
15. Take out T-pins that you will not be able to
get to after the sheeting is glued down.
❏ ❏
16. Glue the forward wing skin into position. Our
preferred method is to first apply aliphatic resin to the
ribs, then to glue the sheet to the LE with thin CA.
Lay weights on top of the sheeting to hold it to the
ribs, then glue it to the main spar with thin CA.
❏ ❏
17. Make an
aft wing skin for the top of the
wing by trimming another 6" x 30" sheet to fit. The
grain is parallel with the outer TE spar. You’ll have to
trim a piece from the trailing edge of the sheet near
the tip, then glue it back onto the other end of the
sheet to make it wide enough. The aft skin ends in
the
middle of the outer TE spar between rib W-6B
and rib W-2. This will create a “ledge” to support the
flap sheeting that will be added later. Glue the aft
wing skin into position.
Do not glue the sheeting to
the inner TE spar and to rib 2 aft of the inner TE spar
(see the following photo).
❏ ❏
18. Cut the sheeting from the wing from the
middle of the inner TE spar and the middle of rib W-
2 aft of the inner TE spar. This will create a ledge to
support the sheeting that will be added after the wing
panels are joined.
❏ ❏
19. Make an
aileron skin from 1/16" sheeting left
over from the top wing skins and glue it into position.
Sorry, the flap skin won’t be so simple...but it’s worth it.
-31-