Top Flite TOPA0910 User Manual
Page 27
❏
1.
Y
ou ma
y wish to balance y
our air
plane bef
ore
deciding on the final location of the batter
y f
or the lighting
system, b
ut most lik
ely the batter
y placement will not be
cr
ucial f
or pur
poses of balancing the air
plane
.Mount the
batter
y f
or the lighting system on the opposite side of the
batter
y/receiv
e
r tr
a
y
from the batter
y f
or the r
adio
system.
Use the plastic tie wr
aps to hold them in place
.
❏
2.
Install a s
witch and charge jac
k on the fuselage
the same w
a
y done f
or the receiv
e
r.
❏
3.
Be sure the main landing light from the front of
the fuselage is plugged into the pre-installed lighting
har
ness
.
P
lug the wires from the s
witch into the
wir
ing har
ness and the batter
y pac
k.
❏
4.
Once e
v
er
ything in the fuselage is connected
proper
ly
, use tie wr
aps or tape to b
undle the e
xcess
wire together to help clean up the entire installation.
When doing this be sure that y
ou lea
v
e the male
connector f
or the lights in the wing accessib
le
.
❏
5.
Install a
“Y”
har
ness to the wires from the left and
right wing tip light.
When y
ou assemb
le the air
plane
for flight, plug the lights from the wing into the
connector on the lighting har
ness
.
Appl
y the Decals
1.
Use scissors or a shar
p hob
b
y
knif
e to cut the
decals from the sheet.
2.
Be cer
tain the model is clean and free from oily
finger
pr
ints and dust.
Prepare a dishpan or small
b
u
c
k
et with a mixture of liquid dish soap and w
a
rm
w
ater–about one teaspoon of soap per gallon of w
ater
.
Submerse the decal in the soap and w
ater and peel off
the paper bac
king.
Note:
Ev
en though the decals ha
ve
a
“stic
ky-bac
k”
and are not the w
ater tr
ansf
er type
,
submersing them in soap and w
ater allo
ws accur
ate
positioning and reduces air b
u
b
b
les under
neath.
3.
P
osition the decal on the model where desired.
Holding the decal do
wn, use a paper to
w
e
l to wipe
most of the w
ater a
w
a
y.
4.
Use a piece of soft balsa or something similar to
squeegee remaining w
a
ter from under the decal.
Apply the rest of the decals the same w
a
y.
GET
THE MODEL READ
Y
T
O
FL
Y
Chec
k the Contr
ol Directions
❏
1.
T
u
rn
on the tr
ansmitter and receiv
er and center
the tr
ims
.
If necessar
y,
remo
v
e
the ser
v
o
ar
ms from
the ser
v
os and reposition them so the
y are centered.
Reinstall the scre
ws that hold on the ser
v
o
ar
ms
.
❏
2.
With the tr
ansmitter and receiv
er still on, chec
k
all the control surf
aces to see if the
y are centered.
If
necessar
y,
adjust the cle
vises on the pushrods to
center the control surf
aces
.
❏
3.
Mak
e cer
tain that the control surf
aces and the
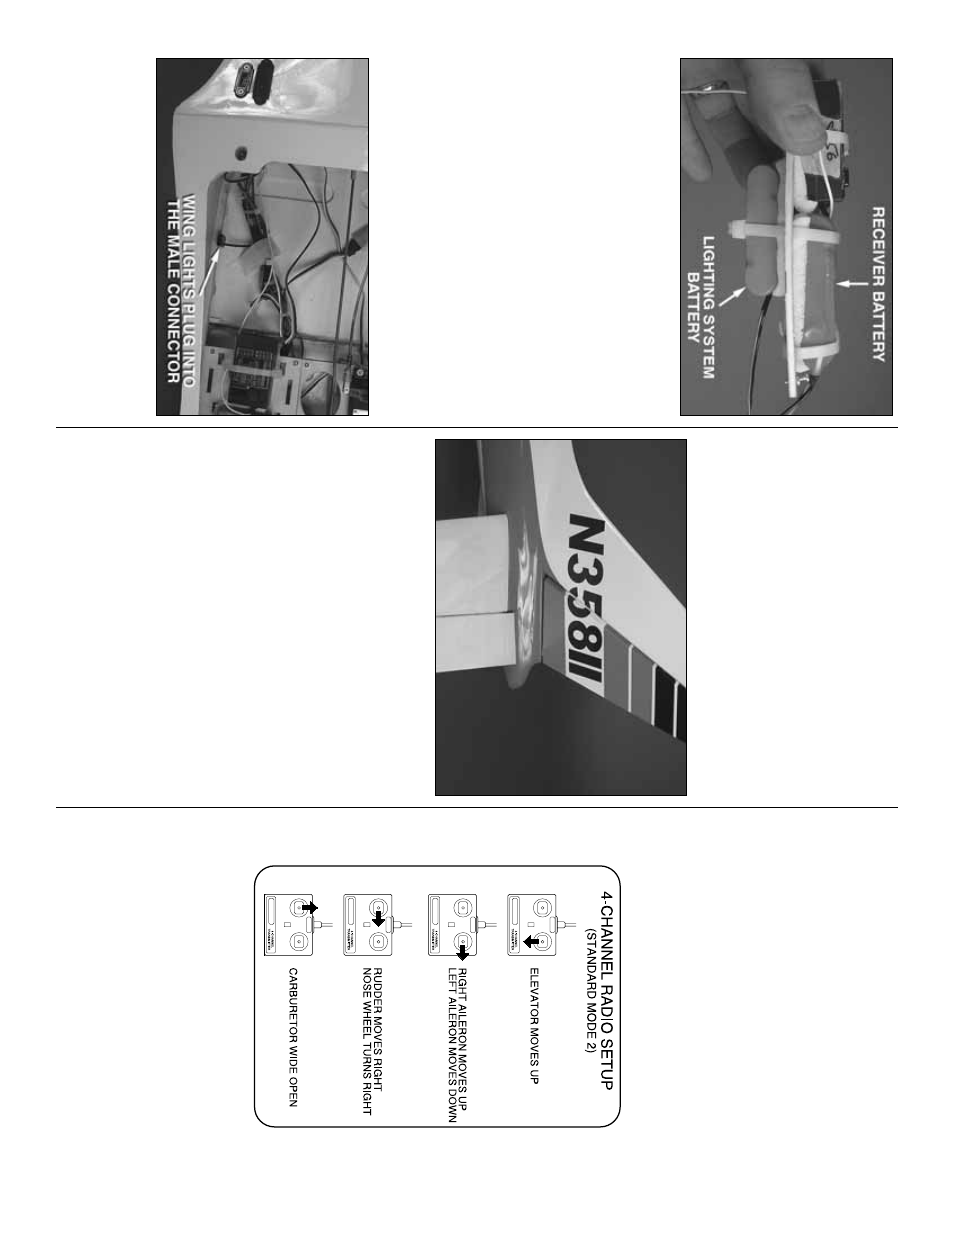
carb
uretor respond in the correct direction as sho
wn
in the diag
ra
m.
If an
y of the controls respond in the
wrong direction, use the ser
v
o
re
v
ersing in the
tr
ansmitter to re
v
erse the ser
v
os connected to those
controls
.
Be cer
tain the control surf
aces ha
v
e
remained centered.
Adjust if necessar
y.
- 27
-