Top Flite TOPA0704 User Manual
Page 8
8
❏
❏
7. Drill a 3/32" [2.4mm] hole through each of the
mounting holes in the control horn, drilling into the
plywood plate.
Do not drill through the top of the aileron
.
Secure the control horn with four #4
1/2" [13mm]
screws. (
Be sure you install the screw and then remove it.
Apply a drop of thin CA glue into the holes as instructed
at the beginning of this section of the manual).
❏
❏
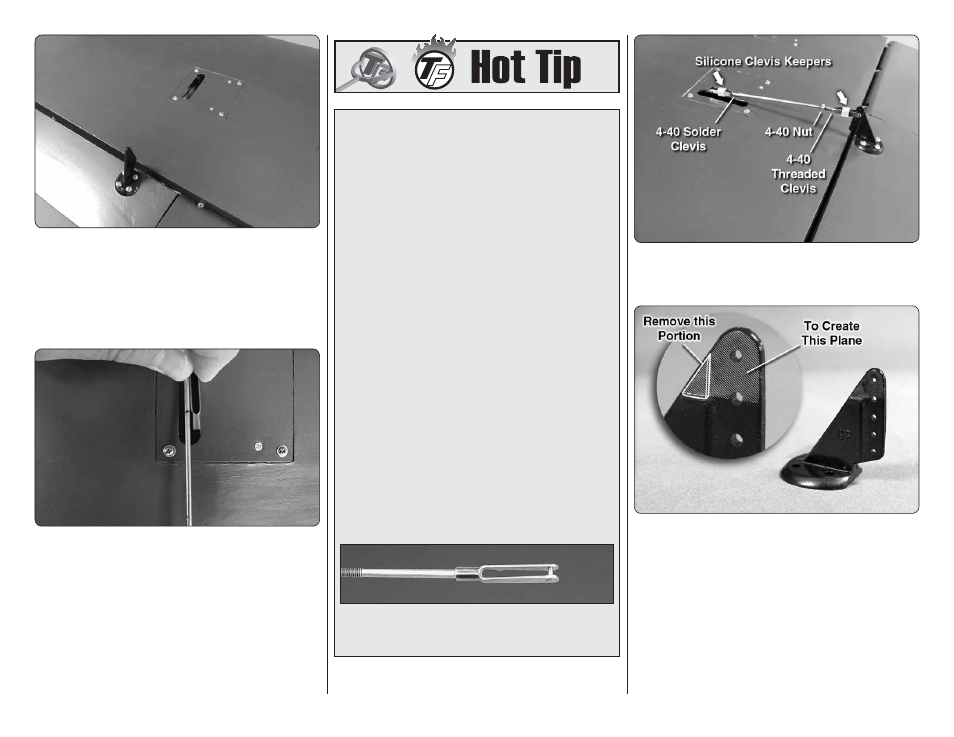
8. On the threaded end of a 4-40
5-3/4" [146mm]
wire install a 4-40 nut, silicone clevis keeper and
threaded clevis. Install the clevis into the second hole
from the end of the
clevis
. Install a 4-40 solder clevis
into the outer hole of the servo horn.
Be sure the servo
and the aileron are centered.
Make a mark on the wire
where it passes through the solder clevis. Cut the wire
on that mark. Remove the clevises and wire from the
control horn and servo arm. Solder the solder clevis to
the wire. If you are not familiar with solder techniques
use the method in the “Hot Tip” that follows this step.
HOW TO SOLDER
1. Use denatured alcohol or other solvent to
thoroughly clean the pushrod. Roughen the end of
the pushrod with coarse sandpaper where it is to be
soldered.
2. Apply a few drops of soldering fl ux to the end of
the pushrod, then use a soldering iron or a torch
to heat it. “Tin” the heated area with silver solder
by applying the solder to the end. The heat of the
pushrod should melt the solder – not the fl ame of
the torch or soldering iron – thus allowing the solder
to fl ow. The end of the wire should be coated with
solder all the way around.
3. Place the clevis on the end of the pushrod. Add
another drop of fl ux, then heat and add solder. The
same as before, the heat of the parts being soldered
should melt the solder, thus allowing it to fl ow. Allow
the joint to cool naturally without disturbing. Avoid
excess blobs, but make certain the joint is thoroughly
soldered. The solder should be shiny, not rough. If
necessary, reheat the joint and allow to cool.
4. Immediately after the solder has solidifi ed, but
while it is still hot, use a cloth to quickly wipe off
the fl ux before it hardens.
Important:
After the joint
cools, coat the joint with oil to prevent rust.
Note:
Do
not use the acid fl ux that comes with silver solder for
electrical soldering.
This is what a properly soldered clevis looks like
– shiny solder with good flow, no blobs and flux
removed.
❏
❏
9. Install the pushrod assembly to the servo arm
and the clevis. Be sure to install a silicone clevis keeper
onto both clevises.
❏
❏
10. The photo above shows how the clevis has
been modifi ed for installation in the next step. Use a
sanding bar or moto-tool with a sanding drum to remove
the material on the top 1/4" [6mm] of the clevis. The
clevis needs to be even in this area on both sides of
the clevis.