Top Flite TOPA0704 User Manual
Page 34
34
❏
27. Glue the former onto the back side of the dummy
engine.
❏
28. Slide the dummy engine into the back of the
cowl, positioning it in the approximate place in the cowl.
Install the cowl to the fuselage with the socket head
cap screws that have been retained in the cowl ring.
Adjust the dummy engine as needed to get it close to
the proper position in the cowl. Through the cut-outs
you made in the dummy engine you should be able to
reach all of the screws with a long handled ball wrench.
(If you do not have a long handled wrench you can get
a complete set of the Great Planes
®
long handle ball
wrenches (GPMR8008) from your hobby dealer or hobby
mail order company). Tighten the cowl to the fuselage.
❏
29. Adjust the position of the dummy engine until it is
centered properly in the cowl. The dummy engine should
fi t snug and remain where you position it. When you are
satisfi ed with the fi t of the dummy engine
CAREFULY
loosen all of the cowl mounting screws and remove the
cowl, making sure you do not disturb the positioning of
the dummy engine. (If your dummy engine is not tight
enough to remain where you place it in the cowl, apply a
couple of drops of medium CA where the dummy engine
contacts the cowl to keep it in place while removing the
cowl). Once you have the cowl removed, tack glue the
dummy engine to the cowl ring with medium CA glue.
Allow the glue to harden.
❏
30. Re-install the cowl. Double check the positioning
of the cowl and the dummy engine, making sure you
are satisfi ed before permanently gluing everything in
place in the next step. When you are satisfi ed remove
the cowl from the fuselage.
❏
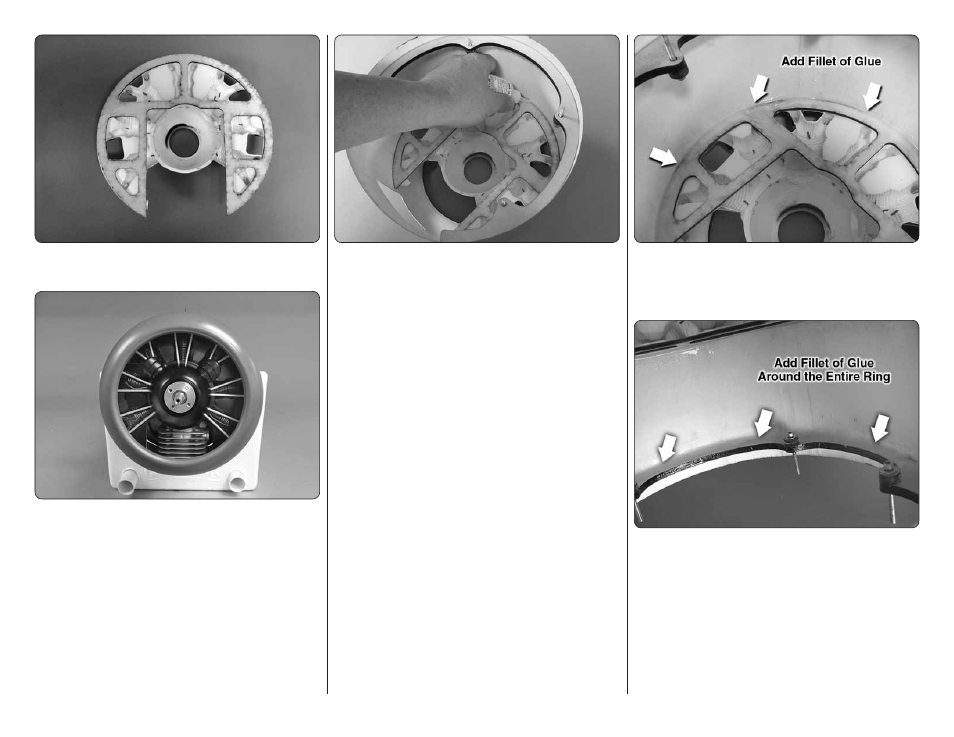
31. To permanently attach everything to the cowl
you will be applying RTV silicone glue to the front side
of the cowl ring and to the back side of the dummy
engine former. Clean the inside of the cowl in these
areas with alcohol.
❏
32. Apply RTV silicone glue to the dummy engine
former. Use a small knife or wooden popsicle stick to
apply a fi llet of glue to the back of the dummy engine
former.
❏
33. Apply RTV silicone glue and make a fi llet of the
glue on the front side of the cowl mounting ring. You
should also apply a fi llet of glue on the back side of the
cowl ring but
do not apply glue in the area where
the cowl mounting ring will make contact with the
wood cowl mounting blocks.
Set the cowl aside and
allow the glue to completely cure before moving onto
the next step.