Top Flite TOPA0500 User Manual
Page 56
❏
4. Turn the fuselage over and remove the wing. Keep
track of any pieces of balsa you may have used for
shims so you can put them back in position when you
are gluing the fillet bases to the fuse. Cover the middle
of the wing with Plan Protector so glue will not stick.
❏
5. Remove the fillet bases and apply a mixture of
30-minute epoxy and microballoons to the inner wing
saddles and the fuse side. Tape the fillet bases to the
inner wing saddles and bolt the wing to the fuselage.
Insert balsa shims if you used any and recheck the
alignment of the wing and stab. Wipe away excess
epoxy and allow it to fully cure before you proceed.
❏
6. Position the plastic wing fillets on the fuselage and
glue them to the saddle bases and fuse with medium
and thin CA as needed. Don’t worry if you can’t get the
plastic fillets to fit perfectly all around the leading edge of
the wing. You can finish that later with filler.
❏
7. Remove the wing and take off the Plan Protector.
Trim the edges of the fillet base to within approximately
1/8" from the plastic fillet. This will leave a
ledge
for the
filler so you can sand it to a thin edge.
❏
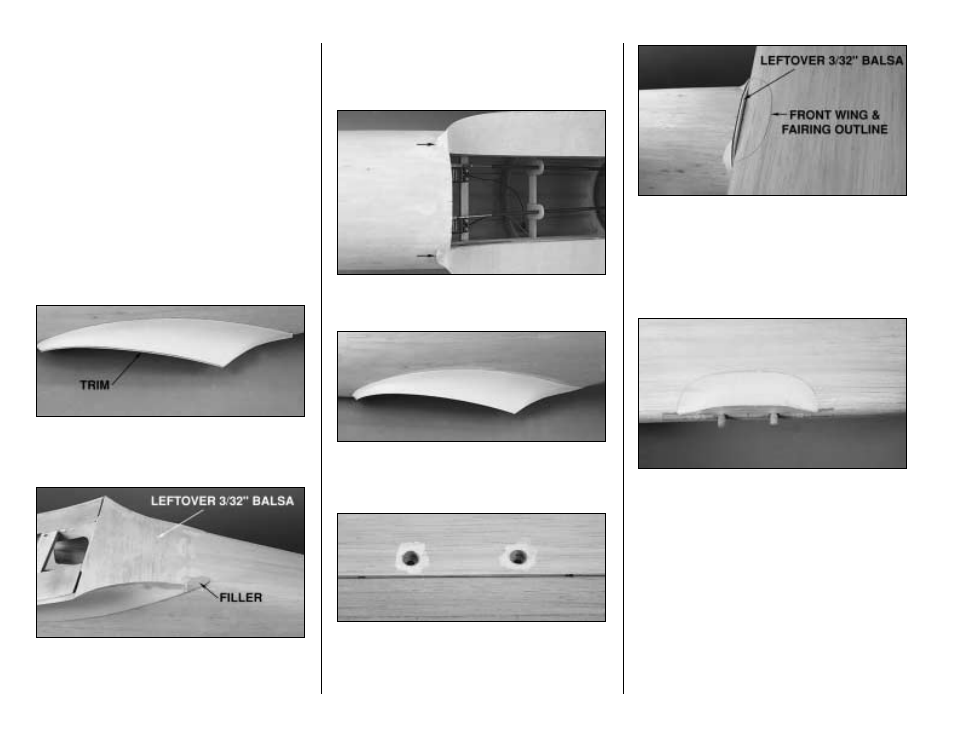
8. Bolt the wing to the fuselage. Make the aft portion
of the fillet base from leftover 3/32" balsa, connecting
the rest of the fillet to the fuselage. The balsa is cross
grain and extends from the TE of the wing to the end of
the fillets. Sand the aft end of the balsa flush with the
fuse. Finish the aft tip of the fillet by blending the balsa
and plastic to the fuselage with filler. We used Bondo
body filler because it adheres well to plastic and wood.
❏
9. Blend the front of the wing fillet to the fuselage and
to the fillet base with automotive Bondo, Squadron white
or green putty or other suitable filler. Sand when dry.
❏
10. Paint the fillet base with a coat of primer. We
brushed on a layer of primer over areas that had filler
(because filler needs more primer than bare plastic), then
masked off the fuselage and sprayed on a coat of primer.
❏
11. Bolt the wing to the fuselage. Trace around the
wing bolts on the bottom sheeting with a ballpoint pen.
Remove the wing bolts and cut out the wood. Glue in
pieces of paper tube and sand them flush with the wing.
❏
12. With the wing bolted to the fuselage, fit a piece of
leftover 3/32" balsa between the fuse and the wing. This
will be the wing fairing former. Trim the wing fairing
former even with the bottom of the fuselage. Use the
front wing fairing pattern on the plan to trace the
outline on the wing as shown in the photo.
❏
13. Remove the wing from the fuse and fill the area
between the wing fairing former and the outline you
made with lightweight balsa filler. Sand smooth.
MOUNT THE FUEL TANKS AND RECEIVER
If you prefer to do this after you cover your model, skip
this section, then return after you cover the wing.
❏
1. Cover the bottom of the fuel tank compartment with
R/C foam rubber (make sure you have fuel proofed the
fuel tank compartment first).
- 56 -