Top Flite TOPA0500 User Manual
Page 23
❏
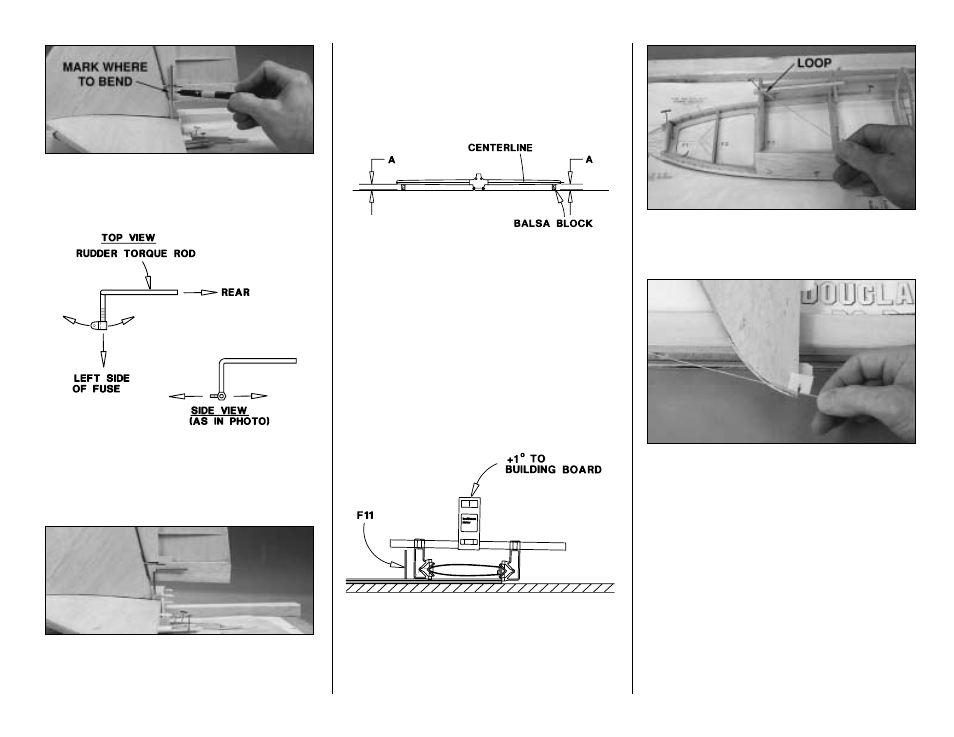
5. Make sure the threaded portion of the rudder
torque rod with the nylon torque rod horn is above the
main stringer (as shown in the sketch and on the side
view of the fuse plan). Use a felt tip pen to mark where
to bend the rudder torque rod as shown on the plan.
❏
6. Take the stab off the fuse. With the torque rod and
the bearing tube still in the stab, use pliers to bend the
torque rod toward the rear of the fuselage at the mark
you made. Make sure you bend the torque rod straight
back when the torque rod horn is pointing to the left as
shown in the sketch.
❏
7. Return the stab to the fuse and position the fin and
rudder on top of the stab next to the torque rod. See if the
bend in the torque rod is 90 degrees to the hinge line (or
parallel to the rudder ribs). Adjust the bend if necessary.
❏
8. If you haven’t already done so, final-sand the stab
before you glue it to the fuse. It’s easier to do when it’s off
the fuse than when it is glued in place! Don’t sand the mark
off the top of the stab near the TE indicating the center.
❏
9. Place the stab on the stab saddle, aligning the
centerline mark on the top of the stab with the centerline
on the front of former F12. Place weights on top of the
stab to hold it in position. View the fuse from the rear
and make sure the stab is level. To confirm, place balsa
blocks (not included) under both sides of the stab and
measure the distance of the centerline on the TE of the
stab from your building board. If necessary, reposition
the balsa blocks, shift the weight or carefully sand the
high
stab saddle until the stab will rest level. Be sure to
sand carefully and a little at a time so as not to change
the incidence angle of the stab.
❏
10. With the stab resting on the saddles and weights
on top to hold it down, check the stab incidence by
placing an Incidence Meter across one side of the stab,
then the other side of the stab near the fuse. If
necessary, adjust the stab saddles so the incidence is
+1 degree to your building board.
❏
11. Place a leftover piece of 3/16" x 3/16" stringer in the
top, center notch of formers F3 and F4. Insert a T-pin in
the stringer where shown. Tie a small loop at one end of a
48" length of string and slip it over the T-pin.
❏
12. Fold a piece of masking tape over the other end of
the string and draw an arrow on it. Slide the tape along
the string and align the arrow with one end of the stab.
Swing the string over to the other end of the stab. Shift
the stab and slide the tape along the string until the
distances between both ends of the stab and the front of
the fuse are equal. Now your stab is centered and square
with the fuse. For future reference, mark the LE of the
stab over the stab saddles to help you reposition it.
❏
13. Recheck to see that your stab is still level.
❏
14. One last thing before you glue the stab to the
fuse. Apply a small dab of petroleum jelly to the rudder
torque rod on both ends of the bearing tube to keep glue
out when you glue the bearing tube to the stab (later in
the manual).
- 23 -