TC-Helicon VoiceLive 3 - Reference Manual User Manual
Page 45
VoiceLive 3 overview
VoiceLive 3 – Reference manual (2014-03-29) 43
Using Global Tempo
Depending on how you would like to man-
age tempo within VoiceLive 3, you can choose
whether tempo information is recalled from each
individual Preset or managed globally.
If you would like to store specific tempos within
your Presets, simply set the tap tempo as de-
scribed in “Tapping tempo” and save the Preset.
If you would like to set one tempo and have all
Presets “follow” it, you will need to head into the
System menu.
– Press the Setup button.
– Use < or > to navigate to the System tab.
– Use the Control Knob to scroll down to the
Global Tempo option.
– Use the Mix Knob to change the value to ON.
– Press the Home button.
Global Tempo on
Now, any tempo you tap will immediately be ef-
fective and be used for whatever Preset you
choose.
Editing an Effect
Now that we have heard some sounds, let’s edit
an effect in a Preset. You can choose to edit ei-
ther the Vocal or Guitar effects, whichever you
like.
To edit the Vocal effects within a Preset, press
the Vocal button.
Editing Vocal effects
To edit the Guitar effects within a Preset, press
the Guitar button.
Editing Guitar effects
Both effect layers (Vocal and Guitars) have a se-
ries of “tabs”. There is a tab for each effect within
a Preset, and there are a couple of extra tabs for
other Preset options like Button Mapping and
Expression Pedal assignment.
All the effect edit screens that you can access
using these tabs have a similar structure. On
top of each edit screen, you will find simple and
easy-to-use controls, while scrolling down us-
ing the Control Knob will show more parameters
that offer more advanced parameters for deeper
editing.
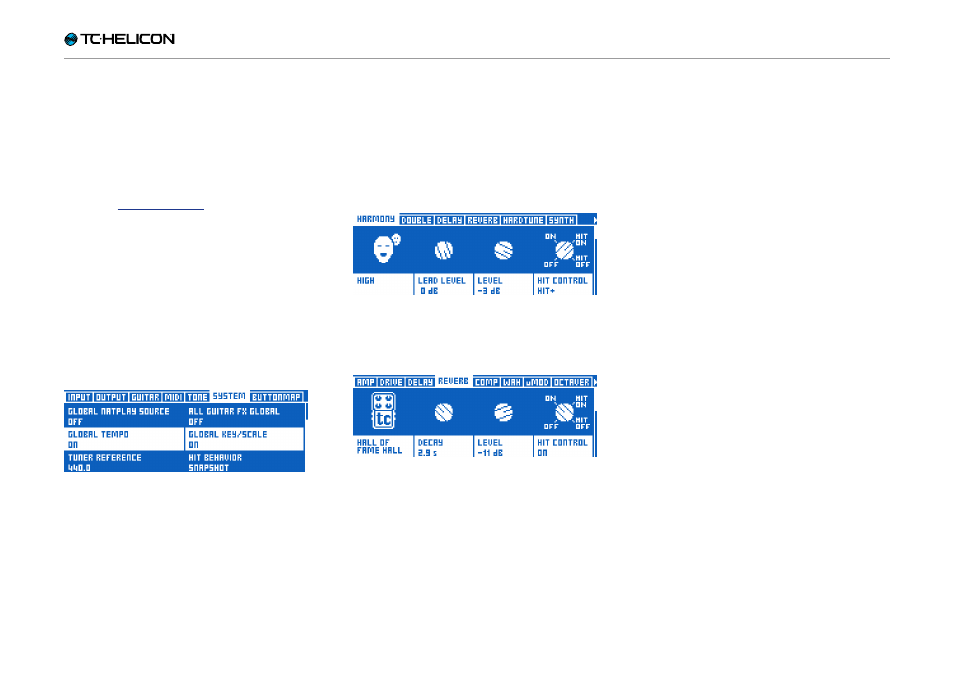
On the top level, most effects have four main pa-
rameters:
1. Style: Style sets the “sound” of the effect. For
example, you might choose a “Hall” or “Stu-
dio” reverb type.
2. Parameter 1: The first parameter shown varies
from effect to effect and will have a different
name – it will not be called “Parameter 1”. To
continue with the Reverb example, Decay time
is located here.
3. Parameter 2: Again, this control will vary from
effect to effect, but is commonly the Level
control, which controls the overall volume of
the effect.
4. Control: control sets the “state” of the effect
and how it is controlled.
–
Off:
The effect is inactive.
–
On:
The effect is active, regardless of the
status of the HIT button.
– HIT On: This effect is active only when the
HIT button is ON.
– HIT Off: This effect is active only when the
HIT button is OFF.
You may also change this control by press-
ing the footswitch associated with this effect
(if it is mapped to a footswitch). This can be a
quick way to set up several effects to come on
or off when HIT is pressed