TC-Helicon VoiceTone Correct XT Manual User Manual
Voicetone correct xt, Take control of your vocal sound, Mp-75
www.tc-helicon.com - www.youtube.com/tchelicon
(EN) Introduction
VoiceTone Correct XT gives your vocals a studio-produced sound with the peace of mind that
comes from automatic anti-feedback.
Congratulations on your purchase of Correct XT. Use it to make your vocals brighter, more balanced
and more in tune than ever before without having to learn complicated outboard equipment. When
feedback is a problem, the automatic anti-feedback feature hunts and silences those pesky squeaks
and squeals quickly.
•
Super-simple setup and control
•
Multiband Shape EQ adapts to your individual voice
•
Separate Tone and Pitch on/off footswitches
•
Compression and de-ess smooth peaks and sibilance
•
Balanced XLR in and out with phantom power for condenser microphones.
•
1/4” instrument input-to-DI convenience feature
•
USB connection to computer for easy firmware updates, news and tips via the free VoiceSupport
application.
• Turn down your PA when making all connections.
• The USB connection does not provide power to the unit.
• If you hear hum from your PA or amp, push the GRND in. Otherwise, it should remain out.
Features Detail
Tone - The Tone footswitch activates the Shape and Dynamics processors which produce a “studio”
vocal sound. Shape is a single-knob, multiband EQ that removes muddy lows due to microphone
proximity effect while adding silky brightness. The Dynamics feature uses a high quality compressor
and de-esser to tame volume peaks in both vowel sounds and sibilants (sss sounds). Warmth is a part
of shape that boosts low frequencies for added warmth without muddiness
Adaptive Shape and Adaptive Dynamics - Typically the two Adaptive LEDs should be lit so that
Shape and Dynamics are tailored to your specific voice and it’s moment to moment requirements.
For example, a woman singing high in her range farther from the mic requires different EQ and
compression than a deeper male voice singing right on top of the mic.
Pitch Correct - This helps you to be more aware of your singing pitch as well as to nudge you gently
closer to being in-tune. It’s like a metronome for singers. Your pitch is instantly compared to the notes
in a chromatic scale (all notes are valid) and quickly shifted closer to the nearest semitone. The Pitch
knob controls the speed and amount of correction. The center detent setting is the most natural sound-
ing while still providing useful correction. Note that you will hear the effect; it is similar to chorusing but
this is only heard by you and perhaps anyone nearby who can hear both your natural voice acoustically
and your amplified and pitch-corrected voice.
Tips for Avoiding Feedback
• Ensure your monitor and/or PA speakers don’t aim directly at the front of your mic
• Sing confidently and close to the mic, even touching the grill with your lips
•
Try a super-cardioid dynamic mic such as TC-Helicon’s MP-70 and MP-75
•
Set your PA channel EQ and graphic EQ flat
•
Have your band play quieter on stage and lower PA/monitor volume
The VoiceSupport Application
VoiceSupport is your way of getting the most from your TC-Helicon product, as well as letting your
product grow with firmware updates. VoiceSupport includes:
• Access to the latest firmware updates and features
• Videos, artist profiles, tips & tricks
• Registration of your product
To access the VoiceSupport application:
1. Download VoiceSupport from www.tc-helicon.com/voicesupport.
2. Install VoiceSupport on your computer.
3. Connect your product via USB to your computer.
3. Run VoiceSupport.
4. Read the news, click on tabs and browse the features of the application.
Important Safety Instructions
1 Read these instructions.
2 Keep these instructions.
3 Heed all warnings.
4 Follow all instructions.
5 Do not use this apparatus near water.
6 Clean only with dry cloth.
7 Do not block any ventilation openings. Install in accor-
dance with the manufacturer’s instructions.
8 Do not install near heat sources such as radiators, heat
registers, stoves, or other apparatus (including ampli-
fiers) that produce heat.
9 Only use attachments/accessories specified by the
manufacturer.
10 Refer all servicing to qualified service personnel.
Servicing is required when the apparatus has been
damaged in any way, such as power-supply cord or
plug is damaged, liquid has been spilled or objects
have fallen into the apparatus, the apparatus has been
exposed to rain or moisture, does not operate normally,
or has been dropped.
Warning!
• To reduce the risk of fire or electrical shock, do not
expose this equipment to dripping or splashing and
ensure that no objects filled with liquids, such as vases,
are placed on the equipment.
• Do not install in a confined space.
Service
• All service must be performed by qualified personnel.
Caution:
You are cautioned that any change or modifications
not expressly approved in this manual could void your
authority to operate this equipment.
EMC/EMI
This equipment has been tested and found to comply with
the limits for a Class B Digital device, pursuant to part 15
of the FCC rules.
These limits are designed to provide reasonable protection
against harmful interference in residential installations.
This equipment generates, uses and can radiate radio
frequency energy and – if not installed and used in
accordance with the instructions – may cause harmful
interference to radio communications. However, there is
no guarantee that interference will not occur in a particular
installation. If this equipment does cause harmful
interference to radio or television reception – which can
be determined by turning the equipment off and on –, the
user is encouraged to try correcting the interference by
one or more of the following measures:
•
Reorient or relocate the receiving antenna.
•
Increase the separation between the equipment and
the receiver.
•
Connect the equipment to an outlet on a circuit
different from the one to which the receiver is
connected.
•
Consult the dealer or an experienced radio/TV
technician for help.
For the customers in Canada:
This Class B digital apparatus complies with Canadian
ICES-003. Cet appareil numérique de la classe B est
conforme à la norme NMB-003 du Canada.
¡Precaución!
• Para reducir el riesgo de incendios o descargas eléc-
tricas, no permita que este aparato quede expuesto
a salpicaduras y asegúrese de no colocar sobre él
ningún objeto que contenga líquidos, como un jarrón,
para evitar que se pueda derramar.
• No instale este aparato dentro de un espacio confi-
nado, como encastrado en una librería.
Reparaciones
• Cualquier reparación debe ser realizada únicamente
por personal de un servicio técnico oficial.
Atención:
Le advertimos que cualquier cambio o modificación que
no aparezca aprobada expresamente en este manual
puede anular su autorización a utilizar este aparato.
Attention Danger!
• Pour éviter tout risque d’électrocution ou d’incendie,
ne pas exposer cet appareil à quelque source liquide
(goûtes d’eau, projections liquides,etc.) et veillez à ne
poser aucun objet contenant un liquide sur l’appareil.
• Do not install in a confined space.
Service
• Confiez toutes les opérations de maintenance à un
personnel qualifié.
Attention:
Toute modification apportée à l’appareil et qui n’est pas
expressément préconisée dans ce manuel invalide votre
droit à utiliser cet appareil.
Lors du remplacement de la pile, suivez attentivement les
instructions spécifiées dans ce manuel.
VoiceTone
Correct XT
USER’S MANUAL
BEDIENUNGSANLEITUNG
MANUAL DE INSTRUCCIONES
MANUALE D’USO
MODE D’EMPLOI
www.tchelicon.com
- Prod. No: E60522211
Achtung!
• Um die Gefahr eines Feuers oder eines elektrischen
Schlages zu vermeiden, dürfen Sie dieses Gerät
keinem tropfendem Wasser oder Spritzwasser aus-
setzen. Stellen Sie keine mit Flüssigkeiten gefüllten
Behältnisse – wie beispielsweise Vasen – auf diesem
Gerät ab.
• Montieren Sie das Gerät nicht in einem vollständig
geschlossenen Behälter oder Gehäuse.
Wartung
• Alle Wartungsarbeiten müssen von einem hierfür quali-
fizierten Servicetechniker durchgeführt werden.
Achtung:
Änderungen an diesem Gerät, die im Rahmen dieser
Anleitung nicht ausdrücklich zugelassen wurden, können
das Erlöschen der Betriebserlaubnis für dieses Gerät zur
Folge haben.
Attenzione!
• Per ridurre il rischio di incendio o scossa elettrica, non
esporre questo dispositivo allo sgocciolamento o agli
schizzi di alcun liquido. Non posizionare sul dispositivo
oggetti contenenti liquidi, come vasi o bicchieri.
• Non installare in uno spazio ristretto.
Assistenza
• Ogni intervento tecnico deve essere effettuato solo da
personale qualificato.
Cautela:
Si avverte che qualsiasi cambiamento e modifica non
espressamente approvata in questo manuale può
annullare la vostra autorità di utilizzo del dispositivo.
Gate: This auto gate reduces mic level when you’re not singing. It can be useful for reducing feedback
as well as to minimize instrument leakage through the PA via your mic.
Anti-Feedback - Auto: This feature provides extra protection from squeals and rings during perfor-
mance once you’ve followed the Tips for Avoiding Feedback listed below. To enable automatic anti-
feedback turn the Anti-FB LED on and the Manual LED off. This algorithm constantly looks for pure
feedback tones caused by your mic and will engage one of its nine filters for each frequency up to nine
in total. The bands are extremely narrow to minimize degradation of your vocal tone when and if they
become active. If all nine bands become allocated, further feedback will cause Correct XT to turn down
the volume of your mic by 3 dB once only. At this point, you should turn your PA/monitors down and
reset the filters (see below).
Anti-Feedback - Manual: When this button is lit, anti-feedback problem frequencies will only be detect-
ed and eliminated when you press both footswitches together. Manual mode may work better when
there are instruments in your band capable of pure tones such as Rhodes or flute which could fool the
Auto algorithm.
Anti-Feedback On/Off & Reset: The Anti-FB button can be toggled to compare pre and post anti-
feedback sound if desired. Holding the Anti-FB button when it’s LED is lit initializes all filters.
CAUTION: Anti-FB off & Reset can both induce feedback.
1 - Input: green=signal, amber=OK,
red=clip
2 - Anti-feedback on/off. CAUTION see below
3 - Shape brightens, reduces mud
4 - Compression and de-ess amount
5 - Auto-chromatic pitch correct amount
6 - Auto gate on/off
7 - Phantom power active LED
8 - Anti-feedback filters active
9 - Compression amount: 1LED/dB
10 - Pitch correct display
11 - Warmth adds lows without mud
12 - Manual anti-feedback on/off
16
9
1
2
3
4
5
10
8
6
MP-75
Modern Performance Microphone
with Mic Control
MP-70
Modern Performance
Microphone
VoiceTone
T1
Adaptive Tone & Dynamics
VoiceTone
R1
Vocal-Tuned Reverb
VoiceTone
C1
HardTune & Correction
VoiceTone
D1
Doubling and Detune
Take Control of
your Vocal Sound!
17
13
14
12
11
15
7
13 - Adapts Shape EQ to your voice
14 - Adapts Compression to your singing
15 - Pitch display on/off
16 - Tone (Shape+Dynamics) on/off
17 - Pitch correct on/off
18 - USB connection to computer
19 - Instrument DI output (optional)
20 - Main voice-processed output
21 - Instrument thru to stage amp
22 - AC power input
23 - Instrument input to DI (optional)
24 - Inst ground: in=lifted
25 - Balanced mic input
18
23
24
22
25
PA
20
19
21
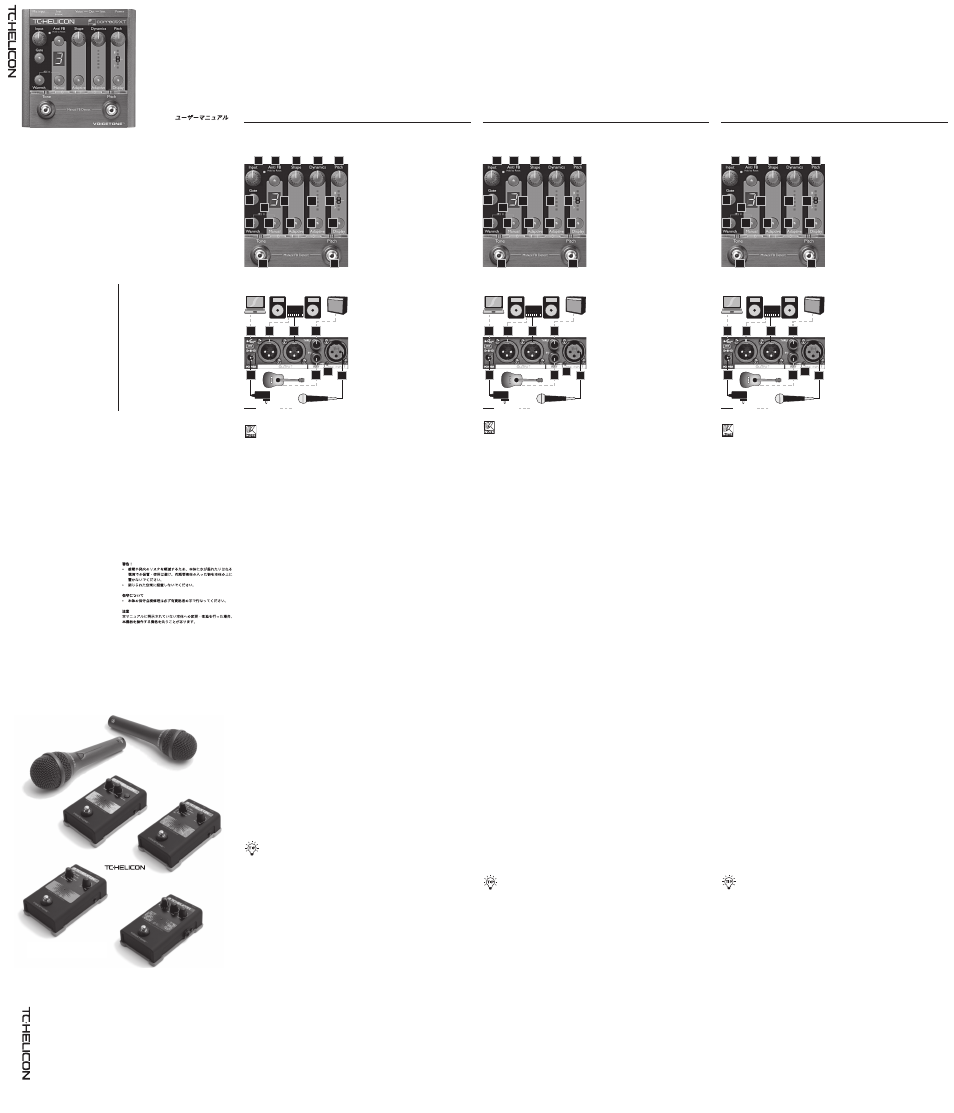
Front Panel
Back & Connections
Required
Optional
First Setup and Use
1. Turn down your PA’s master volume.
2. Connect your mic, PA and AC adaptor to Correct XT as shown in the diagram. For live performance,
a USB connection to a computer is not required.
3. Sing into your mic while adjusting the Input control so that the level LED flashes amber on peaks.
4. Set remaining knobs to center detent and ensure only the 2 Adaptive buttons are lit. Press the Tone
footswitch so it’s LED lights.
5. Sing while turning up your PA volume to a comfortable level.
There will be a brief adaptive period as you sing then your voice will sound brighter and lightly
compressed. From here you can experiment with the features of Correct XT.
Phantom Power
Ensure your PA is muted. Hold Warmth and Manual buttons together to engage 48v phantom power for
condenser mics. This setting is retained over power cycles.
www.tc-helicon.com - www.youtube.com/tchelicon
(DE) Einleitung
Mit dem VoiceTone Correct XT können Sie Ihr Publikum auch live mit einem Vocal-Sound in Studioqualität
überzeugen. Und die integrierte automatische Rückkopplungsunterdrückung schont Ihre Nerven.
Wir gratulieren Ihnen zum Kauf Ihres Correct XT. Verwenden Sie es, um Ihre Stimme höhenreicher, ausgewogener
und treffsicherer klingen zu lassen – und all das, ohne erst den Umgang mit kompliziertem Outboard-Equipment lernen
zu müssen. Und wenn Feedback droht, macht die automatische Rückkopplungsunterdrückung kurzen Prozess mit
unerwünschtem Fiepen und Jaulen.
• Extrem einfache Einrichtung und Steuerung
• Der adaptive Multiband-Shape-EQ passt sich dem individuellen Klang Ihrer Stimme an.
• Separate Ein-/Aus-Taster für Klangbearbeitung (Tone) und Tonhöhenkorrektur (Pitch)
• Der integrierte Kompressor und der De-Esser „entschärfen“ Pegelspitzen und Zischlaute
• Symmetrischer XLR-Ausgang und -Eingang mit Phantomspeisung für Kondensatormikrofone
• Klinkeneingang für Durchleitung an DI-Box
• Per USB an Computer anschließbar – für einfache Firmware-Updates, News und Tipps mit Hilfe der kostenlosen
Software VoiceSupport.
• Wenn Sie die Verbindungen zu diesem Gerät herstellen, sollte Ihre PA stummgeschaltet sein.
• Das Gerät wird über die USB-Verbindung nicht mit Strom versorgt.
• Wenn Sie aus Ihrem Verstärker oder der PA ein Netzbrummen hören, drücken Sie die
Ground-Lift-Taste. Ansonsten sollte diese Taste nicht gedrückt sein.
Die Funktionen im Detail
Tone-Bereich:
Drücken Sie den Taster
Tone, um die Shape- und Dynamics-Prozessoren zu aktivieren. Sie verleihen Ihrer Stimme
einen professionellen „Studiosound“. Der Shape-EQ ist ein Mehrband-Equalizer, der mit einem einzigen Regler
effektiv bedient werden kann. Er entfernt „matschige“ Bässe aus einem Signal, die durch den so genannten Nahbe-
sprechungseffekt entstehen. Gleichzeitig sorgt er für angenehme, seidige Höhen. Der Dynamics-Prozessor umfasst
einen hochwertigen Kompressor und einen De-Esser. Sie „entschärfen“ Pegelspitzen sowie überbetonte Vokale und
Zischlaute. Warmth ist eine Komponente des Shape-EQs, die den Sound durch Anhebung tiefer Frequenzen wärmer
klingen lässt, ohne ihn zu vermatschen.
Adaptive Shape und Adaptive Dynamics:
Normalerweise sollten die beiden
Adaptive-Leuchtdioden leuchten. Der Shape- und der Dynamics-Prozessor folgen
dann permanent Ihrer Stimme mit „maßgeschneiderten“ Einstellungen. Für eine Sängerin, die in einem hohen Register
relativ weit weg vom Mikrofon singt, sind zum Beispiel andere Einstellungen erforderlich als für einen Sänger, der mit
tieferer Stimme ganz nah am Mikrofon singt.
Pitch (Tonhöhenkorrektur):
Diese Funktion unterstützt Sie bei der Erkennung und Korrektur Ihrer Intonation – Sie werden behutsam in Richtung
der korrekten Tonhöhe „geschubst“. Diese Funktion ist so etwas wie ein Metronom für die Intonation eines Sängers.
Wenn Sie eine Note singen, wird deren Tonhöhe sofort mit einer chromatischen Tonleiter (die alle Halbtöne umfasst)
verglichen und rasch zum nächstliegenden Halbton hin korrigiert. Mit dem Regler
Pitch legen Sie fest, wie schnell und
mit welcher Intensität diese Korrektur erfolgt. Wenn Sie den Regler zentrieren, erhalten Sie ein natürlich klingendes
und dennoch effektives Ergebnis. Bitte beachten Sie, dass Sie die Korrektur als solche wahrnehmen werden – der
„schwebende“ Effekt ähnelt einem Chorus. Hörbar wird dies allerdings wirklich nur für Sie (und eventuell Personen in
Rückkopplungsunterdrückung an/aus und Reset:
Um das Signal mit und ohne Rückkopplungsunterdrückung zu vergleichen, drücken Sie die Taste
Anti FB. Um alle Filter
der Rückkopplungsunterdrückung auf die Ausgangswerte zurückzusetzen, drücken und halten Sie die Taste
Anti FB,
während ihre LED leuchtet. Achtung: Das Zurücksetzen der Filter, wenn die LED der Taste
Anti FB nicht leuchtet, kann
zu Rückkopplungen führen.
Wie Sie Rückkopplungen vermeiden
• Achten Sie darauf, dass Ihr Monitor und/oder die Lautsprecher Ihrer PA nicht direkt auf die Vorderseite Ihres
Mikrofons abstrahlen.
• Singen Sie so nah wie möglich an Ihrem Mikrofon. Nur keine Scheu: Die Lippen können das Metallgitter des
Mikrofonkorbs berühren.
• Verwenden Sie ein dynamisches Mikrofon mit Supernierencharakteristik wie zum Beispiel ein MP-70 oder MP-75 von
TC-Helicon.
• Stellen Sie den Kanal-EQ oder den grafischen Equalizer Ihrer PA auf eine flache Kennlinie ein.
• Wenn keine andere Maßnahme hilft, muss die Band leiser spielen beziehungsweise die PA/Bühnenmonitore leiser
stellen.
Die VoiceSupport-Software
Mit der Software VoiceSupport können Sie den größtmöglichen Nutzen aus Ihrem TC-Helicon-Produkt ziehen.
Außerdem ermöglicht diese Software es Ihnen, von Aktualisierungen der Software Ihres Gerätes (Firmware) zu
profitieren. VoiceSupport bietet die folgenden Features:
• Zugriff auf die neuesten Firmware-Aktualisierungen und Leistungsmerkmale
• Videos, Künstlerprofile, Tipps und Tricks
• Registrierung Ihres Produkts.
So erhalten und verwenden Sie die Software VoiceSupport:
1. Laden Sie die Software VoiceSupport von www.tc-helicon.com/voicesupport herunter.
2. Installieren Sie VoiceSupport auf Ihrem Computer.
3. Verbinden Sie Ihr Gerät über ein USB-Kabel mit Ihrem Computer.
4. Starten Sie die Software VoiceSupport.
5. Lesen Sie neue Informationen zu Ihrem Produkt, klicken Sie auf die Register (Tabs) und machen Sie sich mit den
Leistungsmerkmalen der Software vertraut.
unmittelbarer Nähe, die sowohl Ihre unbearbeitete Stimme als auch die verstärkte und tonhöhenkorrigierte Version
hören).
Gate:
Dieses automatisch arbeitende Noisegate reduziert den Mikrofonpegel, wenn Sie gerade nicht singen. Es dient dazu,
Rückkopplungen zu reduzieren und das Einstreuen anderer Signale von der PA über Ihr Mikrofon zu vermindern.
Anti-FB (Anti-Feedback) – automatischer Betrieb:
Grundsätzlich sollten Sie zur Vermeidung von Feedback den Tipps im Abschnitt „Wie Sie Rückkopplungen vermeiden“
folgen. Dieses Feature bietet zusätzlichen Schutz vor Jaulen und Fiepen. Um die automatische Rückkopplungsunter-
drückung zu aktivieren, drücken Sie die Taste
Anti FB, so dass ihre LED leuchtet. Die LED der Taste Manual darf nicht
leuchten. Dieser Algorithmus prüft das Signal von Ihrem Mikrofon permanent auf die charakteristischen Feedback-Töne.
Wenn er eine entsprechende Störung erkennt, wird einer von neun Filtern aktiviert. Es können also maximal neun
störende Frequenzen gleichzeitig bearbeitet werden. Die von diesen Filtern bearbeiteten Frequenzbänder sind extrem
schmal, damit ihre Aktivierung das Nutzsignal nicht beeinträchtigt. Wenn bereits alle neun Frequenzbänder aktiviert
wurden und weitere Rückkopplungen auftreten, senkt das Correct XT den Pegel Ihres Mikrofons einmalig um 3 dB ab. In
diesem Fall sollten Sie den Pegel der PA/Bühnenmonitore absenken (lassen) und die Filter zurücksetzen (siehe unten).
Anti-Feedback – manuelle Konfiguration:
Wenn die LED der Taste
Manual leuchtet, werden problematische Feedback-Frequenzen nur dann ermittelt und
abgesenkt, wenn Sie die beiden Taster (
Tone und Pitch) des Pedals gleichzeitig drücken. Sie sollten die Rückkopp-
lungsunterdrückung auf diese Weise manuell konfigurieren, wenn es in Ihrer Band Instrumente wie Rhodes-E-Pianos
oder Flöten gibt, die sinusartige, reine Schwingungen erzeugen können. Solche Wellenformen können den Algorithmus
der automatischen Erkennung durcheinander bringen.
1: Input-Regler und -LED: (grün = Signal liegt an;
bernsteinfarben = OK; rot = übersteuert)
2: Rückkopplungsunterdrückung an/aus. Achtung –
siehe unten
3: Shape – für einen höhenreichen, transparenten
Sound
4: Dynamics – Komprimierung und De-Esser
5: Pitch – Intensität der autochromatischen
Tonhöhenkorrektur
6: Automatisches Gate an/aus
7: Statusleuchtdiode für Phantomspeisung
8: Anzahl der aktiven Rückkopplungsunterdrückungs-
Filter
9: Kompressionsintensität: Eine Leuchtdiode pro dB
10: Tonhöhenkorrektur-Anzeige
11: Warmth – Bassanhebung ohne „Vermatschen“ des
Klangbilds
16
9
1
2
3
4
5
10
8
6
17
13
14
12
11
15
7
12: Rückkopplungsunterdrückung manuell an/aus.
13: Passt den Shape-EQ an Ihre Stimme an
14: Passt die Komprimierung an Ihren Gesang an
15: An- und Abschalten der Tonhöhenanzeige
16: An- und Abschalten von Shape-EQ und
Dynamikbearbeitung
17: An- und Abschalten der Tonhöhenkorrektur
18: USB-Anschluss zur Verbindung mit einem Computer
19: DI-Ausgang für Instrument (optional)
20: Hauptausgang – bearbeitete Stimme
21: Durchleitung Instrumentensignal an
Bühnenverstärker
22: Netzbuchse (Wechselstrom)
23: Instrumenteneingang > DI (optional)
24: Ground Lift-Taste (gedrückt: aktiv)
25: Mikrofoneingang (symmetrisch)
18
23
24
22
25
PA
20
19
21
Vorderseite
Anschlüsse an der Rückseite
Erforderlich
Optional
Konfiguration und Inbetriebnahme
1. Senken Sie zunächst den Pegel an Ihrem Verstärker oder der PA ab.
2. Schließen Sie das Correct XT zunächst entsprechend der Abbildung an Ihr Mikrofon und Ihre PA an und stecken Sie
dann das Netzteil in eine Steckdose. Die USB-Verbindung wird beim Live-Einsatz nicht benötigt.
3. Singen Sie in Ihr Mikrofon und passen Sie mit dem
Input-Regler die Eingangsempfindlichkeit so an, dass die
Pegel-Leuchtdiode bei Pegelspitzen bernsteinfarben leuchtet.
4. Stellen Sie die verbleibenden Regler auf die neutrale Mittelstellung und achten Sie darauf, dass nur die beiden
Adaptive-Leuchtdioden leuchten. Drücken Sie den Taster Tone, so dass dessen Leuchtdiode leuchtet.
5. Singen Sie, während Sie den Pegel an Ihrer Verstärkeranlage erhöhen, bis der gewünschte Pegel erreicht ist.
Während Sie singen, erfolgt eine Anpassung, bei der Ihre Stimme kurzzeitig höhenreicher und leicht komprimiert zu
hören ist. Jetzt können Sie damit anfangen, mit den Funktionen des Correct XT zu experimentieren.
Phantomspeisung
Achten Sie darauf, dass Ihre Verstärkeranlage stummgeschaltet ist. Um die 48V-Phantomspeisung für Kondensatormik-
rofone zu aktivieren, drücken und halten Sie gleichzeitig die Tasten
Warmth und Manual. Diese Einstellung bleibt auch
nach dem Abschalten des Gerätes erhalten.
www.tc-helicon.com - www.youtube.com/tchelicon
(ESP) Introducción
El VoiceTone Correct XT da a sus voces un sonido con calidad de estudio, con toda la
tranquilidad que le ofrece su anti-realimentación automática.
Felicidades y gracias por su compra del Correct XT. Uselo para hacer que sus voces sean más
brillantes, balanceadas y afinadas que nunca hasta la fecha, pero sin la complicación de tener
que usar complejos aparatos externos. Cuando la realimentación sea un problema, la función de
anti-realimentación automática se ocupará de silenciar rápidamente esos molestos pitidos.
•
Configuración y control súper sencillos
•
El EQ de modelado multibandas se adapta a cada voz concreta
•
Pedales on/off Tone y Pitch independientes
•
La compresión y el de-esser suavizan los picos y sibilancias
•
Entrada y salida en XLR balanceado con alimentación fantasma para micrófonos condensadores.
•
Magnífica función de entrada de instrumento de 6,3 mm-a-DI
•
Conexión USB a ordenador para descargas de firmware, actualizaciones, noticias y consejos por
medio del programa gratuito VoiceSupport.
• Reduzca al mínimo su equipo PA a la hora de hacer cualquier conexión.
• La conexión USB no pasa corriente eléctrica a esta unidad.
• Si escucha zumbidos en su PA o amplificador, pulse GRND. En caso contrario, déjelo sin pulsar.
Explicación detallada de las funciones
Tone - El pedal Tone activa los procesadores Shape y Dynamics, que se encargan de producir un
sonido vocal de tipo “estudio”. Shape es un EQ multibandas en un único mando que elimina los graves
opacos debidos al efecto de proximidad del micro a la vez que añade un brillo sedoso. La función
Dynamics usa un compresor y un de-esser de alta calidad para nivelar los picos de volumen en los
sonidos vocales y en los sibilantes (sonidos ssss). Warmth es una parte del moldeado que realza las
frecuencias graves para añadir más calidez sin emborronar el sonido
Adaptive Shape y Adaptive Dynamics - Habitualmente los dos pilotos Adaptive deberían estar
iluminados para que Shape y Dynamics se adapten a su voz específica y a sus necesidades
puntuales. Por ejemplo, una mujer cantando agudo en su rango lejos del micro requiere una EQ y
compresión distintas a la de un hombre con una voz profunda y muy cerca del micrófono.
Pitch Correct - Esto le ayuda a controlar más el tono de su canción y a la vez fuerza suavemente
a que cante afinado. Es como si fuese un metrónomo pero para cantantes. Su tono es comparado
de forma inmediata con las notas en una escala cromática (todas las notas válidas) y es ajustado
lo más cerca posible del semitono más próximo. El mando Pitch controla la velocidad y cantidad de
corrección. El ajuste de muesca central le ofrece el sonido más natural con un nivel de corrección
útil. Tenga en cuenta que aquí SI escuchará el efecto; es algo similar al chorus, pero aquí solo lo
escuchará usted y quizá las personas que estén muy cerca y que puedan escuchar su voz al natural y
la versión amplificada y con tono corregido.
Anti-Feedback On/Off y Reset: Si quiere, puede conmutar el botón Anti-FB para comparar el antes y
después de la función de anti-realimentación. El mantener pulsado el botón Anti-FB cuando su piloto
está encendido hará que todos los filtros sean reiniciados.
ATENCION: Tanto Anti-FB off como Reset pueden dar lugar a realimentación.
Consejos para evitar la realimentación
• Asegúrese de que sus monitores y/o altavoces PA no apunten directamente hacia el micro
• Cante con seguridad y cerca del micro, incluso tocando la parrilla (o “alcachofa”) del mismo
con sus labios
•
Pruebe a usar un micro dinámico super-cardioide como el MP-70 y MP-75 de TC-Helicon
•
Elija un ajuste plano para el EQ de canal del PA y el EQ gráfico
•
Haga que el resto del grupo no toque al máximo sobre el escenario y/o disminuya el volumen de
los monitores/PA
El programa VoiceSupport
El VoiceSupport es la puerta de acceso para que pueda sacarle el máximo partido a su producto
TC-Helicon y para hacer que su entorno vaya creciendo con actualizaciones de firmware. Este
VoiceSupport incluye:
• Acceso a las últimas actualizaciones de firmware y nuevas funciones
• Videos, perfiles de músicos, consejos y trucos
• Registro de su producto
Para acceder al programa VoiceSupport:
1. Descargue el VoiceSupport desde la web www.tc-helicon.com/voicesupport.
2. Instale el VoiceSupport en su ordenador.
3. Conecte su producto al ordenador vía USB.
3. Ejecute el programa VoiceSupport.
4. Lea las noticias, haga clic en las distintas pestañas y navegue por las múltiples funciones del
programa.
Gate: Esta puerta de ruido automática reduce el nivel del micro cuando no cante. Esto puede resultar
muy útil para reducir la realimentación y minimizar el efecto de deslizamiento de señal de instrumentos
en el PA a través de su micro.
Anti-Feedback - Auto: Esta función le ofrece una protección extra contra los pitidos que se pueden
producir en una actuación una vez que haya seguido los Consejos para evitar la realimentación que
comentamos después. Para activar esta anti-realimentación automática haga que el piloto Anti-FB
se encienda y que el Manual quede apagado. Este algoritmo busca continuamente tonos puros de
realimentación causados por su micro y activará uno de sus nueve filtros para cada frecuencia, hasta
nueve en total. Las bandas son extremadamente estrechas para reducir al mínimo el deterioro de su
voz cuando se activen. Si las nueve bandas son asignadas, la presencia de cualquier realimentación
añadida hará que el Correct XT reduzca el volumen de su micro en 3 dB de forma puntual. Si ocurre
esto, debería bajar el volumen de su PA/monitores y reiniciar los filtros (vea luego).
Anti-Feedback - Manual: Cuando el piloto de este botón esté iluminado, las frecuencias problemáticas
para la realimentación solo serán detectadas y eliminadas cuando pulse ambos pedales a la vez. Este
modo Manual le resultará más útil cuando en su grupo haya instrumentos capaces de producir tonos
puros como un Rhodes o una flauta que podrían volver loco al algoritmo Auto.
1 - Input: verde=señal, naranja=OK,
rojo=saturación
2 - On/off anti-realimentación. CUIDADO vea luego
3 - Control de brillo Shape, reduce la opacidad
4 - Cantidad de compresión y de-esser
5 - Cantidad de corrección de tono auto-cromático
6 - On/off de puerta de ruidos automática
7 - Piloto de alimentación fantasma activa
8 - Cantidad de filtros anti-realimentación activos
9 - Cantidad de compresión: 1 LED/dB
10 - Pantalla de corrección de tono
11 - Warmth añade graves sin emborronar
12 - On/off de anti-realimentación manual
16
9
1
2
3
4
5
10
8
6
17
13
14
12
11
15
7
13 - Adapta el EQ de modelado a su voz
14 - Adapta la compresión a ña voz cantada
15 - On/off de pantalla de tono
16 - On/off de tono (modelado+dinamismo)
17 - On/off de corrección de tono
18 - Conexión USB a ordenador
19 - Salida de DI a instrumento (opcional)
20 - Salida principal de voz procesada
21 - Thru de instrumento a etapa de potencia
22 - Entrada de fuente de alimentación
23 - Entrada de instrumento a DI (opcional)
24 - Toma de tierra de Inst: pulsado=anulado
25 - Entrada de micro balanceado
18
23
24
22
25
PA
20
19
21
Panel frontal
Panel trasero y conexiones
Necesario
Opcional
Configuración inicial y uso
1. Reduzca al mínimo el volumen master de su sistema PA.
2. Conecte su micro, sistema PA y adaptador de corriente al Correct XT tal como le mostramos en el
diagrama anterior. Para actuaciones en directo no es necesaria la conexión USB.
3. Cante en el micro y ajuste el control Input hasta que el piloto parpadee en naranja en los picos.
4. Coloque el resto de mandos en su muesca central y asegúrese de que solo estén iluminados los
dos botones Adaptive. Pulse el pedal Tone para que su piloto se ilumine.
5. Siga cantando mientras sube el volumen de su PA hasta un nivel adecuado.
Se producirá un breve periodo de adaptación a su voz y después sonará más brillante y suavemente
comprimida. A partir de aquí ya podrá experimentar con el resto de funciones del Correct XT.
Alimentación fantasma
Asegúrese de que su sistema PA esté al mínimo o anulado. Mantenga pulsados a la vez los botones
Warmth y Manual para activar la alimentación fantasma de 48 v para micrófonos condensadores. El
ajuste que realice quedará memorizado aunque apague la unidad.