Great Planes P-51D Mustang 40 Kit - GPMA0175 User Manual
Page 14
D D 29. Epoxy the 7/16" x 5/8" x 7/8" hardwood block to
the LG block and to the 1/16" ply doubler on rib W-3, as
shown on the plan and in the photo, then epoxy the small
hardwood gusset to the other end of the LG block and to the
1/16" ply doubler on rib W-4.
D D 30. Drill a 5/32" hole down through the grooved LG
block and the 7/8" block. Line up the drill so you are drilling
straight down through the middle of the 7/8" block.
D D 31. Trial fit the 5/32" diameter main landing gear
wire into the landing gear block at this time. Cut or file the
groove and hole in the landing gear block as necessary for a
good fit.
D D 32. Using a razor saw and a sanding block, carefully
cut off and sand all excess sheeting, spars, LE and TE even
with W-1 and W-11.
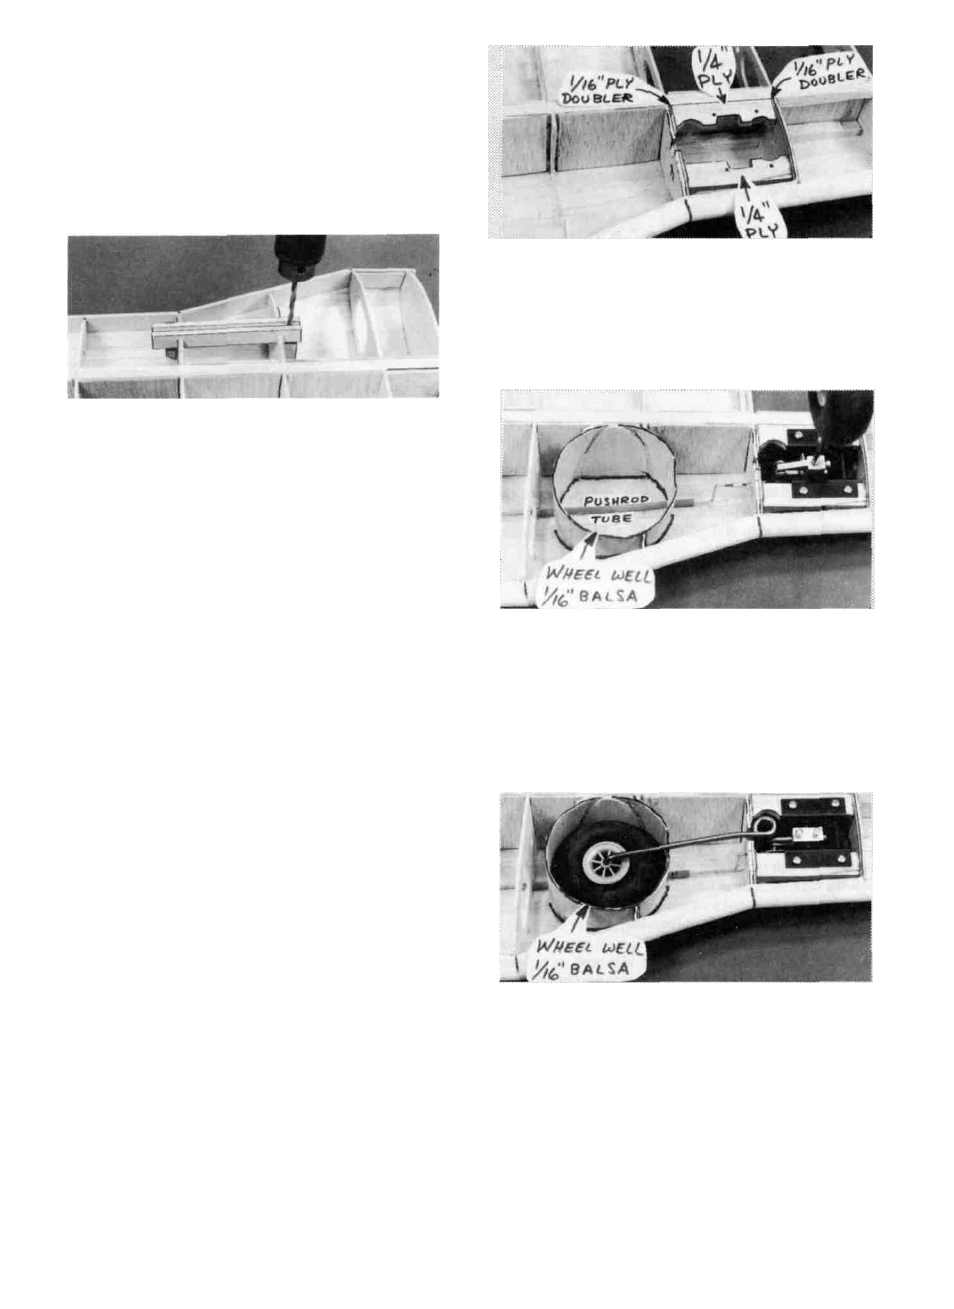
NOTE: If you will be installing retracts, now is the
time to install the 1/4" x 5/8" x 2-5/8" ply retract
mounting rails with epoxy on the bottom of the wing
between the 1/16" ply doublers on ribs W-4 and W-5, as
shown on the plan. Add 1/4" balsa triangle under the
1/4" ply rails. Installing retracts requires careful
planning and a lot of trial Fitting, customizing the
installation as necessary to accommodate your retracts;
therefore, you should take the time now to plan out your
installation. Here are some typical tasks you must
perform when installing retracts:
NOTE: All photos in this book show installation of the
Dave Brown mechanical retracts.
C. Gluo in 1/4" ply retract mounting; rails using
epoxy.
D. Trim the rails as necessary.
E. Install pushrod and guide tube just under the top
sheeting.
F. Fabricate wheel well from 1/16** balsa or styro-
foam cup.
A. Glue in the 1/16" ply nose rib doublers to reinforce
ribs W-4 and W-5 where retracts are to be installed.
B. Trial fit the retract unit to determine the mounting
location and angles. Cut away the ribs as necessary for
clearance.
G. Install retract unit and check operation.
H. Sheet bottom of wing, taking note where sheeting
will be cut away for retract.
D D 33. With the wing upside down, again use the TE jig
to support the TE. Then install the bottom TE sheeting, LE
sheeting* and Center Section sheeting, cutting and fitting the
14