Remote sensor see fig. 10, Operation display panel, Class button – Pioneer SX-209RDS User Manual
Page 20: Fm/am selector button, Tuning buttons +), Station buttons (-, +), Bass tone control, Treble tone control, Balance control, Fenêtre du capteur voir fig. 10
Attention! The text in this document has been recognized automatically. To view the original document, you can use the "Original mode".
FRONT PANEL FACILITIES
ELEMENTS DU PANNEAU AVANT
I
I
(Q) EON (Enhanced Other network information)
MODE button/ indicator
See page 46.
® Remote sensor
See Fig. 10.
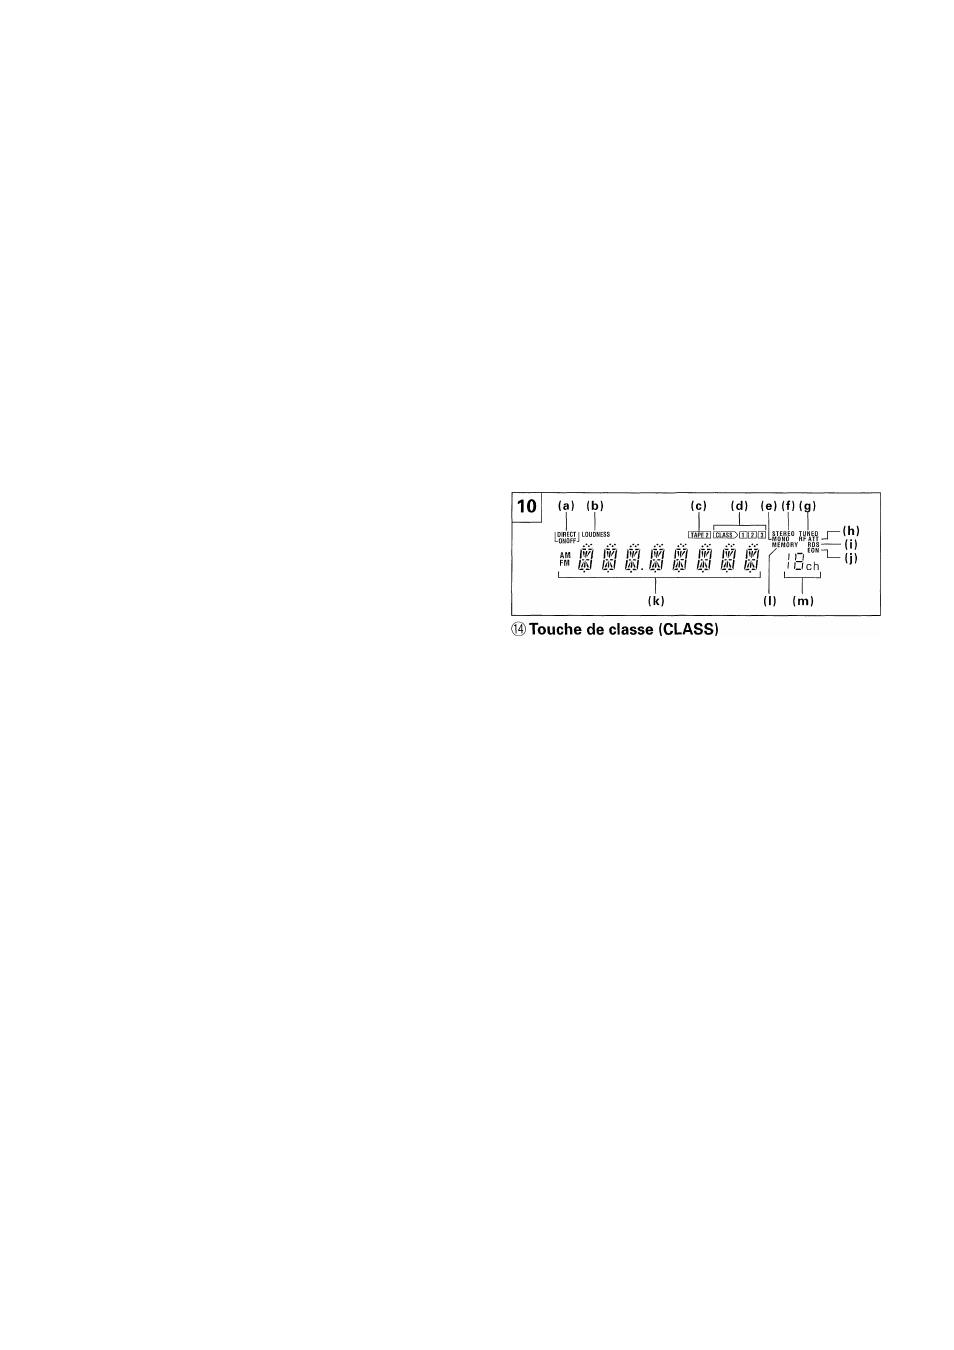
©Operation display panel
(a) DIRECT ON/OFF indicator
(b) LOUDNESS indicator
(c) TAPE 2 monitor indicator.
(d) CLASS indicator
(e) MONO indicator
(f) Lights up when a stereo FM broadcast is being received.
(g) Lights up when a station is tuned.
(h) RF ATT indicator
(i) Lights when an RDS broadcast is received.
(j) Lights when a station bloadcasting EON information is received.
(k) Frequency, function, character display
(
l
) MEMORY indicator
(m) Channel display
10
(a) (b)
(c)
(d) ( e ) ( f ) ( g )
[oiiSMommiiiteo
tuned
AM IVI IVI iVl iVf iVi
™ IKi IKf /Al. /AI /Al
IVI IVI IVI
/AJ /AJ /AJ
_j____ ^__ u
______ ^
( h )
MONO RFATT-I
...
MEMORY RDS------- (|)
EON —1
' '
i o
I LI ch
( j )
( k )
( I ) ( m )
(@ CLASS button
Use to switch between preset memory classes 1 to 3. In each class,
one station can be memorized in each of the 1 to 10 STATION
CALL buttons, enabling a total of 30 stations to be memorized.
® FM/AM selector button
This button is used to select either AM or FM reception.
©TUNING buttons +)
Use for tuning frequencies. Press the buttons to change the fre
quency display (3-speed Accel Tuning) (see page 28).
In the Manual Name input mode and PTY search mode, use to
select characters and program types.
© STATION buttons (-, +)
+: Stations change in order in the upward direction.
Stations change in order in the downward direction.
© BASS tone control
Use to adjust low-frequency tones. The center position is the flat
(normal) position. When turned to the right, low-frequency tones
are emphasized.
NOTE:
This control can not be used when the DIRECT function Is ON.
The DIRECT function can be turned ON/OFF using the remote
control unit.
® TREBLE tone control
Use to adjust high-frequency tones. The center position is the
flat (normal) position. When turned to the right, high-frequency
tones are emphasized.
NOTE:
This control can not be used when the DIRECT function is ON.
The DIRECT function can be turned ON/OFF using the remote
control unit.
©BALANCE control
Should normally be left in the center position. Adjust balance if
the sound is louder from one of the speakers. If the right side is
louder, turn toward the L position and if the left side is louder,
turn toward the R position.
NOTE:
This control can not be used when the DIRECT function is ON.
The DIRECT function can be turned ON/OFF using the remote
control unit.
20
En/Fr
(Q)Touche/indicateur EON (Enhanced Other
Network) MODE
Se reporter à la page 46.
© Fenêtre du capteur
Voir Fig. 10
©Afficheur de fonctionnement
(a) Voyant DIRECT
(b) Voyant LOUDNESS
(c) Voyant de contrôle TAPE 2
(d) Voyant CLASS
(e) Voyant MONO
(f) Ce témoin s'éclaire pendant la réception d'une émission FM
en stéréophonie.
(g) Ce témoin s'éclaire après accord sur une station.
(h) Voyant RF ATT
(i) Ce témoin s'éclaire pendant la réception d'une émission RDS.
(j) Ce témoin s'éclaire si la station diffuse des informations EON.
(k) Affiche la fonction, la fréquence ou un caractère
(
l
) Voyant MEMORY
(m) Affiche le canal
Cette touche est utilisée pour commuter entre les classes de mémoire 1
à 3. Chaque classe permet de mémoriser une station par touche de
rappel (STATION CALL) 1 à 10, ce qui correspond à 30 stations au total.
©Sélecteur FM/AM
Cette touche est utilisée pour sélectionner la réception AM ou FM.
©Touches de syntonisation (TUNING -, +)
Utiliser ces touches pour syntoniser une station. Appuyer sur
une de ces touches pour modifier l'affichage de fréquence
(syntonisation directe à 3 vitesses) (voir page 28).
En mode d'entrée manuelle de nom et en mode PTY, utiliser ces
touches pour sélectionner les caractères et le type de programme.
©Touches STATION (-, +)
+: Pour choisir une station dans l'ordre croissant des numéros.
Pour choisir une station dans l'ordre décroissant des numéros.
©Commande de tonalités graves (BASS)
A utiliser pour régler les basses fréquences. La position centrale
est la position plate (normale). Quand la commande est tournée
vers la droite, les basses sont accentuées.
Remarque:
Cette commande est sans effet quand le signal est directement
appliqué à Tétage d'amplification.
L'application directe du signal à Tétage d'amplification peut être mise
en service ou hors service grâce à la télécommande (DIRECT).
©Commande de tonalités aiguës (TREBLE)
A utiliser pour régler les hautes fréquences. La position centrale
est la position plate (normale). Quand la commande est tournée
vers la droite, les aiguës sont accentuées.
Remarque:
Cette commande est sans effet quand le signal est directement
appliqué à Tétage d'amplification.
L'application directe du signal à Tétage d'amplification peut être
mise en service ou hors service grâce à la télécommande (DIRECT).
©Commande d'équilibre (BALANCE)
Doit normalement se trouver au milieu. Régler l'équilibre si le
son d'une des enceintes est plus fort. Si le côté droit est plus
fort, tourner la commande vers le L et si le côté gauche est plus
fort, tourner la commande vers le R.
Remarque:
Cette commande est sans effet quand le signal est directement
appliqué à Tétage d'amplification.
L'application directe du signal à Tétage d'amplification peut être
mise en service ou hors service grâce à la télécommande (DIRECT).