Kenmore 200 User Manual
Page 35
Attention! The text in this document has been recognized automatically. To view the original document, you can use the "Original mode".
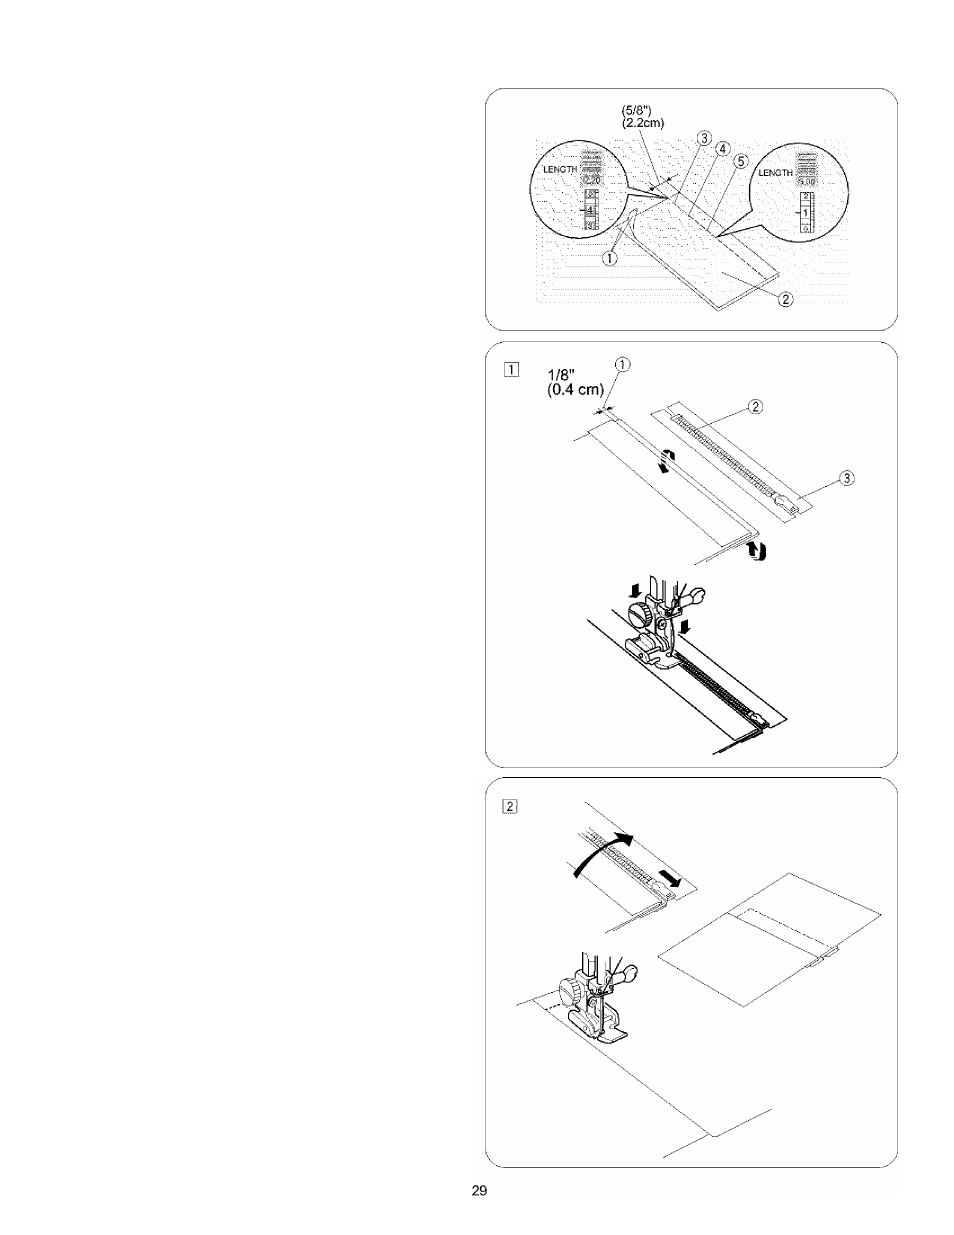
Fabric preparation
® Right {top) side of fabric
(
2
) Wrong (bottom) side of fabric
(3) Bottom seam
0 Zipper bottom stop position
0 Basting stitch
Place the right (top) sides of the fabric 0 together. Sew a
bottom seam 0 5/8" (2.2 cm) from the right edge to the
estimated zipper bottom stop position
0
.
Sew in reverse
a few stitches to iock.
increase the stitch length to 5, set needle thread tension
to
0
, and sew basting stitch
0
the entire length of the
zipper tape.
To sew
0
1/8" (0.4cm) fabric margin
0
Zipper teeth
0
Zipper tape
Jj Attach zipper foot on right-side of pin.
Fold back the upper layer seam allowance. Fold back
the lower layer seam allowance to leave a 1/8" (0.4 cm)
margin of fabric
0
.
Place zipper teeth next to margin edge and pin margin to
zipper tape.
Align zipper foot with margin edge. Return thread tension
and stitch length to original settings. Sew a seam the
entire length of zipper tape, removing pins as you go.
Before reaching pull-tab, stop the machine with needle in
the fabric and raise the foot, then unzip a few inches to
clear a path for the stitch.
Remove fabric and close zipper.
I Raise and release foot, and re-attach it on left-hand side
of pin.
Take the upper fabric layer and lay it flat over the zipper.
Starting just below zipper bottom stop, sew across fabric
to about 3/8” to 1/2" distance from the basting stitch line.
Turn fabric 90° and sew a seam the entire length of
zipper tape. Before reaching pull-tab, stop the machine
with needle in fabric and raise the foot. Use seam ripper
to open a few inches of basting stitch, then unzip a few
inches to dear a path for the stitch. At the end of the
zipper tape, sew in reverse a few stitches to iock.
Once both sides of zipper are sewn, use seam ripper to
open the basting stitch.