How to set up each mode (lv-s31), How to set up special modes, End program) – KEYENCE LV-SB User Manual
Page 8: E lv-s-im, When using a model other than lv-s31
8
E LV-S-IM
How to Set up Each Mode (LV-S31)
The settings of Output 1 and 2 can be divided into common settings and indi-
vidual settings depending on the modes. Change the mode by using the
channel selection switch. To exit the mode setting while it is not completely
finished, press the MODE button for over 2 seconds.
How to set up special modes
■ When using a model other than LV-S31
When Std is selected
When
HSP is
selected
b
a
When Timer
OFF
is selected
When other
setting than
Timer OFF
is selected
OR
Press for two
seconds or more
MODE
End of the basic
menu display
When selecting a timer mode,
If other setting than *1 is selected
→ a
If *1 is selected
→ b
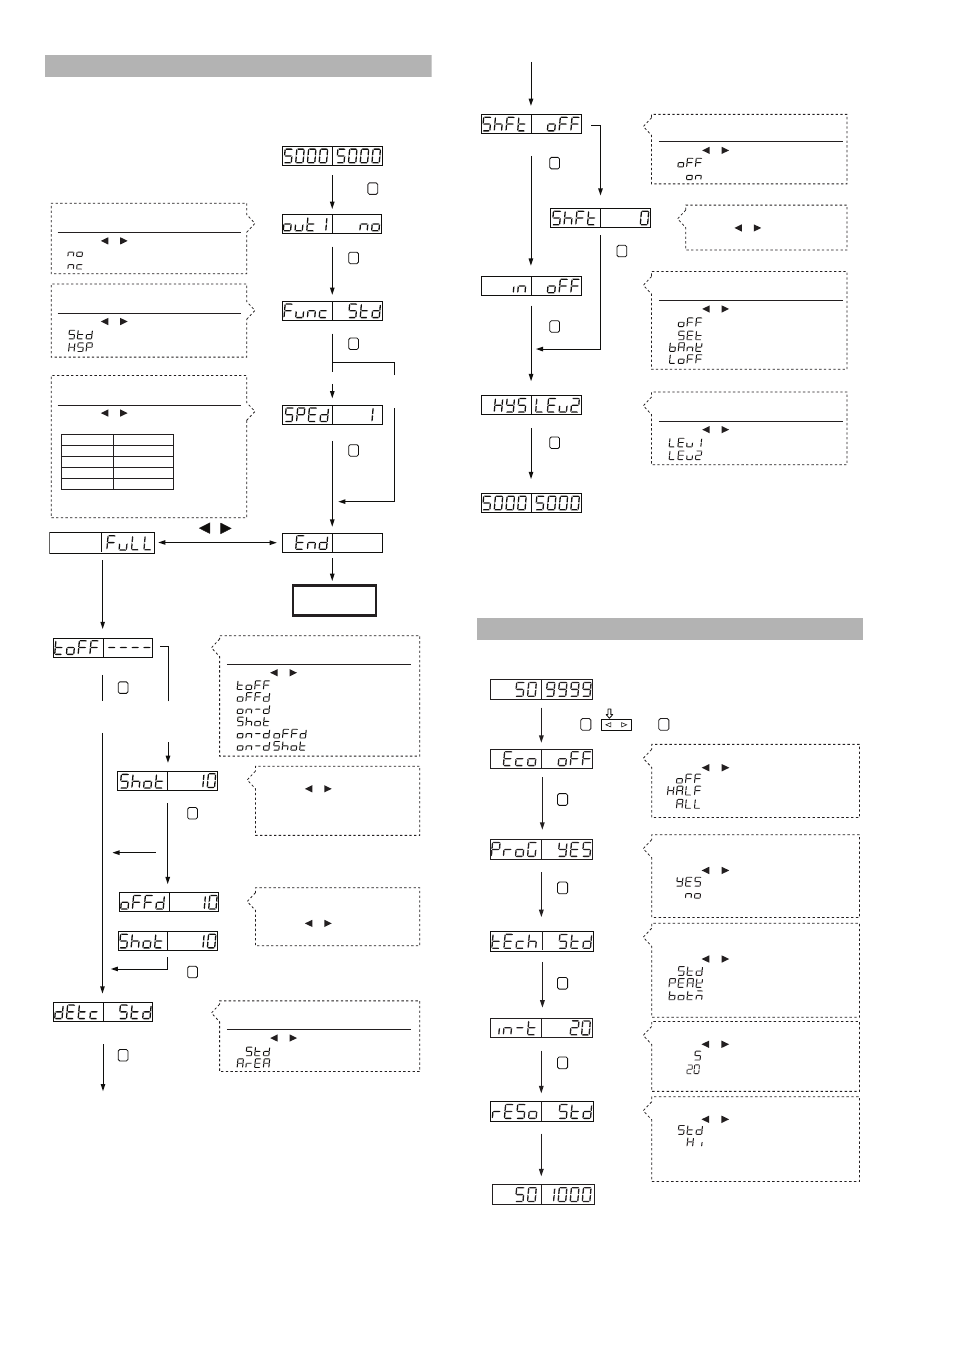
1
Selecting output
Press the or button to select.
• Turns on the output nearer to the sensor.
• Turns on the output farther to the sensor.
Output 1/2 individual setting
4
Selecting the timer mode
Press the or button to select.
• Timer OFF
• OFF delay
• ON delay
• One-shot
• ON delay, OFF delay *1
• ON delay, One-shot *1
Output 1/2 individual setting
5
Selecting the detection mode
Press the or button to select.
• Normal detection mode
• Area detection mode
Output 1/2 individual setting
2
Selecting the power mode
Press the or button to select.
• Normal mode
• High-speed mode (response time 250 µs)
Output 1/2 common
3
Selecting the response time
Press the or button to select.
Varies depending on the power mode.
Output 1/2 common
When the power mode is HSP, the
response time is fixed to 250 µs.
SPEED
Response
time
1
500µs
2
2ms
3
8ms
4
32ms
Timer setting
Press the or button to select.
Can be set between 0.1 and 5000 ms.
When *1 is selected, the ON delay timer is
activated.
Timer setting 2
Sets an OFF delay (one-shot) time.
Press the or button to select.
Can be set between 0.1 and 5000 ms.
MODE
MODE
MODE
MODE
MODE
MODE
MODE
6
Setting the shift function
Press the or button to select.
• Do not use shift.
• Use shift.
Output 1/2 common
8
Setting the hysteresis mode
Press the or button to select.
•
Hysteresis: small
•
Hysteresis:
large
Output 1/2 common
7
Selecting the control input function
Press the or button to select.
• Does not use the control input
• External calibration
• Bank selection
• Laser emission stop
Output 1/2 common
When OFF
is selected
When
ON is
selected
Setting the shift target value
Press the or button to select.
It can be set by the unit of 1.
MODE
MODE
MODE
MODE
(End Program)
* Output 2 cannot be used when the Area detection mode is selected.
If a mode other than the Normal/Area detection mode is selected for either Output 1 or 2, the
setting of item 5 or 6 cannot be selected for both Output 1 and 2.
Selecting the shift function input time
Press the or button to select.
• 5ms
• 20ms
The input time is fixed to 20 ms for all other functions.
Switching zero datum settings
Press the or button to select.
• Standard
• Hight-accuracy
* When Hi (High-accuracy) is selected, the width for the zero
datum setting value becomes smaller. During this state, be
especially aware of shocks and other causes of fluctuation.
Selecting the memory of value set by an
external input while using the shift function
Press the or button to select.
• Saves the value *1
• Does not save the value (clears data at power-off)
*1 Data can be saved up to one million times.
Selecting the acquisition of the sampling
value* (received light intensity)
Press the or button to select.
• Use the average value from sampling
• Use the peak value from sampling
• Use the bottom value from sampling
* Used during % calibration or display scaling.
MODE
MODE
MODE
MODE
(End Program)
Selecting the Power saving function (Eco mode)
Press the or button to select.
• Normal use
• Eco-half
• Eco-all
Press , , and for three seconds or more at the same time.
MODE
SET