For repair parts list, see under tank lid, Warning, 3 - care and cleaning – Waterworks Otis Two Piece High Efficiency Elongated Watercloset with Slow Close Plastic Seat User Manual
Page 3
12
- 3 -
CARE AND CLEANING
When cleaning your toilet, wash it with mild, soapy water, rinse thoroughly with clear water and dry with a soft cloth. Avoid detergents,
disinfectants, or cleaning products in aerosol cans. NEVER use abrasive scouring powders or abrasive pads on your toilet seat. Some
bathroom chemicals and cosmetics may damage the seat's finish.
WARNING:
Do not use in-tank cleaners. Products containing chlorine (calcium hypochlorite) can seriously damage fittings in the
tank. This damage can cause leakage and property damage.
TROUBLESHOOTING GUIDE
PROBLEM
POSSIBLE CAUSE CORRECTIVE ACTION
Does not flush
a. Water supply valve closed.
a. Open valve and allow water to fill tank.
b. Supply line blocked.
b. Shut off water supply, disconnect supply line, and inspect
all gaskets and washers.
c. Flush valve chain too loose or disconnected.
c. Readjust chain length as required.
Poor or sluggish flush
a. Bowl water level too low.
a. Check that refill tube is connected to water control and
inserted into tank overflow without being kinked or damaged.
b. Supply valve partly closed.
b. Open supply valve fully. Be sure that proper supply tube size is used.
c. Partially clogged trapway and/or drain pipe and/or vent.
c. Remove obstruction. Consult a plumber if necessary.
d. Supply pressure too low.
d. Normal supply pressure must be at least 20 psi.
Toilet leaks
a. Poor supply line connection.
a. Review Step 9 of installation procedure.
b. Poor bowl to tank/floor connection.
b. Review Step 4 through 7 of installation procedure.
Toilet does not shut off
a. Flush valve chain too tight, holding flush valve open.
a. Readjust chain length as needed. Review step 10.
b. Flush valve seat and/or flapper worn or deformed.
b. Replace flapper/flush valve assembly, as needed.
!
10
11
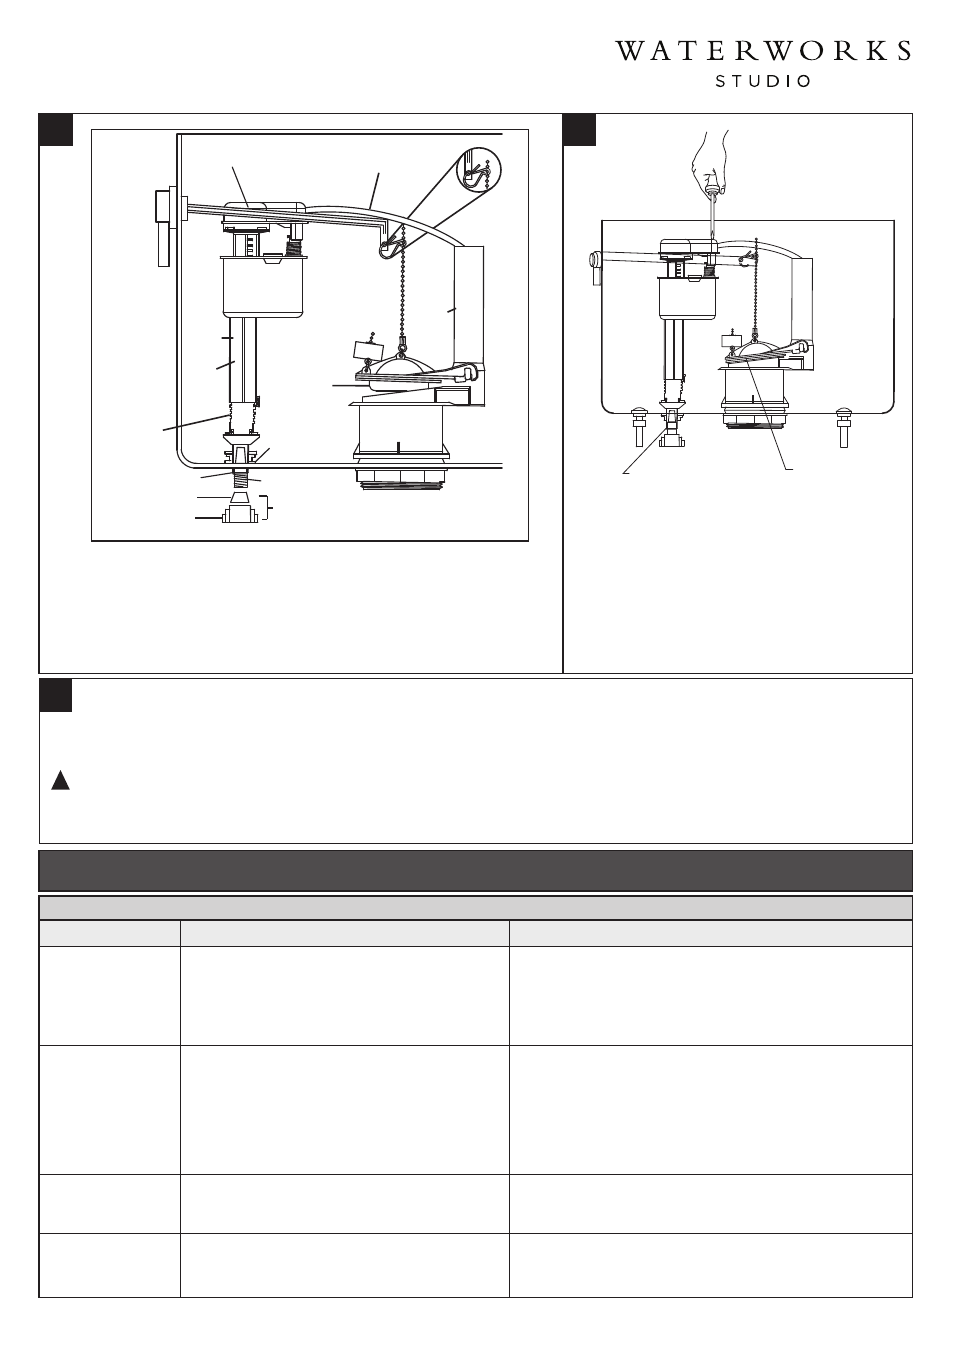
ADJUSTMENTS
a. Adjust water level. Water level should be adjusted to level indicated on tank by
adjusting float cup.
See Step 11 for water level adjustment method
b. If bowl fails to siphon, an adjustment may be required with the lift chain. Simply
remove the bead chain from the retainment clip (see Fig. 10A) and take up
slack on the chain, and reinsert on lift rod. Make sure the chain is not too taught.
Diagram 1
Adjust tank water level to the proper marked
waterline by rotating threaded rod clockwise
to raise water level or counterclockwise to
lower water level.
Filter Screen
Remove tape
before flushing.
TOP
REFILL
TUBE
FLOAT
CUP
FLUSH
VALVE
FILL
VALVE
VALVE
BODY
ADJUSTABLE
HEIGHT
FLAPPER
SHANK
WASHER
LOCK NUT
CONE WASHER
COUPLING NUT
(HAND TIGHT ONLY)
THREADED
SHANK
PARTS FOR WATER
CONNECTION
FOR REPAIR PARTS LIST, SEE UNDER TANK LID.