Waterworks Easton Classic Gooseneck Concealed Tub Filler With Handshower and White Porcelain Lever Handles User Manual
Installation guidelines
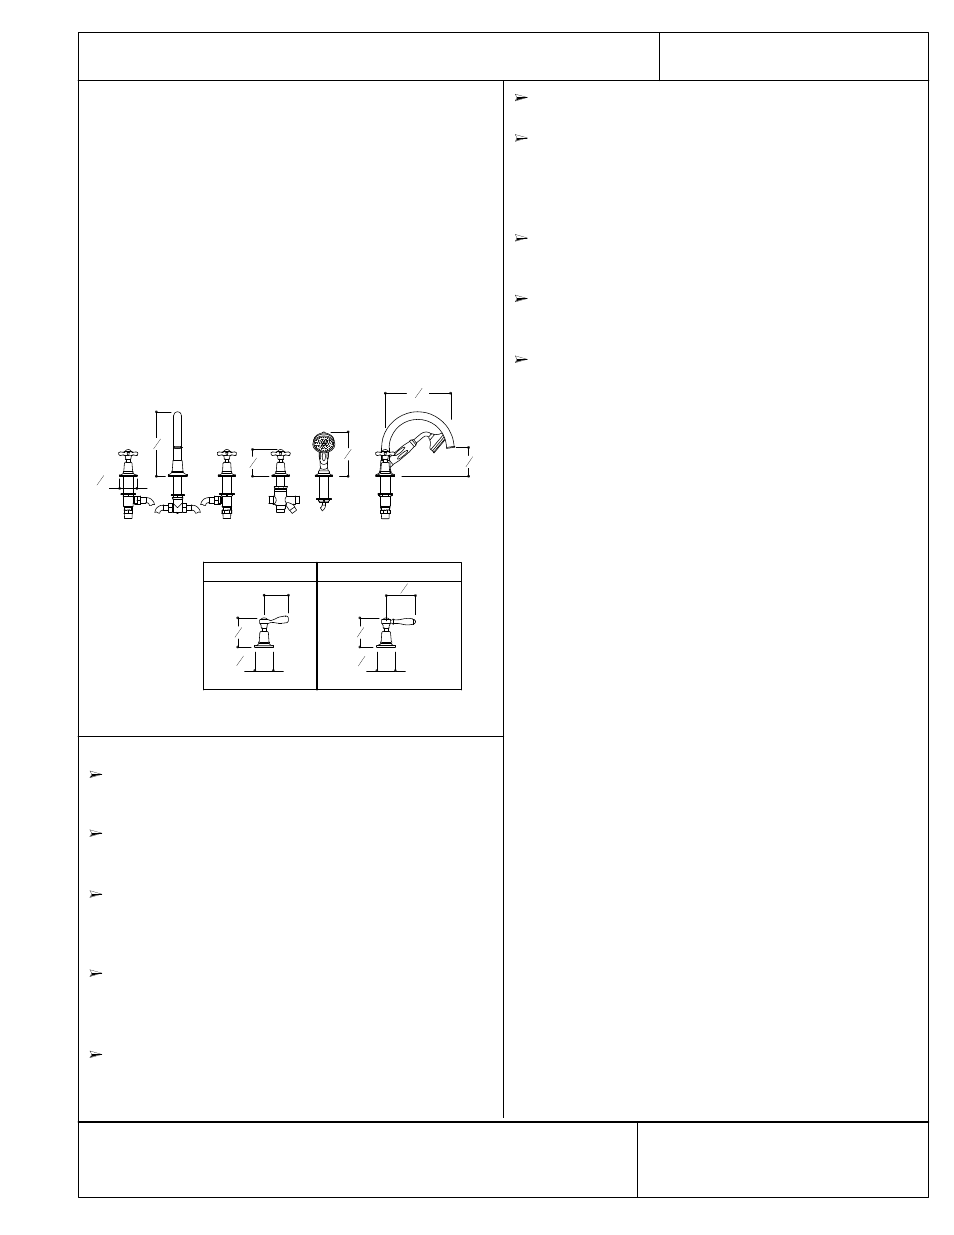
Easton Classic Concealed Gooseneck Tub Filler With Handshower
And Diverter
6
1
8
"
3
5
8
"
8
3
4
"
2
3
8
"
8
7
8
"
3
15
16
"
EATU52
3
5
8
"
2
3
8
"
3"
3
3
8
"
EATU53 ,54, 55
CLASSIC CONCEALED GOOSENECK TUB FILLER
WITH HANDSHOWER AND DIVERTER
EATU51 (cross handles)
EATU52 (metal lever handles)
EATU53 (white porcelain lever handles)
EATU54 (black porcelain lever handles)
EATU55 (oak lever handles)
3
5
8
"
2
3
8
"
IMPORTANT
To ensure this product is installed properly, you
must read and follow these guidelines.
The owner/user of the tub filler must keep this
information for future reference.
Be sure your installation conforms to local codes. Anti-
scald protection is the responsibility of the installer and
according to applicable codes.
This tub filler should be on-site prior to rough in and
allows the installer to visualize the installation and
verify the center spread.
Check tub deck and tub measurements to assure the
spout projects far enough into the tub.
An access panel is required for future servicing.
Refer to the specification and assembly drawings
attached. Faucet is sold partially assembled but shown
fully disassembled for illustrative and service purposes
only.
Inspect this product to assure you have all parts
required for proper installation.
Use only a strap wrench or protected/smooth-jaw
wrench on any finished surface.
Install accessible hot and cold service stop valves to
facilitate servicing.
IMPORTANT:
Run ¾" hot and cold supply lines for maximum flow.
The hot and cold supplies must be routed to the
diverter. Water mixes in the 2-way diverter and can
be directed to either the handshower hose or the
single flexible hose to the tub spout.
These instructions include information for installing the
optional handshower and diverter. If the handshower
and diverter are not being used, some of the
information included below and in the exploded view
drawing is not applicable.
SIDE VALVE INSTALLATION
1. With the lock nut (4b) and lower sealing gasket (4a)
installed on the side valve (5-5b), insert the side valve
into the hole in the mounting surface so at least 1" of
threads are exposed above the deck surface.
2. Place the upper sealing gasket (3a) onto the side valve
then thread the base escutcheon (3) onto the side
valve.
3. Thread the handle assembly (1-1h) onto the side valve
until it stops. Hand tight is adequate; if this assembly is
too tight, the handle will bind.
4. Unthread the base escutcheon (3) until it contacts the
gland nut (1e) which will assure proper side valve
height.
5. Tighten the lock nut (4b) up against the underside of
the mounting surface to secure the side valve.
These guidelines have been prepared for the professional contractor to aid in the installation of:
EASTON
CLASSIC CONCEALED GOOSENECK TUB FILLER WITH CROSS HANDLES (EATU51) &
LEVER HANDLES (EATU52, 53, 54, 55) WITH HANDSHOWER AND DIVERTER.
All dimensions are based on original specification and are subject to change and
variation. Please consult your Design Associate for current specifications.
Installation Guidelines
W A T E R W O R K S
Waterworks is a registered trademark of Waterworks Inc.
0
4.08