Waterworks Formwork Three Way Diverter Valve Trim for Pressure Balance System with Metal Lever Handle User Manual
Installation guidelines
PRODUCT SUPPORT 800.927.2120 8am - 6pm EST
FORMWORK
Diverter Trim Plates for Pressure Balance Systems
INSTALLATION GUIDELINES
Page 1 of 2
4.29.2014
These guidelines have been prepared for the professional contractor to aid in the installation of:
FORMWORK DIVERTER TRIM PLATES for PRESSURE BALANCE SYSTEMS (STYLE# SEE ABOVE)
All dimensions are based on original specification and are subject to change and variation.
Please consult your Design Associate for current specifications.
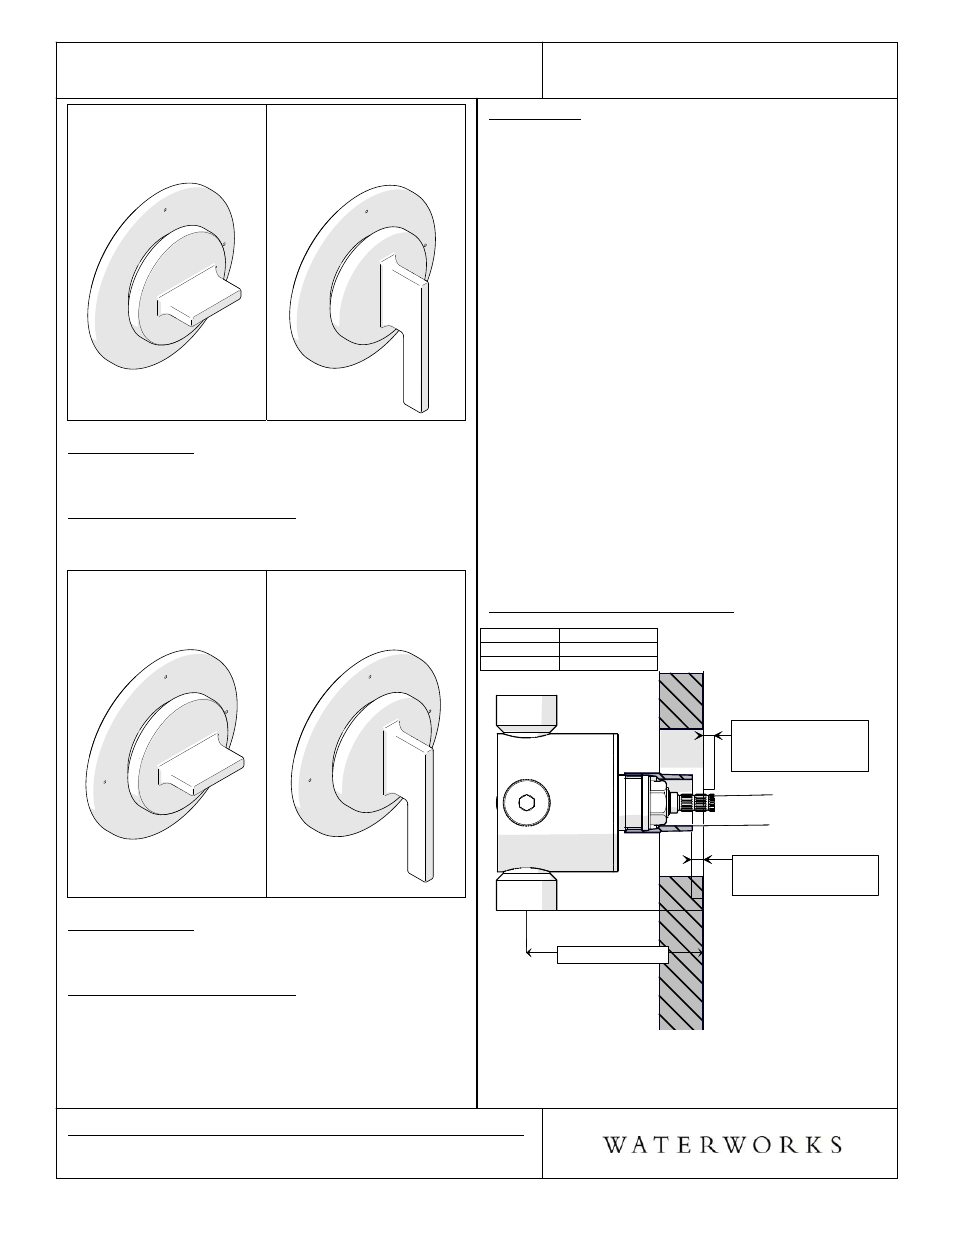
Style No. FM2P01
2 Way Diverter Trim Plate for
PB with Metal Knob Handle
Style No. FM2P10
2 Way Diverter Trim Plate for
PB with Metal Lever Handle
SPECIFICATIONS:
Control Valve Rough-in Depth Minimum: 3"
Control Valve Rough-in Depth Maximum: 3-3/8"
REQUIRED PLUMBING DETAILS:
Universal Two Way Diverter without Shutoff Valve
STYLE # GUDV23 (SOLD SEPARATELY)
Style No. FM3P01
3 Way Diverter Trim Plate for
PB with Metal Knob Handle
Style No. FM3P10
3 Way Diverter Trim Plate for
PB with Metal Lever Handle
SPECIFICATIONS:
Control Valve Rough-in Depth Minimum: 3"
Control Valve Rough-in Depth Maximum: 3-3/8"
REQUIRED PLUMBING DETAILS:
Universal Three Way Diverter without Shutoff Valve
STYLE # GUDV65 (SOLD SEPARATELY)
IMPORTANT:
¾ To ensure this product is installed properly, you
must read and follow these guidelines. The
owner/user of this product must keep this
information for future reference.
¾ This product must be installed with a Two or Three
Way Diverter Valve (SOLD SEPARATELY). Please
refer to the specific valve installation guidelines for
rough-in requirements.
¾
Be sure your installation conforms to federal state,
and local codes. In the State of Massachusetts, all
installations must comply with the rules and
regulations set forth within 248 CMR.
¾ This product must be installed by a professional
licensed contractor and must be onsite prior to
rough-in, this allows the installer to visualize the
installation.
¾ Inspect this product to ensure you have all the parts
required for proper installation.
¾ Use only a strap wrench or protected/smooth-jaw
wrench on any finished surface.
¾ The use of certain plumber's putty may stain stone
or tile surfaces.
DIVERTER VALVE INSTALLATION:
Dimension Value
(inches)
A 3/16"
B 3/16"
CARTRIDGE
STEM
THREADED
TUBE
CARTRIDGE
STEM
THREADED
TUBE
"A"
CUT CARTRIDGE STEM
IN FRONT OF THE
FINISHED WALL
"B"
CUT THREADED TUBE
BEHIND FINISHED WALL
ROUGH -IN DEPTH
FIGURE - 01
*Warning: If Valve is roughed in too shallow, trim cannot
be installed correctly.