Rice Lake MSI-9750A CellScale RF Portable Indicator User Manual
Page 37
MSI CellScale
®
System • 9750A User Guide Page 37
MEASUREMENT SYSTEMS INTERNATIONAL
Firmware Version 5-XX for 2450 Modems
PASSWORD LOCKS
The Lock function allows the user to lock various setups and or functions to prevent unauthorized changing or
erasing of scale functions, features and statistical data. For security a lock password (1-14 characters) is used. Once
the MSI 9750A is locked the message “LOCKED” will appear whenever a locked function is tried. To temporarily
unlock a function, press any locked key, press
ENTER
, then enter the password followed by the
ENTER
key.
To lock or unlock all functions you must use the “PASSWORD LOCKS” menu.
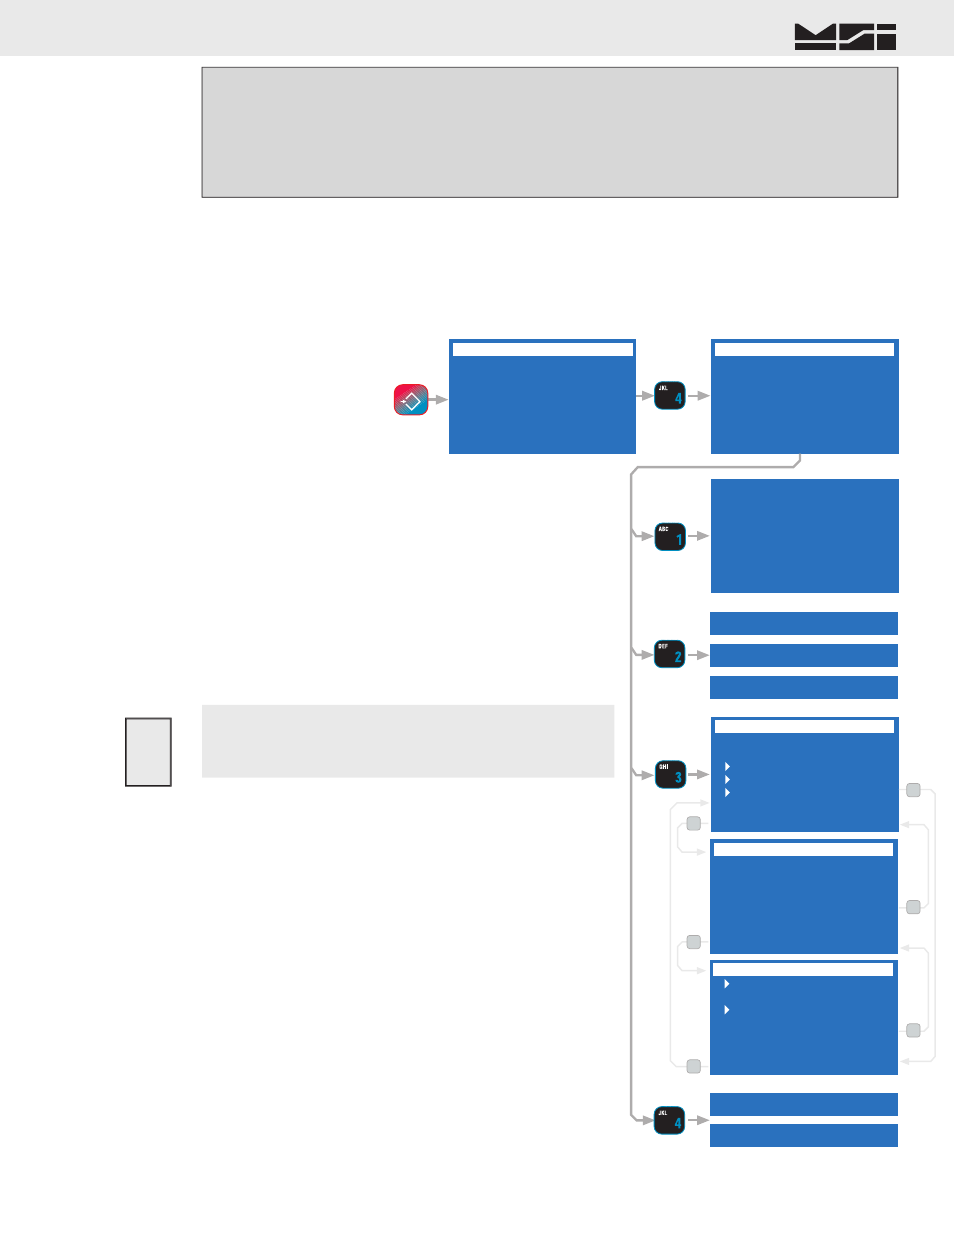
SETUP SELECT MENU
1 Function Keys
2 Set Points
3 System
4 Password Locks
5 BarCode
6 Total
7 MORE 1/2
PASSWORD LOCKS
1 Change Password
2 Status LOCKED
3 Lock Mode
4 Lock Override OFF
Password is:
-Password-
LOCK MODE
1 Function Key Setup
2 Set Points
3 System Settings
4 Set Password Locks
5 Display Preview
6 Total Setup
7 MORE 8 BACK 2/3
LOCK MODE
1 Channel/Calibrate
2 Scale Display Line
3 RF Modem
4 Comm 1 & Strings
5 Product ID Codes
6 Tare Setup
7 MORE 8 BACK 3/3
LOCK MODE
1 Lock All
2 FUNCTION Keys
3 SETUP Key
4 TARE Key
5 NET/GROSS Key
6 ZERO Key
7 MORE 8 BACK 1/3
2 Status LOCKED
2 Status UNLOCKED
7
7
7
8
8
8
2 Status LOCK ON PWR
Len 0 F4 Menu
Max 14 ENT Save
Pos 1
NEW PASSWORD
1
SETUP SELECT MENU
PASSWORD LOCKS
LOCK MODE
LOCK MODE
LOCK MODE
4 Lock Override OFF
4 Lock Override ON
See General Text Editing
Procedure
ESC
!
SETUP
To enter the Password Locks Menu press
SETUP
then [
4]
.
[1]
Change Password – Used to change the password. Pressing
[1]
brings up a text entry screen. Use the
ALPHA
key and the
keypad to input any password. Passwords are case sensitive,
so pay attention to upper and lower case characters.
[2]
Status – Pressing the
[2]
key changes the status from
“LOCKED” to “UNLOCKED” to “LOCK ON PWR”. The
“LOCK ON PWR” mode leaves the 9750A unlocked until the
power has been cycled. This allows the primary operator to
complete all setups without having to enter the password over
and over. When completely fi nished with setups, cycle the
power and then the lock will be in effect.
Do not forget your password. The only way to unlock a
locked system without the proper password is to do a
complete reset (RESET ALL), which will cause you to lose
all setups. Make a note of it in a secure location.
[3]
Lock Mode – Press the
[3]
key to select features and functions
for password protection. There are 3 submenu select screens. Use
the
[7]
key to scroll through all lockable items. Press the number
key beside each item to select it for locking. For example, to
lock out the Setup key press
[3]
. The arrow will appear indicat-
ing the Setup Key will lock. After selecting all the lock items,
press
SETUP
to return to the “PASSWORD LOCKS” menu.
Tip: Use “Lock All” to lock every lockable feature. Then unlock any features you wish to remain
operational. Remember to look at all three screens using the 7 key. The CLR key will unlock all
functions while in the Lock Mode menu.
If you forgot your password
MSI provides a master unlock that will erase all operator setups and
require you to completely start from scratch. This procedure will not
erase calibration, which is stored in the CellScale, not the 9750A.
However, all display modes, text strings, system settings, etc., stored
in the 9750A, will be lost.
!
[3]
Date Mode – Pressing
[3]
changes the date mode from MM/DD/YY to DD-MM-YY.
[4]
Time Mode – Press
[4]
to change between 24 hour time or 12 hour time with AM/PM indication.
[5]
Daylite (sic) Saving – Press
[5]
to select the Daylight Saving mode. Select “ON” when in Daylight Savings
Time (adds 1 hour). Select “OFF” when not in Daylight Savings time. Select “AUTO” to allow the 9750A
to automatically enter into and out of daylight savings time (follows US rules). Set the daylight saving
mode before setting the date and time.