Windshield shroud, Ab c d – SoundOff Signal Predator2 WS Light Suction Cup Mount User Manual
Page 2
WARNING
: Warning devices are strictly
regulated and governed by Federal, State and
Municipal ordinances. These devices shall be
used ONLY on approved vehicles. It is the sole
responsibility of the user of these devices to
ensure compliance.
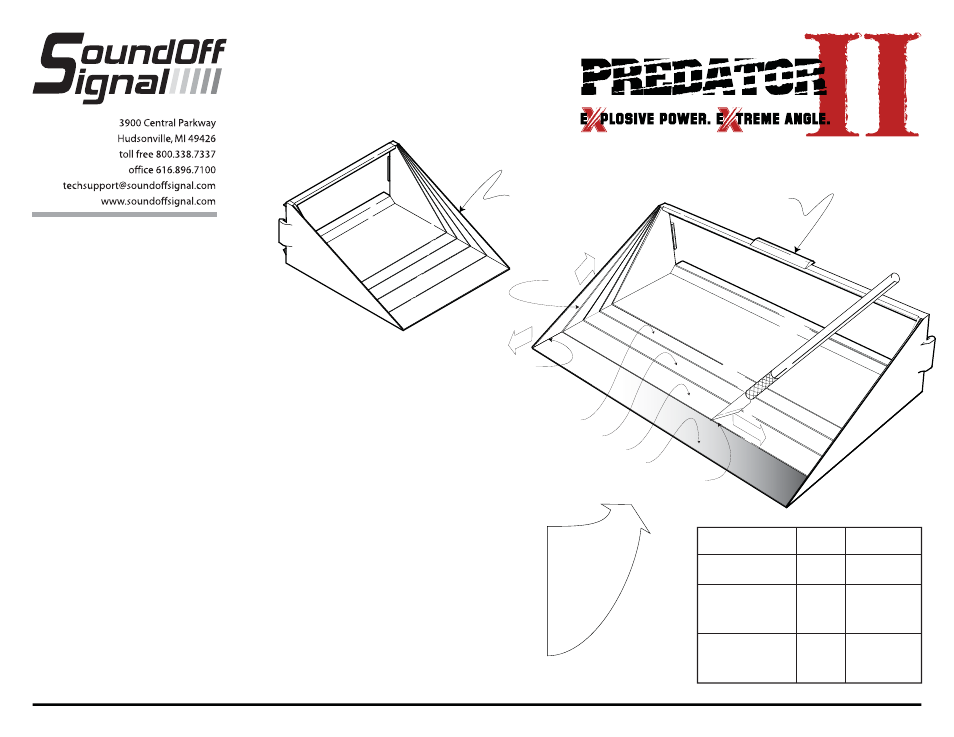
SHROUD SECTION REMOVAL
Tools Required: Sharp knife.
Procedure
Note: It is strongly recommended that only
one section at a time is removed and unit is
tested for fit in the mount position against the
windshield.
1. Place shroud on firm surface (work bench or
similar) and, using a sharp knife, score along
bottom guide crease. The score should be
about 1/2 the thickness of the plastic and
can be made easily with several light passes
of the knife. DO NOT ATTEMPT TO CUT
ENTIRELY THROUGH THE SHROUD.
2. Score from the first guide crease forward (to
front of shroud) along both side walls.
3. Flex bottom piece of section "A" until it
breaks free. Always remove bottom,
rectangular section before removing the side
triangles.
4. Score along both side guide creases.
5. Flex each side piece until it breaks free.
6. Check shroud for correct position and repeat
steps 1-5 as necessary until correct fit is
achieved.
Vehicle
Windshield Shroud sections
Model (2002-03)
Angle
to be removed
CHRYSLER
Intrepid
25
o
NONE
FORD
Crown
Victoria 35
o
A and B
Explorer
30
o
A
Expedition
35
o
A and B
GENERAL MOTORS
Camaro
25
o
NONE
Impala
28
o
A
Tahoe
40
o
A, B, and C
Single Shield
WINDSHIELD SHROUD
MOUNTING INSTRUCTIONS
Single (PPRDWSSWS), Dual (PPRDWSDWS)
EP2xWS+(x) 4.08
4
MOUNTING SHROUD
1. Align shroud so that it is square to front face of the
PREDATOR II Light.
2. Push shroud onto PREDATOR II Light. The side
mounting tabs will snap lock it onto the light. See figure 1
Note: The dual shroud has a support tab on the top
and bottom that need to be on the outside of the
PREDATOR II Light housing when shroud is snapped in place.
REMOVING SHROUD
1. Place your thumb on the inside of one of the
sidewalls of the shroud near the mounting clip.
2. Gently push out on the side wall and then
pull back. Mounting clip should disengage
3. Repeat steps #1 and #2 for other side.
ADJUSTING ANGLE OF SHROUD
The shroud comes with built-in guide lines that are used
to adjust the angle to better fit the windshield. See figure 1.
The shroud is produced with a 25o windshield angle - removal
of each section allows 5o adjustment to windshield angle.
ADJUSTING SHROUD
See Chart A for a list of vehicles commonly used by
emergency personnel and the recommended number of
shroud sections that need to be removed for proper fit.
For vehicles not listed, hold the PREDATOR II (with shroud
installed) against the windshield near the final mount position. If
the unit is not level, the angle must be adjusted by removing a
section of the shroud. This must be done one shroud
section at a time and unit then retested for fit.
2
A
B
C
D
1
4
Dual Shield