SoundOff Signal EPL7100 User Manual
Epl7100 mini lightbar permanent mount
1.800.338.7337 / www.soundoffsignal.com
IMPORTANT INFORMATION:
Warning devices are strictly regulated and governed by Federal, State and Municipal ordinances. These devices shall be used ONLY on approved vehicles. It is the sole responsibility of the user of these devices to ensure compliance.
To review our Limited Warranty Statement & Return Policy for this or any SoundOff Signal product, visit our website at
www.soundoffsignal.com/sales-support.
If you have questions regarding this product, contact
Technical Services, Monday - Friday, 8 a.m. to 5 p.m. at 1.800338.7337 (press #4 to skip the automated message).
Questions or comments that do not require immediate attention may be emailed to
SUPERIOR CUSTOMER RELATIONSHIPS. SMARTLY DESIGNED LIGHTING & ELECTRONIC SOLUTIONS.
Please see reverse for
Technical Specifications
• Warning devices are strictly regulated and governed by Federal, State and Municipal ordinances.
These devices shall be used ONLY on approved vehicles. It is the sole responsibility of the user of these
devices to ensure compliance.
• DO NOT install this product or route any wires in the Air Bag Deployment Zone. Refer to your vehicle
Owner’s Manual for the location of any air bag deployment zones.
• DO NOT connect this device to a strobe power supply. This product is self-contained and does not
require an external power supply.
EPL71PD(xx) 11.14
Important Information:
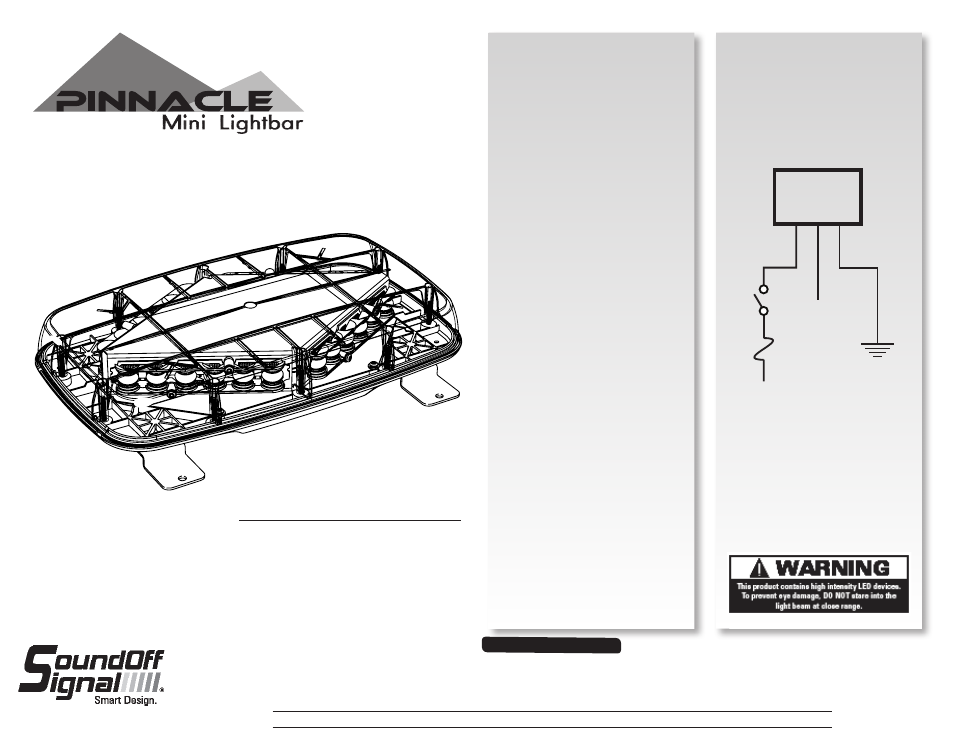
ELECTRICAL CONNECTION:
Follow diagram below for electrical
connections:
RED WIRE: Connect through a switch
and fuse to 10-16Vdc.
BLACK WIRE: Connect to a good reliable
ground (-).
PATTERN CHANGE:
Connect BLACK WIRE to ground. Touch
the WHITE WIRE to 10-16Vdc and hold
for 1-2 seconds. The mini lightbar will
advance one flash pattern and flash the
new pattern each time this is done.
INSTALLATION:
1) Determine a clean, flat location
(typically roof) on the vehicle to
mount the PINNACLE Mini Lightbar.
The PINNACLE Mini Lightbar comes
with two (2) steel brackets which
should be used to permanently
mount the light bar to a vehicle roof
or similar horizontal surface.
2) Position the bar with brackets
attached and mark hole centers.
Center punch or drill pilot holes for
a 1/4” sheet metal screw (customer
supplied).
3) Place a locking washer over the
screw and securely fasten the
brackets to the mounting surface.
The screws and holes should
be calked with a silicone based
material to prevent leakage.
DO NOT
OVERTIGHTEN!
4) Make electrical connections.
Caution: Do not install this product
or route any wires in the air bag
deployment zone. Refer to your vehicle
Owner’s Manual for the location of any
air bag deployment zones.
RED
BLACK
WHITE
5 AMP FUSE
+12 Vdc
PINNACLE
LIGHTBAR
EPL7100 MINI LIGHTBAR
PERMANENT MOUNT
EPL71PD(xx) Low Bracket (shown)