Prescolite SLLED1 User Manual
Instruction sheet
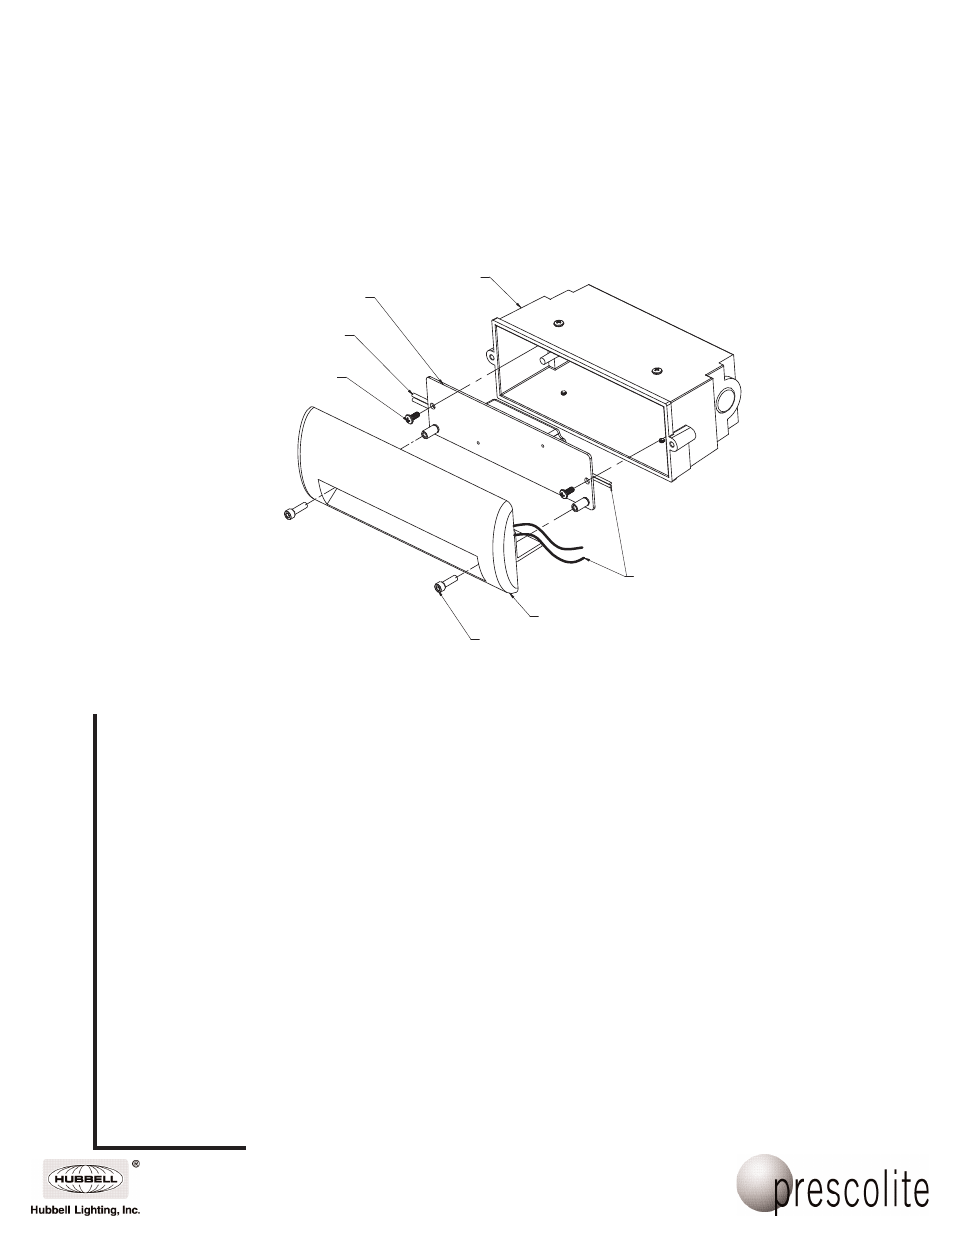
CONNECT SAME COLOR WIRES
WITH UL APPROVED WIRE NUTS.
BLACK AND WHITE WIRE
TO BE CONNECTED TO
SUPPLY.
HOUSING
DRIVER ASSEMBLY
(2) 10-32 TAMPER RESISTANT
SOCKET HEAD CAP SCREWS
FACE PLATE ASSEMBLY
(2) 8-32 PAN HEAD
SCREW PROVIDED
Instruction
Sheet
www
.prescolite.com
•
Prescolite T
ollFree T
echnical
Support
1.888.PRS.4TEC
• Hours: 8am - 5pm ET
701 Millennium Blvd., • Greenville, SC 29607
With representatives offices in principal cities throughout North America.
Copyright 2008, 9/12 revision, All Rights Reserved - Printed in U.S.A.
Part No. . . . . . . . . . . . . . . . . . . . . . . . . . . . . . . . .93017296
Instruction
Sheet
INSTALLATION INSTRUCTIONS
RECESSED LED AISLE LIGHT SLLED1
1. Remove face plate assembly by removing 10-32 tamper resistant screws and place in bag enclosed to protect optics.
2. Remove wire nuts connecting the face plate assembly to the integral drive plate.
3. Remove the 8-32 screws securing the driver plate to the housing and remove the driver plate and place in bag enclosed to
protect optics.
4. Secure the housing appropriately.
a. For concrete pour and masonry construction refer to Figure 2 and 3.
b. For drywall construction refer to Figure 4, 5, and 6.
5. Connect the black fixture wire from the driver plate to the black supply wire.
6. Connect the white fixture wire from the driver plate to the white supply wire.
7. Secure the drive plate using the 8-32 screws provided. Ensurng that supply wires stay behind driver plate.
8. Connect the black wire from the driver plate to the black wire of the face plate assembly using wire nut provided.
9. Connect the red wire from the driver plate to the red wire of the face plate assembly using the wire nut provided.
10. Secure the face plate assembly using the 10-32 tamper resistant screws provided.
WARNING:
1. DO NOT pinch wires between internal driver plate and housing. Consult a Qualified Electrician for all other options
that require other wiring configurations.
WARNING:
2. This Product contains chemicals known to the State of California to cause cancer, birth defects and/or other repro-
ductive harm. Thoroughly wash hands after installing, handling, cleaning, or otherwise touching this product.
IMPORTANT SAFETY INFORMATION. READ AND FOLLOW ALL SAFETY INSTRUCTIONS. Follow label information
and instructions concerning Wet or Damp Locations, installation near combustible materials, insulation, building materials,
and proper lamping. Do not install in areas subject to combustible vapors or gases. Before wiring to power supply and
during servicing or relamping, turn off power at fuse or circuit breaker. All servicing or relamping must be performed by
qualified service personnel. Product must be grounded to avoid potential electric shock or other potential hazard.
Product must be mounted in locations and at heights and in a manner consistent with its intended use, and in
compliance with the National Electrical Code and local codes. The use of accessory equipment not recommended by
the manufacturer or installed contrary to instructions may cause an unsafe condition. Do not block light emanating from
product in whole or part, as this may cause an unsafe condition. Do not allow items such as drapes, curtains, screens or
the like to come into contact with the product or to block light from the product, as this may cause an unsafe condition.
FIG. 1