Prescolite MC10LED CYLINDER - PENDANT MOUNT User Manual
W.p resco lit e .c o m
Part No...........................................
With representatives offices in principal cities throughout North America.
Copyright , revision, All Rights Reserved - Printed in U.S.A.
701 Millennium Blvd • Greenville, SC 29607
w
w
w
.p
resco
lit
e
.c
o
m
y
Pr
escolite T
o
ll F
ree T
e
chnical Support
1
.8
8
8
.P
R
S
.4
T
E
C
y
H
ours: 8am
- 5pm
ET
IMPORTANT SAFETY INFORMATION. READ AND FOLLOW ALL SAFETY INSTRUCTIONS. Follow label information
and instructions concerning Wet or Damp Locations, installation near combustible materials, insulation, building materials,
and proper lamping. Do not install in areas subject to combustible vapors or gases. Before wiring to power supply and
during servicing or relamping, turn off power at fuse or circuit breaker. All servicing or relamping must be performed by
qualified service personnel. Product must be grounded to avoid potential electric shock or other potential hazard.
Product must be mounted in locations and at heights and in a manner consistent with its intended use, and in
compliance with the National Electrical Code and local codes. The use of accessory equipment not recommended by
the manufacturer or installed contrary to instructions may cause an unsafe condition. Do not block light emanating from
product in whole or part, as this may cause an unsafe condition. Do not allow items such as drapes, curtains, screens or
the like to come into contact with the product or to block light from the product, as this may cause an unsafe condition.
93053634
2014
02/24/14
WARNING – This product contains chemicals known to the State of California to cause cancer, birth defects and/or other
reproductive harm. Thoroughly wash your hands after installing, handling, cleaning, or otherwise touching this product.
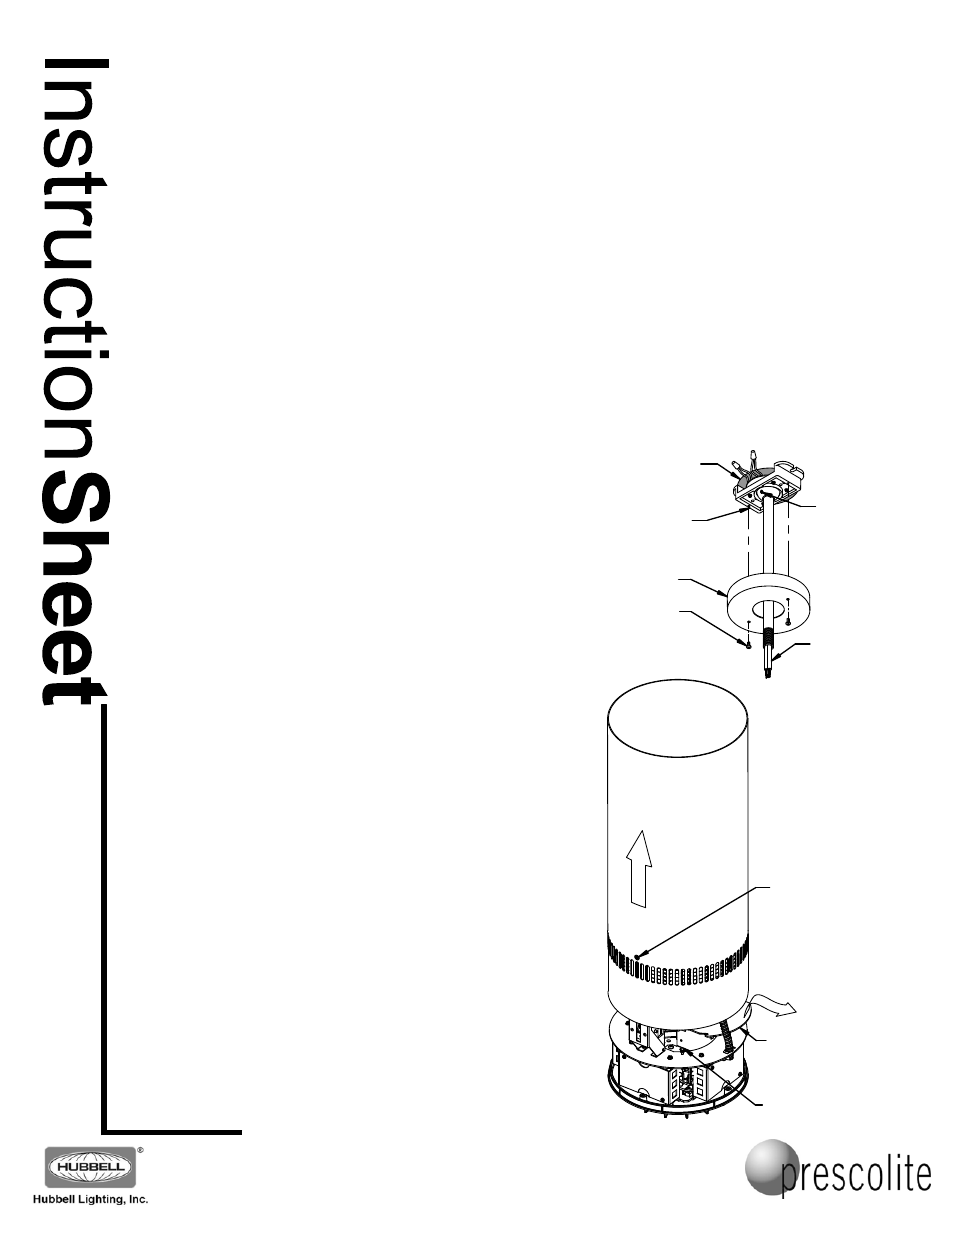
Fig. 1
OUTLET BOX
OPENING
PENDANT
MOUNT
ASSEMBLY
SUPPLIED
WIRING
Fig. 2
PHILLIPS
SCREW
(1 OF 2)
CANOPY
THUMBSCREW
(1 OF 2)
WIRING
COMPARTMENT
COVER
SLIDE
HOUSING
OPEN
INSTALLATION INSTRUCTIONS
MC10LED CYLINDER - PENDANT MOUNT
CAUTION: TO REDUCE THE RISK OF ELECTRICAL SHOCK, MAKE CERTAIN THAT THE
POWER SUPPLY IS TURNED OFF BEFORE INSTALLING OR SERVICING THIS PRODUCT!
NOTE: Maintain free airflow through the fixture to
avoid overheating.
PENDANT MOUNT
1. Unpack the pendant mount from its packing carton, and
remove the canopy by removing the two screws holding it
to the pendant mount assembly. Insert the power wiring
(and control wiring, if needed) through the pendant tube
as shown. Make sure the pendant is completely threaded
into the ball, and the set screw is tightened so the
pendant cannot unscrew. Make the ground connection to
the ground screw on the pendant mount assembly, and
secure the assembly to a properly installed 3-1/2"or 4"
octagonal box (by others) designed to support the weight
of the fixture (Fig. 1). NOTE: The end slots in the casting
are provided for additional structural mounting security.
Additional bolts attached to the building structure through
these slots are recommended for applications where
vibration may be encountered.
2. Make the electrical connections in the outlet box. Connect
the supply lead wires to the fixture lead wires in the
pendant mount assembly using properly sized UL listed
wire connectors. Connect the line voltage to the black
wire, the neutral to the white wire, and make any control
connections to the proper control wires. Place the wiring
and connections into the junction box.
3. Carefully stand the cylinder on its top (the finned, cast
end). Loosen (do not remove) the two Phillips screws on
opposite sides of the cylinder (near the vent slots) until
the screws disengage from the internal locking slots and
the cylinder housing is free to slide. Slide the outer
cylinder housing open towards the reflector (it should
move about 7 inches from the top finned casting) and
tighten the two Phillips screws until the cylinder housing
maintains its open position (Fig. 2).
4. Loosen the two thumbscrews holding the wiring
compartment cover closed, rotate and lift the cover free,
and carefully slide it out of the way (there is a safety
cable to hold it while the wiring is being completed).
CANOPY
SCREW
SET
SCREW