A313, Assembly & installation instructions – Hubbardton Forge 137725 User Manual
Page 3
Assembly & Installation Instructions
A313
Erlenmeyer Pendant 137725
Page 3 of 4
Hand-Forged, Vermont-Made Lighting and Accessories
154 Route 30 South, Castleton, Vermont 05735
27331
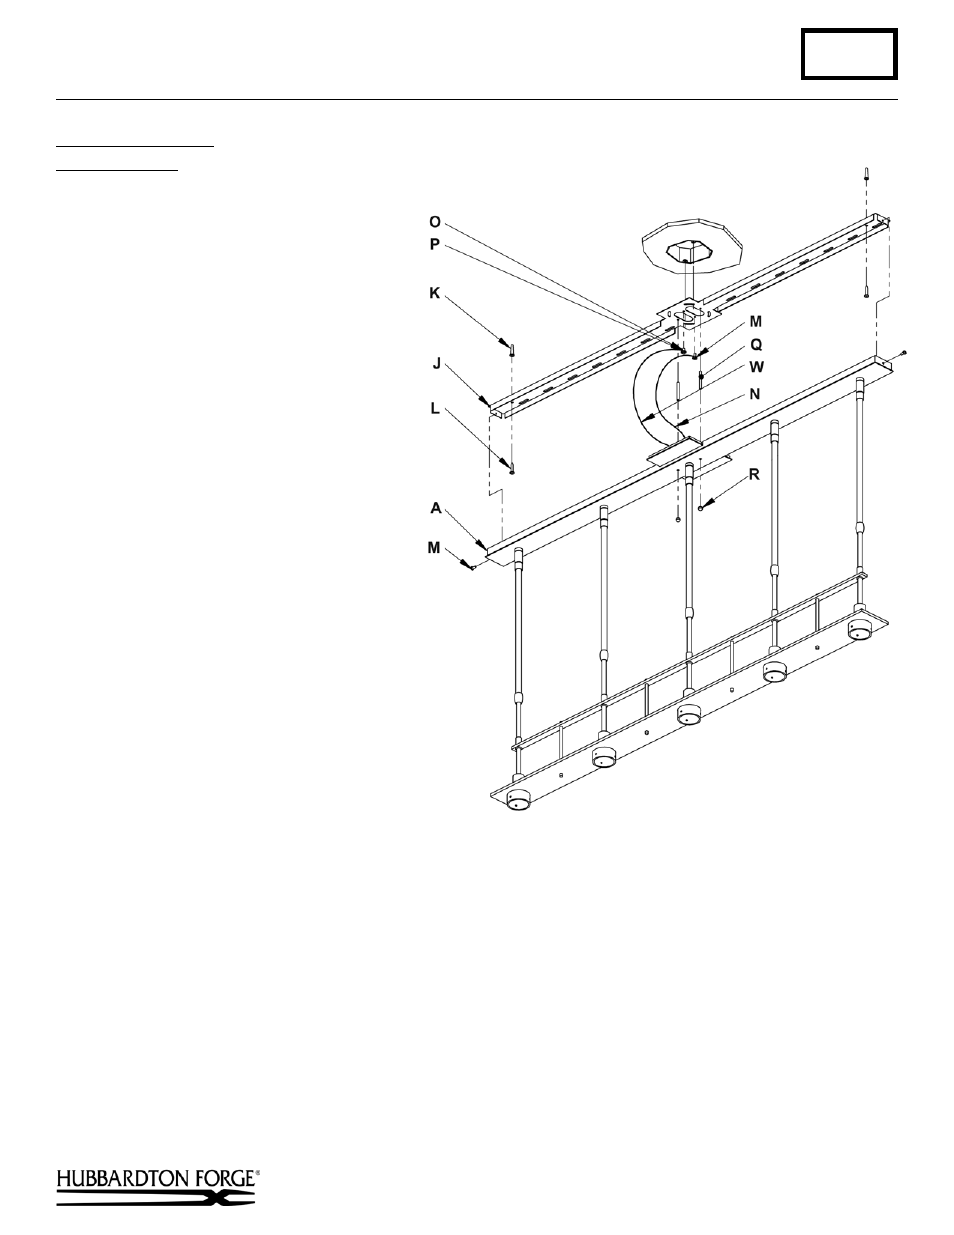
To Install to Ceiling
(Figures 5 & 6)
Component Parts
A Canopy
J
Mounting Bracket
K Anchor (2)
L
#10 Screw
M #8 Screw (3)
N Support Cable
O Cupped Washer
P Ground Screw
Q Threaded Stud
R Knurled Ball (2)
S Wire Connectors (2)
W Fixture Ground Wire
1. Thread studs (Q) through appropriate holes
in mounting bracket (J) to match holes in
canopy (A).
2. Position the mounting bracket (J) over the
electrical box aligning ovals in bracket with
mounting holes in electrical box. Orient
fixture to desired hanging position and mark
the location of both anchors (K) on the
ceiling. Set the mounting bracket aside.
3. Drill 1/8” holes in the location marked on
the ceiling. Place the tapered ends of both
anchors (2) into the holes and gently tap
flush with a hammer.
4. Place mounting bracket (J) over electrical
box. Using two machine screws (not
provided) fasten the mounting bracket (J) to
the electric box. Thread the #10 screws (L)
through the bracket and into the anchors to
secure the bracket to the ceiling. Be careful
not to over tighten or strip the anchors.
Note: A new electric box comes with screws. When replacing an existing fixture, retain screws for use with the new
fixture.
5. Using the two wire connectors (S) provided, connect four black fixture wires to one connector and four white fixture
wires to the other connector.
Wires should be stripped 3/8” maximum
. In the remaining connection of the wire
connectors (S) run a black pig tail lead and a white pig tail lead to the junction box. (Figure 6)
6. Check that fixture wires, ground wire (W), and cable (N) are routed up through the center hole in the square section of
the canopy.
7.
Raise fixture close to ceiling. Attach support cable (N) to mounting bracket using a #8 screw. Temporarily suspend
fixture using cable.
Caution:
The cable is intended to temporarily suspend fixture while wiring connections are completed. Never
depend on them to support fixtures with glass installed.
(continued)
(Figure 5)