Hubbardton Forge 137545 User Manual
A120, Assembly & installation instructions
Assembly & Installation Instructions
A120
For Exos Wave Five-Light Pendant 13-7545
Page 1 of 3
Hand-Forged,
Vermont-Made Lighting and Accessories
P.O. Box 827, 154 Route 30 South, Castleton, Vermont 05735
19890 Rev A
Caution: Do not exceed maximum wattage noted on fixture. Use only recommended bulbs with fixture.
CAUTION: FAILURE TO INSTALL THIS FIXTURE PROPERLY MAY RESULT IN SERIOUS PERSONAL
INJURY OR DEATH AND PROPERTY DAMAGE. We recommend installation by a licensed electrician.
This product must be installed in accordance with applicable installation code(s), by a person familiar with the
construction and operation of the product and the hazards involved.*
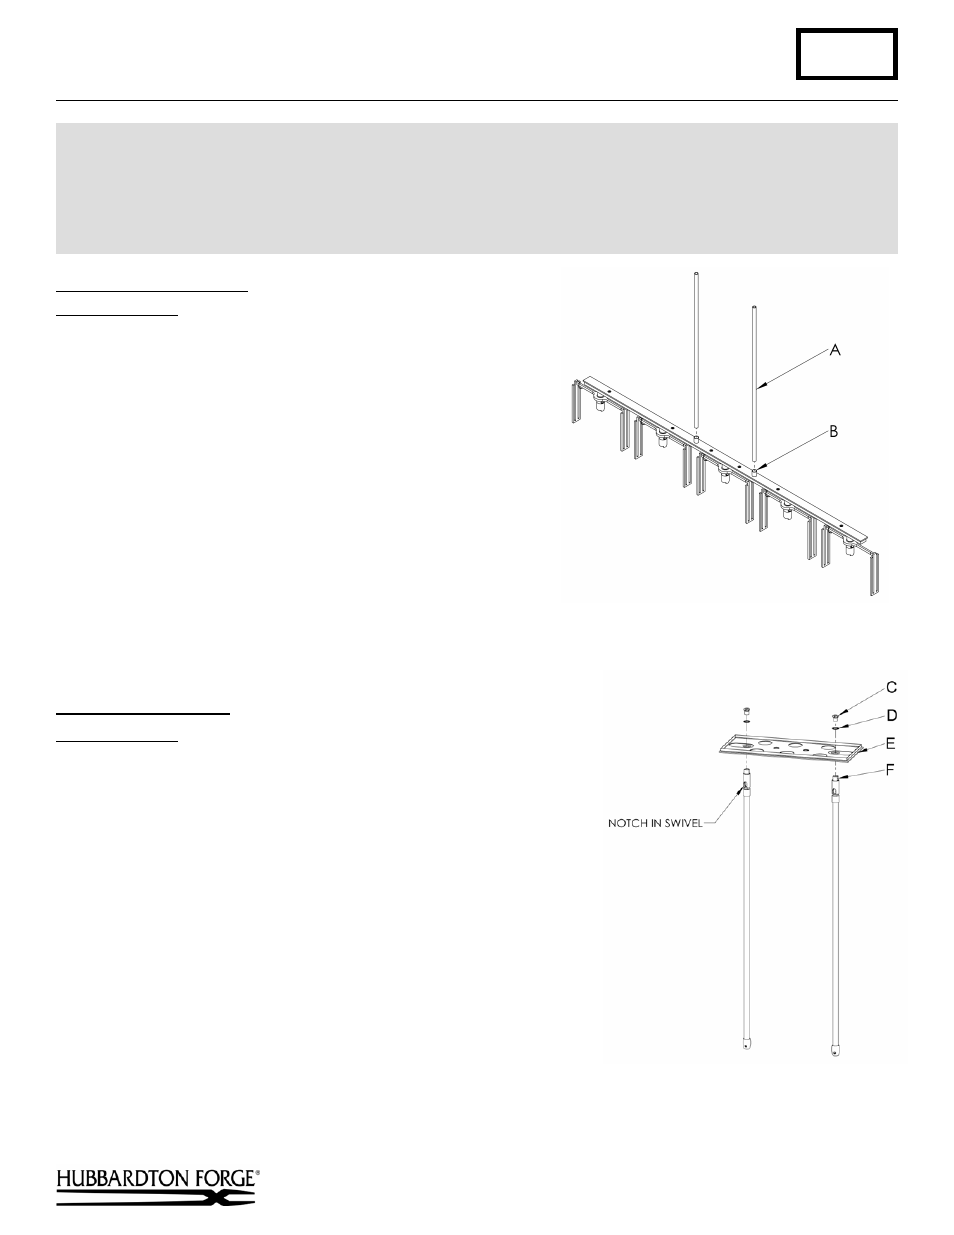
To Attach Fixture Pipes
(Figure 1)
Component Parts
A Fixture
Pipe
B Fixture
Coupling
1. Carefully unpack the fixture from the carton.
2. Carefully thread fixture pipe (A), threaded end first, over
fixture wires.
3. Apply a drop of the supplied thread locking compound to the
internal threads at the top of the fixture (B) and screw stem
into fixture, being careful not to twist the wires.
Note: Application of the thread locking compound is necessary
to prevent the stem from loosening during regular maintenance
and cleaning of the fixture. Be certain to apply the compound.
4. See instructions below to complete the installation.
To Assemble Canopy
(Figure 2)
Component Parts
C Hex Nipple (2)
D Lock
Washer
(2)
E Canopy
F Swivel
(2)
1. Insert threaded end of hex nipple (C) down through lock washer (D),
canopy (E) and into swivel (F).
2. Tighten securely being sure the notches in the swivels are aligned.
Note: If installing on a sloped ceiling, make certain that the notches
in the swivel portion of the stems are oriented toward the lower side
of the slope.
(Figure 1)
(Figure 2)
(continued)