JKS OGS166 User Manual
Page 6
JKSOGS166
JKS Front Trackbar + Sector Shaft Reinforcement Installation
6 Page
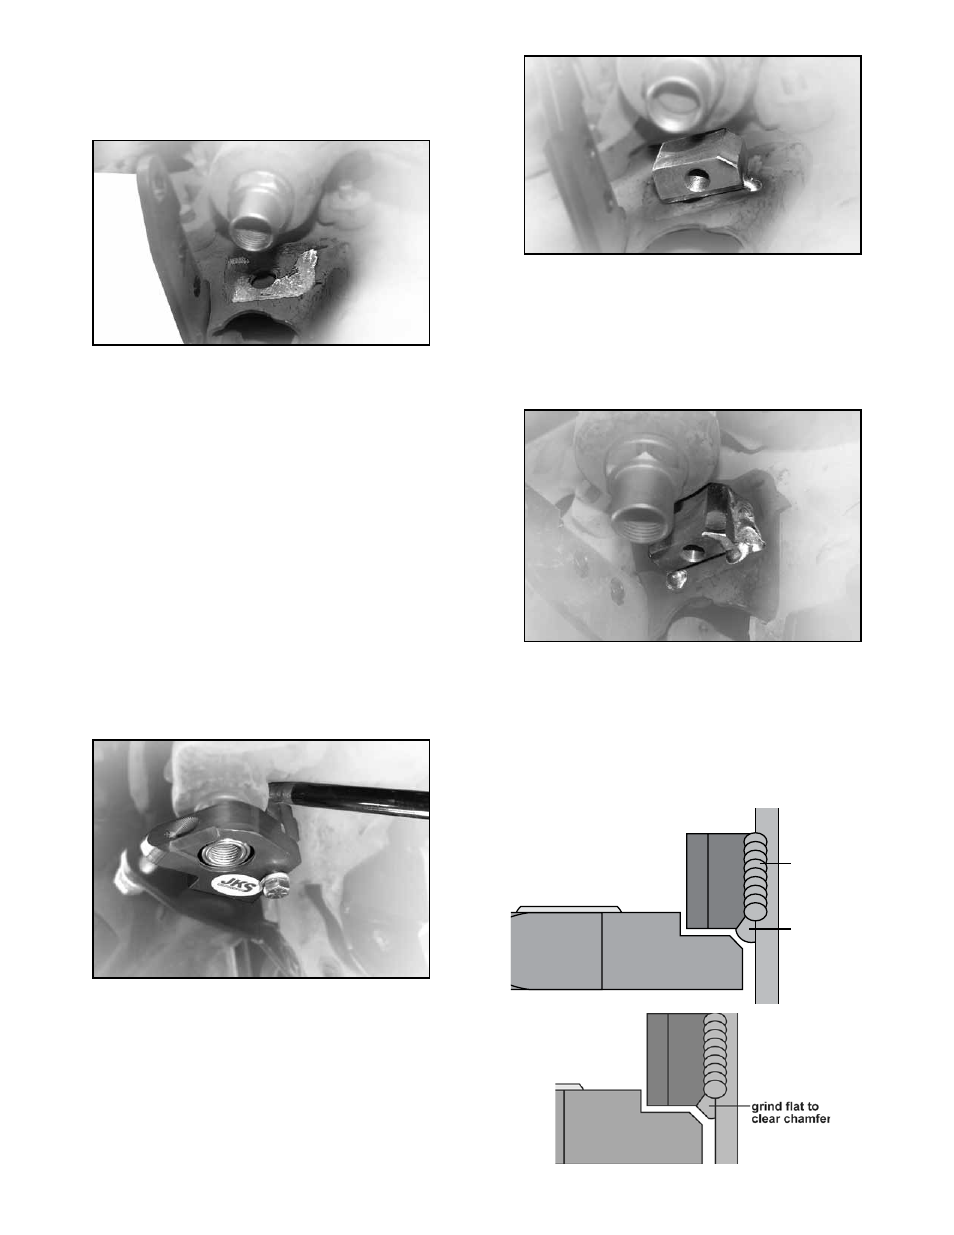
Remove paint from area on chassis where edges
of Pillow Block Frame Mount (I) are marked.
HINT:
If you cannot reach the area with a sanding tool, a
piece of emory cloth or sandpaper may be useful.
With bare metal exposed on chassis, the Steer-
ing Sector Pillow Block (E) must be re-installed so
that the Pillow Block Frame Mount (I) can be tack
welded in place. Slide the Pillow Block assembly
back onto the Sector Bearing Nut (G) and re-insert
the two 3/8” Bolts (L) and 1/2” Bolt (U) to hold the
Pillow Block in position.
Re-adjust the Steering Sector Pillow Block (E) until
level side-to-side and square to Trackbar Chassis
Bracket (A) as before.
Once the Pillow Block is properly positioned, add
tension to the two 3/8” Bolts (L) and 1/2” Bolt (U)
until snug to prevent the Pillow Block from acci-
dentally moving.
With mounting bolts snug, make sure the Pillow
Block Frame Mount (I) is square to Pillow Block
and positioned as close to chassis as possible.
Remember, a small gap between the weld-on
mount and chassis is normal and acceptable.
While holding the Frame Mount (I) in place, care-
fully tack weld both sides of the weld-on mount
directly to the chassis.
HINT: It may be helpful to
apply slight pressure from above using a pry bar to
ensure Frame Mount remains flush against Pillow
Block.
Once the Frame Mount (I) is securely tacked in the
desired position, remove the two 3/8” Bolts and
1/2” Bolt and slide the Sector Shaft Pillow Block off
of the Sector Bearing Nut.
Make sure you can access both sides of Frame
Mount (I) with welder. If necessary, the Trackbar
Chassis Bracket (A), Sector Bearing Nut (G) and/or
pitman arm can be temporarily removed for better
accessibility.
Completely weld both sides of Pillow Block Frame
Mount (I) to chassis.
Bottom of Frame Mount may also be welded to
chassis as long as bead does not interfere with
re-installation of Pillow Block.
HINT: Edges of
weld-on mount and Pillow Block are chamfered
to provide clearance for small weld bead. If weld
bead interferes with re-installation of Pillow Block,
you must remove any protrusions using a grinding
wheel for proper fitment.
horizontal
weld (bottom)
vertical
weld (side)
chassis