Setra System Model 869 User Manual
Page 20
20
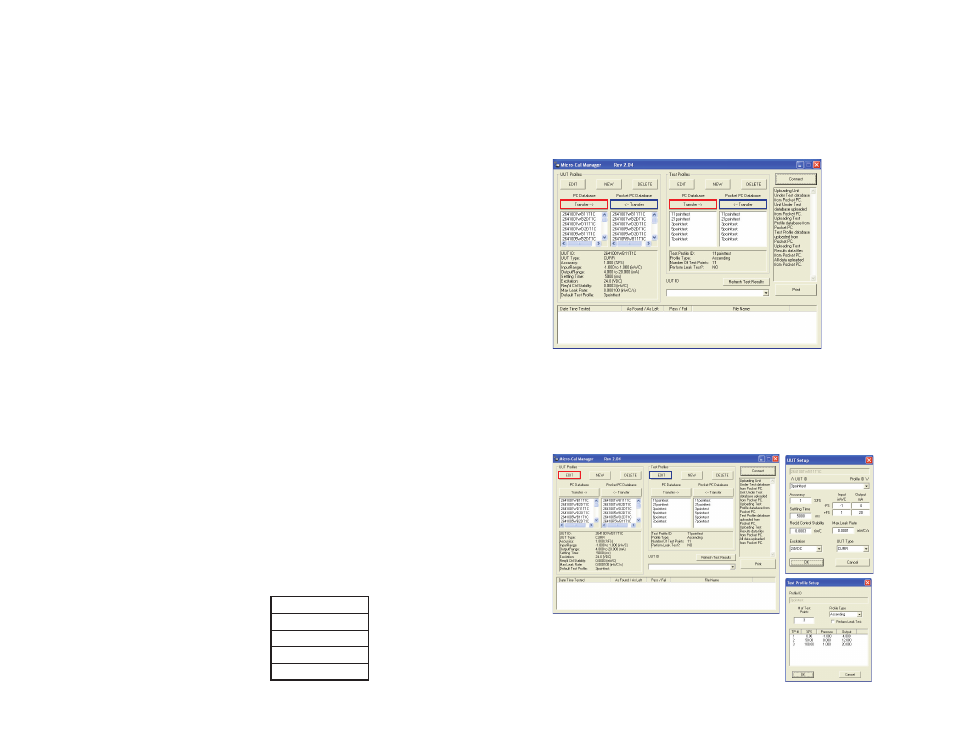
6.5 UUT (UNIT UNDER TEST) SETUP: General
Screen Instructions (Diagram 13):
UUT setup screeen is used for inputting UUT profiles into the UUT
database. The calibrator is supplied with many default instrument
templates which may be copied, modified and saved as new UUT.
1. Select an Existing Profile - Go to the UUT ID drop down
box, click the down arrow and select your unit from the list.
2. Create a New Profile - Tap NEW button at bottom of page, a dialog box
will appear prompting user to enter new UUT ID. Enter new ID in the
box and select UUT to copy if desired from drop down list below.
Press OK to create the new profile or CANCEL to cancel action.
Note: If you don’t want to copy an existing UUT you may select
DEFAULT from the drop down menu.
Note: To automatically setup a UUT using Setra’s configurable part
number, simply enter the Setra part number as the new ID, then press “OK”.
If the number entered is a valid configurable number, the UUT will be
automatically setup.
3. Enter the UUT’s Serial Number in the field provided.
4. In the Accuracy field, enter the pass/fail accuracy for the UUT.
5. In the ReCal Accuracy field, enter an accuracy (less than the one
entered in the Accuracy field) at which you would like the calibrator to
ReCal the transducer in spite of a passing result.
Note: Only used with Setra 269 and RPM. This feature is for automated
calibrations, is optional and can be useful for transducers that have drifted, but
are not yet failing, by avoiding a failing result at the next calibration.
6. Enter the transducer’s lowest and highest pressure in the LO and HI
boxes in the Input column.
7. Enter the transducers corresponding lowest and highest output in
the LO and HI boxes in the Output column.
8. Select DEFAULT TEST PROFILE (some default profiles are already
listed) select which one you want or create a new one (save UUT, go to
PROFILE page and create NEW, return to UUT and select newly
created profile for default profile and press SAVE).
9. Select Excitation Level from drop down list.
10. Select UUT Type from drop down list, Select one:
3 WIRE (VOLAGE)
4 WIRE (VOLTAGE)
CURRENT ( 4 - 20 mA)
PRESS SWITCH
DIAL GAGE
37
Transfer Buttons (‡ & fl) - These buttons will copy a selected profile
from the database it currently exists within, to the other remaining data-
base. I.E., if a profile is selected in the PC database, and Transfer ‡ but-
ton is pressed, the profile will now be copied to the Pocket PC database.
1. When transfering profiles, if a profile of the same ID exists in the ‘Copy
To’ database, the profile will be overwritten on the ‘Copy To’ database.
(See Diagram 30)
Diagram 30
Edit Button - This button opens a dialog box containing the informa-
tion for the selected file. At this point, the data may be manipulated and
saved. ID cannot be changed with this function. To change ID, copy the
profile (See ‘New Button’ section, following), giving it a new ID, then delete
the old version. (See Diagram 31)
Diagram 31