Utilities, Comm port – Liquid Controls WinHost Operation User Manual
Page 10
10
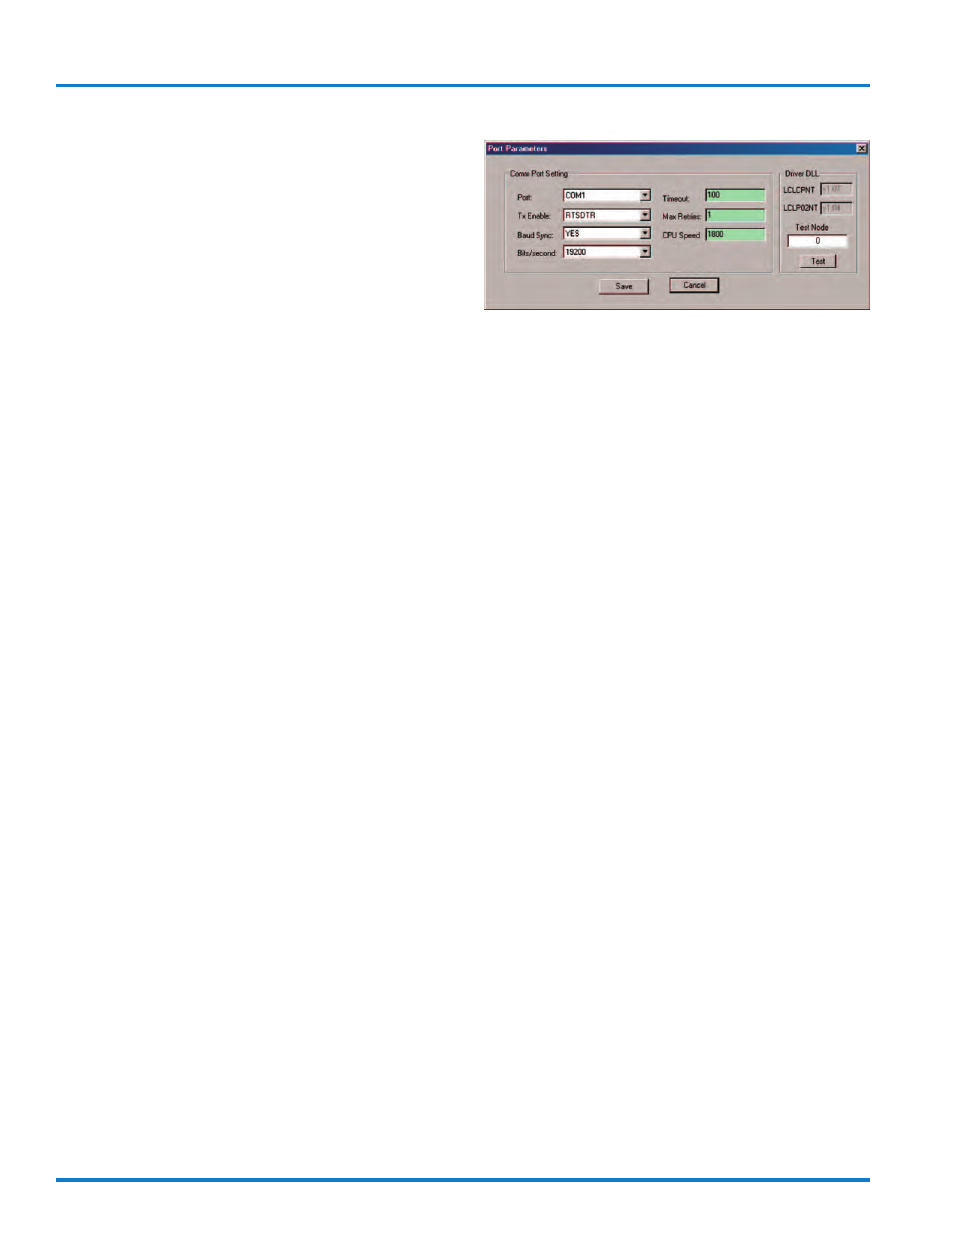
Port Parameters
Prior to connecting to a LectroCount electronic register,
the communication port must be configured.
Select Comm Port from the Utilities drop-down menu.
This opens the Port Parameters configuration window
shown to the right.
Port:
Select the communication port from which the laptop
computer will be communicating. The options for this
setting are COM1 through COM8.
Tx Enable:
Tx Enable Bit” is the Transmit Enable Bit for the laptop
computer being used. The “!” is to be interpreted as
“NOT” defining the option “!DTR” as “NOT DTR”. The
available optons are:
None
!RTS
RTS
!DTR
DTR
!RTS!DTR
RTSDTR
If there is a single register connected to the laptop, this
can be set to None. For a system with two or more reg-
isters, this needs to be set to RTSDTR.
Baud Sync:
The options for Baud Sync are Yes and No. When Yes
is selected, the program will search for the correct baud
rate with which to communicate. When No is selected,
the system will use the base rate set in the Bits/second
field. Select Yes from the List Box Window.
Bits/second:
Select the baud rate from the List Box Window at which
the laptop computer will communicate with the Lectro-
Count register. The options are:
2400
4800
9600
19200
57600
115200
Select a maximum baud rate of 19200 for systems with
a printer connected. Select a maximum of 57600 for
systems without a printer connected.
Utilities
Timeout:
This value represents the amount of time the program
will attempt to communicate with a LectroCount register
before returning a communication error. This value is
represented in milliseconds. A typical valve for this is
100.
Max Retries:
This value represents the number of times the program
will attempt to communicate with a LectroCount register
if the first attempt fails. A typical value for this is 1.
CPU Speed:
This value represents the processor speed of the laptop
computer. To find this value, right-click on the My Com-
puter desktop icon and select Properties from the menu.
The display should contain the CPU speed of the laptop
computer. This value is entered in megahertz (MHz).
The value entered in the example above is “1800” MHz
which is equivalent to 1.80 gigahertz (GHz).
Driver DLL
LCLCPNT and LCLCP02NT represent the version num-
bers of the dynamic library links. This information may
be useful when phoning the factory for assistance.
Test Node
This feature allows the user to test the setup to confirm
successful communication with the connected Lectro-
Count register. With the values entered in the fields for
Port Parameters, click on Save to write the values. En-
ter a numeric value in the Test Node field, such as 250,
and click on Test. If this is a new installation, the Lectro-
Count register is shipped from the factory with a node
address of 250. If the node address is not 250 and it is
known, enter the correct node address in this field and
click on Test. If the node address is not known, a search
will need to be performed for the node address. This
function is covered on Page 12.
If the node is correct and the parameter settings are cor-
rect, the program will return a message indicating that
the LectroCount with the entered node address has been
found.
Comm Port