Stainless steel strainer option – ClimaCool UGW Manual User Manual
Page 55
53
www.climacoolcorp.com
Stainless Steel Strainer Option
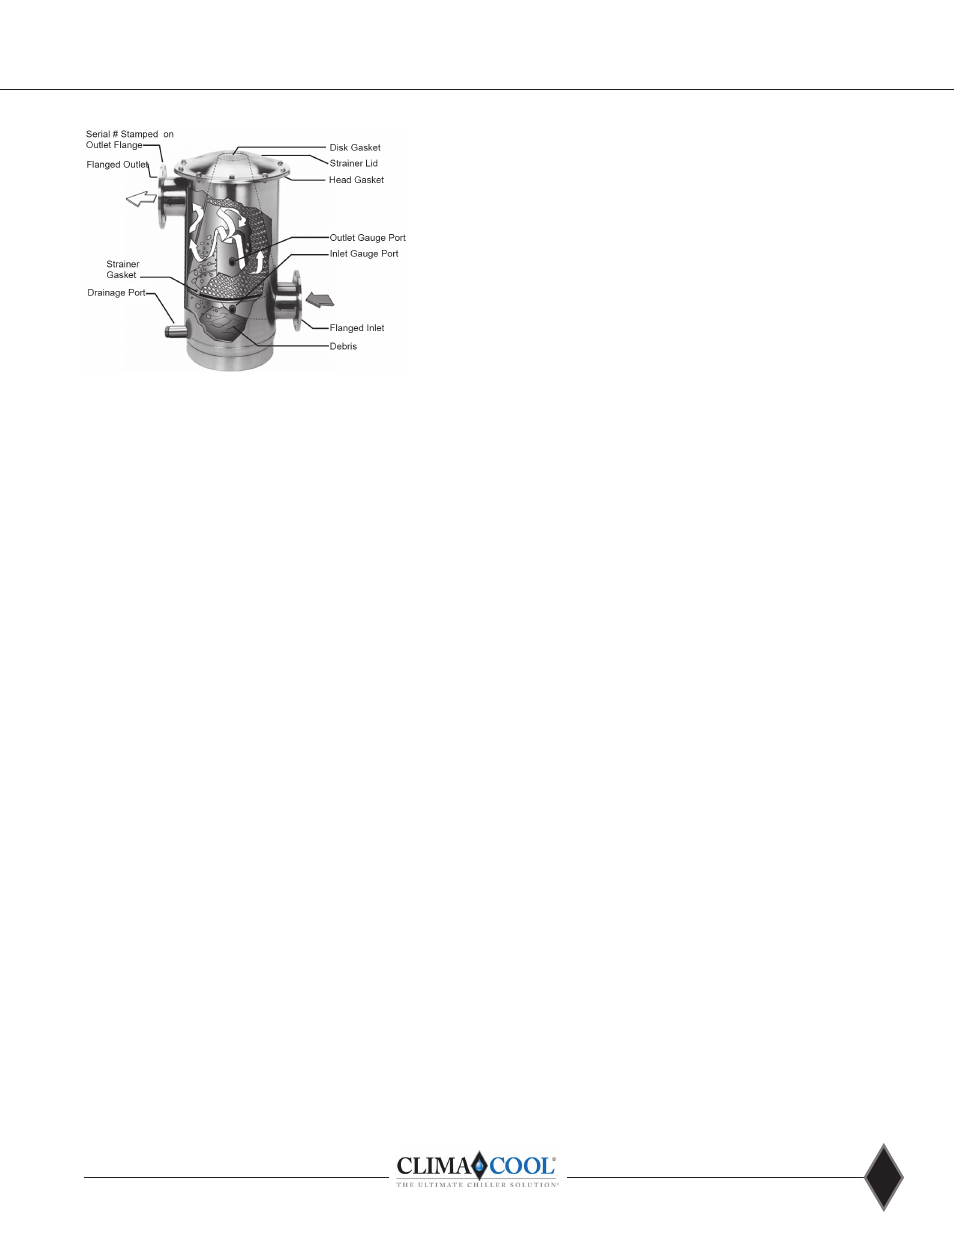
Figure 20 - Stainless Steel Strainer
Safety Considerations
Prior to installation, this manual must be read carefully
and all instruction understood . Personal injury or product
damage can occur if the following safety precautions are
overlooked or ignored . It is strongly recommended to follow
these safety precautions and avoid the potential hazards
listed below when operating and maintaining
your strainer:
1. After unpacking your strainer, carefully inspect your
strainer housing, lid assembly and screen for damaged
or missing parts . Contact ClimaCool’s customer service
department for any replacement parts .
2. The strainer should not be modified or used in a
manner not consistent with the manufacture’s
recommendations . If there are any questions regarding
its application or installations, contact ClimaCool’s
customer service department .
3. Absolutely under no conditions should the strainer
id or pressure gauges be removed while the strainer
is pressurized.
4. Standard bolted lid models should never exceed 150 psi;
V-Band clamp models should never exceed 125 psi .
5. Install back-flow prevention devices (or check valves)
both upstream and downstream of the strainer to
prevent back flow or vacuum effects which can cause
damage to the strainer housing or screen .
6. Install properly sized pressure relief valves both
upstream and downstream of the strainer . This will
help prevent damage to the strainer and screen in the
event that water flow is stopped abruptly, or if water
hammering occurs . The pressure relief valves should
be set to relieve pressure at 1 .2 times the strainer’s
maximum operating pressure (not to exceed the
maximum rated pressure) . Consult your local dealer or
pressure relief valve manufacturer to obtain properly
sized valves for your application .
Note: Minimum 60 mesh screen is required. At no time
should the internal pressure exceed the maximum rated
pressure of the strainer.
Strainer Installation Recommendations
The following the guidelines are recommended when
installing the strainer:
1. The CS strainer should be placed on a firm, supporting
surface . Failure to do so can cause stress on the weld
joints . It is recommended a concrete pad be poured
under the base of the strainer . The weight of the CS
strainer should not be supported by the main water
lines connecting it .
2. The inlet and outlet connections should be securely
fastened. The arrows depict flow direction (see
Figure 20) .
3. The back-mount pressure gauges should be installed
in the gauge ports located on the front of the strainer
body . These gauges will allow you to monitor the
pressure differential across the strainer screen providing
an indication when the strainer element is clogged and
requires cleaning .
4. The CS strainer lid must be securely fastened according
to the following torque specifications to ensure product
safety and an adequate seal .
Torque Specifications
Clamped Lid Models: CS strainer models 3CS and 4CS have
“over-center latch clamp” lid designs . The over-center
clamp does not require adjustment when installing or
removing the lid . The lock washer is set at the factory for
proper clamp compression and normally requires no field
adjustment . Minor tightening may be necessary over time .
The lids are installed as follows:
1. Place the clamp around the strainer lid .
2. Latch the T-bolt with the receiver and push the latch
handle towards the strainer body until the safety
catch engages .
Bolted Lid Models: CS strainer models 6CS, 8CS and 10CS
have “bolted” lid designs . Grade 5 zinc-plated bolts, nuts
and washers are used to attach the lids to these strainers .
See Table 2 for proper lid bolt size and torque rating for each
strainer (page 54). (Exercise care when tightening the lid
bolts so as not to damage the strainer lid or housing) .
It is important to follow the torque specifications as
over-tightening may result in premature failure of the bolts .
It is equally important to follow a star wheel torque pattern
when tightening the lid bolts (see Figure 21). The strainer lid
may not be seated down completely after the first torque
sequence . A second torque sequence should be adequate to
seat the lid securely to the body .