Inspections and maintenance, 1 list of inspections, Type of the inspection – GE Industrial Solutions GERAPID 2607, 4207, 6007, 8007 with arc chutes 1X2, 1X4, 2X2, 2X3, 2X4 User Manual
Page 38
38
Design and specifications are subject to change without notice
S47183e rev.03 2010-06-07
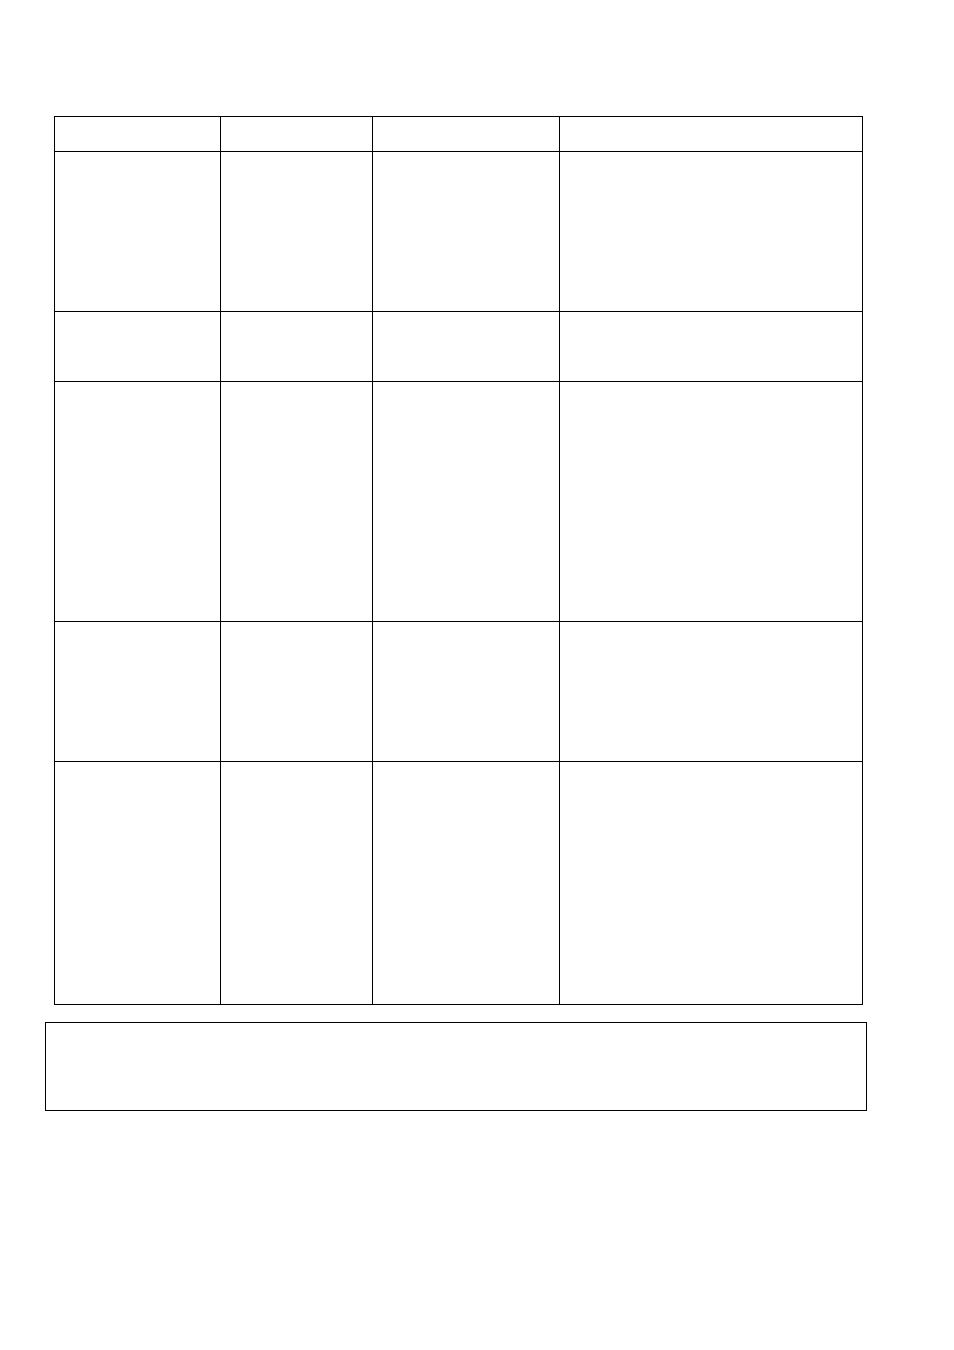
6. Inspections and maintenance
6.1 List of inspections
TYPE OF THE
INSPECTION
BY WHOM
HOW OFTEN
WHAT TO DO/CHECK
A. General visual
inspection
-Customer
-Trained technician
Every 6-12 months
•
Check for damages or cracks of the
frame, adapter or arc chute
•
Check for missing screws or caps
•
Check for damaged labels
•
Check for corrosion
•
Check for distinct manifestations of flame
or smoke at the frame
•
Clean the breaker from dirt and dust
•
Clean and degrease the copper terminals
B. General functional
inspection
-Customer
-Trained technician
Every 6-12 months
•
Manually close and open the breaker to
check the drive and mechanism
•
Close the breaker electrically and open by
trip unit(s) releasing, to check controls
C. Inspection of the arc
chute and contact
system
-Customer
-Trained technician
Every 6-12 months
or after:
•
high short circuit
opening at >25 kA
•
>300 openings at load
current
•
>100 openings at over
current load (2-3 x In)
It is recommend to carry
out inspection of contact
system after breaking of
equivalent of 150MA
2
s total
let through energy.
•
Check for wear of the arc runners; shall
not exceed 30 % of its cross section
•
Check for wear of the pre-arcing contact.
It shall not exceed 2 mm [0.08 in].
•
Check for wear of the main contacts at
fixed and flexible sides; shall not exceed
1.5 mm [0.06 in] of its depth.
•
Check for wear of the arc chute plates;
check for deposits inside of arc chute, this
area shall be free of deposits.
•
Check for wear of protective walls; shall
not exceed 1 mm [0.04 in].
•
Check for contact tilt and gaps.
D. Inspection of the
screw/bolt connections
-Customer
-Trained technician
Every 6-12 months
or after every inspection:
•
of the arc runners
•
of the contacts
•
of the arc chute
Check the position of the countersunk screws
in the sidewalls.
Check for tightness or use torque tool (torque
in SI and Imperial units):
•
M8 ~20 Nm [~ 177 in-lbs]
•
M6 ~10 Nm [~ 88 in-lbs]
•
M5 ~5 Nm [~ 44 in-lbs]
•
M4 ~3 Nm [~ 26 in-lbs]
E. Inspection of the
mechanic components
-GE
-Service technician
Every 5 years
or
After 5.000 openings
•
Carry out inspection “B” above
•
Check out settings of the main contacts
and auxiliary switch
•
Check out upper dumper of the
mechanism; no cracks, deformation or
heavy discoloration; hard consistency;
without punctures
•
Check out main flexband breakage; shall
not exceed 30 % of its cross section
•
Check out wear of mini flexband; shall not
exceed 30 % of its cross section
•
Clean and degrease UVR latch and quick
latch of the mechanism. Apply dash of
Beacon EP2 grease afterwards.
Required tools:
Cleaning tissue; abrasive paper; manual closing lever; hexagon wrenches SW5, SW6; Torx® wrenches size 30, 40, 45; small and
medium screwdrivers; ratchet with 10 mm hex cap; pliers; tongs.
Dispose of the breakers if required:
Pay attention to the national and local regulations of disposal!