3 displaying the logs – ZyXEL Communications ADSL 2+ Gateway P-660HW-T1 User Manual
Page 178
P-660H/HW/W-T Series User’ Guide
Chapter 15 Logs Screens
178
15.3 Displaying the Logs
Click Logs and then View Log to open the View Logs screen. Use the View Logs screen to
see the logs for the categories that you selected in the Log Settings screen (see
Log entries in red indicate alerts. The log wraps around and deletes the old entries after it fills.
Click a column heading to sort the entries. A triangle indicates ascending or descending sort
order.
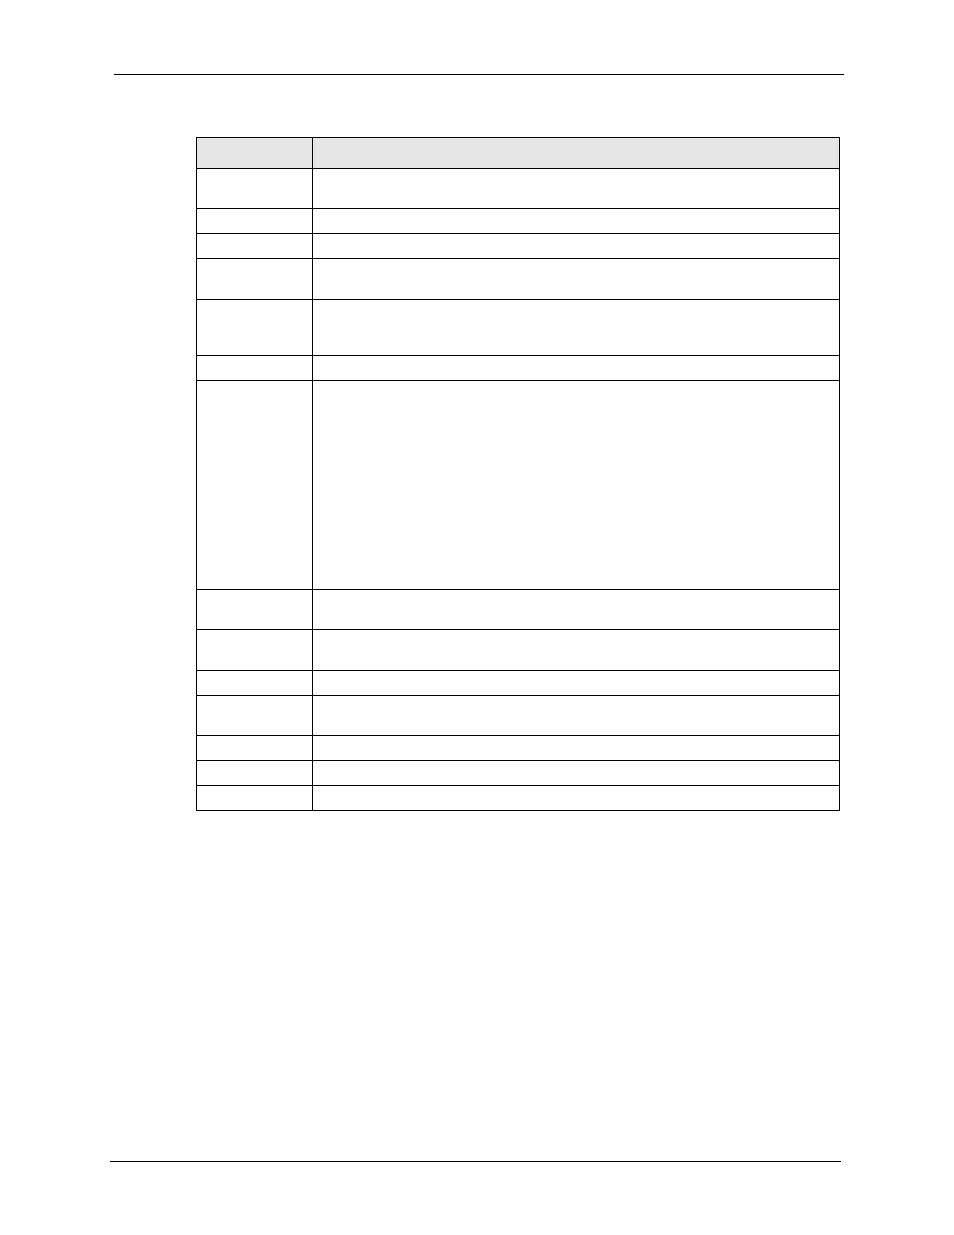
Send alerts to
Alerts are sent to the e-mail address specified in this field. If this field is left blank,
alerts will not be sent via e-mail.
UNIX Syslog
Syslog logging sends a log to an external syslog server used to store logs.
Active
Click Active to enable syslog logging.
Syslog IP
Address
Enter the server name or IP address of the syslog server that will log the selected
categories of logs.
Log Facility
Select a location from the drop down list box. The log facility allows you to log the
messages to different files in the syslog server. Refer to the documentation of your
syslog program for more details.
Send Log
Log Schedule
This drop-down menu is used to configure the frequency of log messages being
sent as E-mail:
•
Daily
•
Weekly
•
Hourly
•
When Log is Full
•
None.
If you select Weekly or Daily, specify a time of day when the E-mail should be sent.
If you select Weekly, then also specify which day of the week the E-mail should be
sent. If you select When Log is Full, an alert is sent when the log fills up. If you
select None, no log messages are sent
Day for Sending
Log
Use the drop down list box to select which day of the week to send the logs.
Time for Sending
Log
Enter the time of the day in 24-hour format (for example 23:00 equals 11:00 pm) to
send the logs.
Log
Select the categories of logs that you want to record. Logs include alerts.
Send Immediate
Alert
Select the categories of alerts for which you want the Prestige to instantly e-mail
alerts to the e-mail address specified in the Send Alerts To field.
Back
Click Back to return to the previous screen.
Apply
Click Apply to save your customized settings and exit this screen.
Cancel
Click Cancel to return to the previously saved settings.
Table 51 Log Settings
LABEL
DESCRIPTION