Basic settings, Press setting, Appears on the display – JVC LVT0858-001A User Manual
Page 21: Low frequency effect attenuator—lfe, Crossover frequency—cross
17
ANALOG
PR
ΙΙ
SUBWFR LFE
VOL
AUTO SR
INPUT ATT
DSP
L
C
R
LS
S
RS
LPCM
DOLBY D
DTS
Basic Settings
TO BE CONTINUED TO THE NEXT PAGE
ΙΙ
VOL
SR
ATT
SETTING
CONTROL
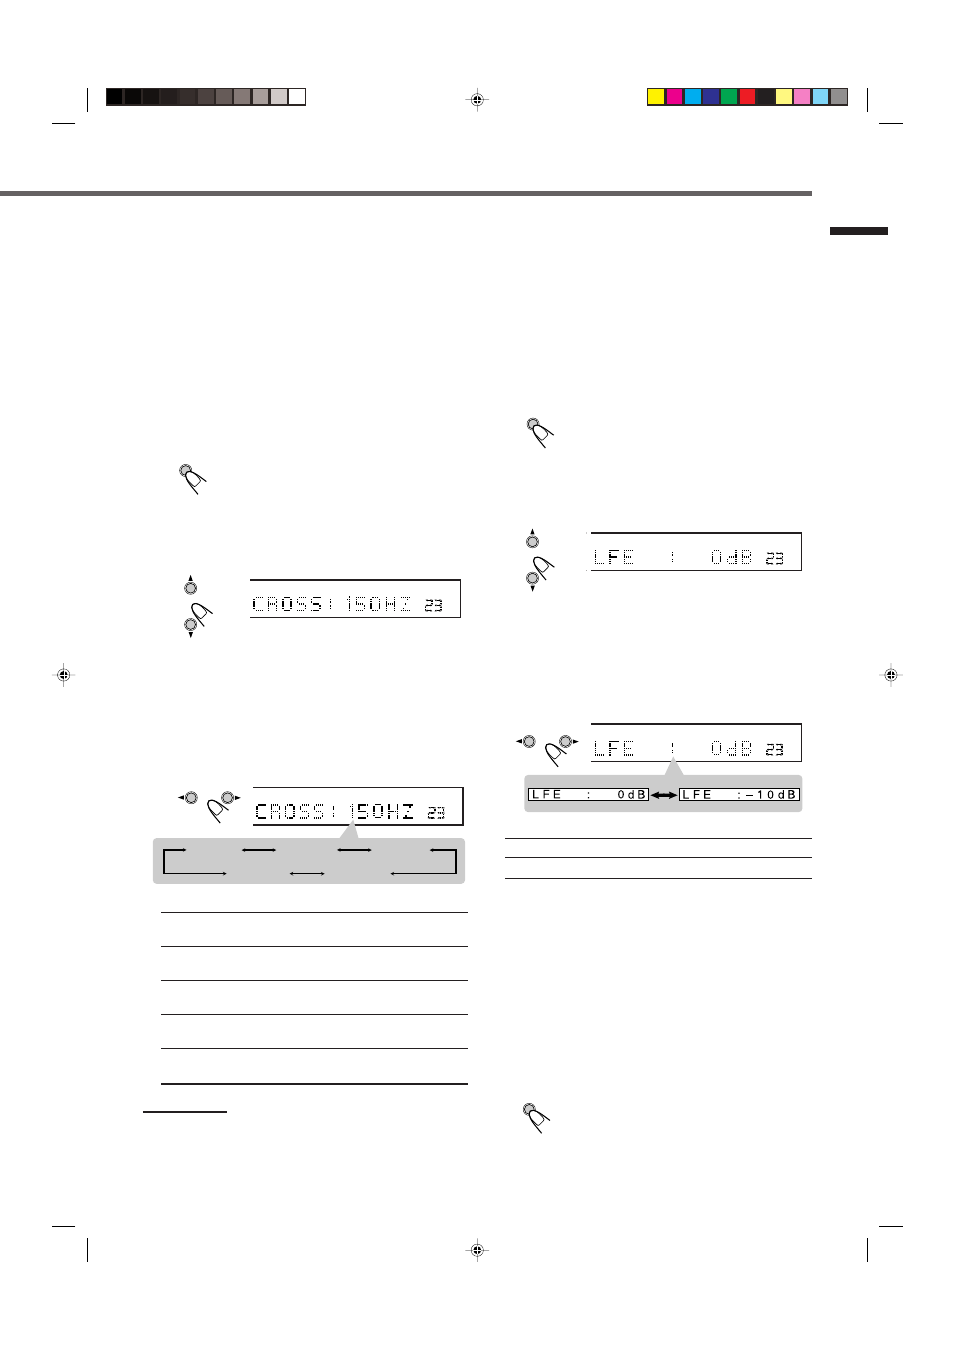
Low Frequency Effect Attenuator—LFE
If the bass sound is distorted while playing back software encoded
with Dolby Digital or DTS Digital Surround, follow the procedure
below:
• This function takes effect only when the subwoofer (LFE) signals
come in.
Before you start, remember...
There is a time limit in doing the following steps. If the setting is
canceled before you finish, start from step
1 again.
1
Press SETTING.
The CONTROL buttons now work for basic
settings.
2
Press CONTROL
∞ (or 5) repeatedly until “LFE
(Low Frequency Effect)” (with the current
setting)
*
appears on the display.
* “0dB” is the initial setting. If you have already changed the
setting, “–10dB” will be shown.
3
Press CONTROL
3 (or 2) to select the LFE
attenuator level.
• Each time you press the button, the LFE attenuator level
changes as follows:
0dB
: Normally select this.
–10dB
: Select this when the bass sound is distorted.
Dynamic Range Compression—D.COMP
You can compress the dynamic range (difference between maximum
sound and minimum sound) of the reproduced sound. This is useful
when enjoying surround sound at night.
• This function takes effect only when playing back a source
encoded with Dolby Digital.
Before you start, remember...
There is a time limit in doing the following steps. If the setting is
canceled before you finish, start from step
1 again.
1
Press SETTING.
The CONTROL buttons now work for basic
settings.
SETTING
CONTROL
VOL
CONTROL
SETTING
Crossover Frequency—CROSS
Small speakers cannot reproduce the bass sounds efficiently. If you
use a small speaker in any position, this unit automatically
reallocates the bass sound elements assigned to the small speaker to
the large speakers.
To use this function properly, set this crossover frequency level
according to the size of the small speaker connected.
• If you have selected “LRG (large)” for all speakers, this function
will not take effect.
Before you start, remember...
There is a time limit in doing the following steps. If the setting is
canceled before you finish, start from step
1 again.
1
Press SETTING.
The CONTROL buttons now work for basic
settings.
2
Press CONTROL
∞ (or 5) repeatedly until
“CROSS (Crossover)” (with the current setting)*
appears on the display.
* “150HZ” is the initial setting. If you have already changed the
setting, another frequency will be shown.
3
Press CONTROL
3 (or 2) to select the crossover
frequency level you like to use.
• Each time you press the button, the crossover frequency level
changes as follows:
• Use the following criteria as reference when adjusting:
80HZ
: Select this frequency when the cone speaker unit
built in the speaker is about 12 cm.
100HZ
: Select this frequency when the cone speaker unit
built in the speaker is about 10 cm.
120HZ
: Select this frequency when the cone speaker unit
built in the speaker is about 8 cm.
150HZ
: Select this frequency when the cone speaker unit
built in the speaker is about 6 cm.
200HZ
: Select this frequency when the cone speaker unit
built in the speaker is less than 5 cm.
Note:
Crossover frequency is not valid for the HEADPHONE mode.
ANALOG
PR
ΙΙ
SUBWFR LFE
VOL
AUTO SR
INPUT ATT
DSP
L
C
R
LS
S
RS
LPCM
DOLBY D
DTS
120HZ
150HZ
200HZ
100HZ
80HZ
CONTROL
EN10-19.RX-E111&112RSL[B]_f
02.2.6, 7:33 PM
17