Basic operations, Turn on the power, Select the source to play – JVC LVT0858-001A User Manual
Page 14: Adjust the volume, Press one of the source selecting buttons, Listening with headphones
10
This manual mainly explains operations using the buttons and controls on the front panel. You can also use the buttons on the remote
control if they have the similar names (or marks) as those on the front panel.
If operations using the remote control are different from those using the front panel, they are then explained.
• You can also see “Mastering Remote Operations” on page 38.
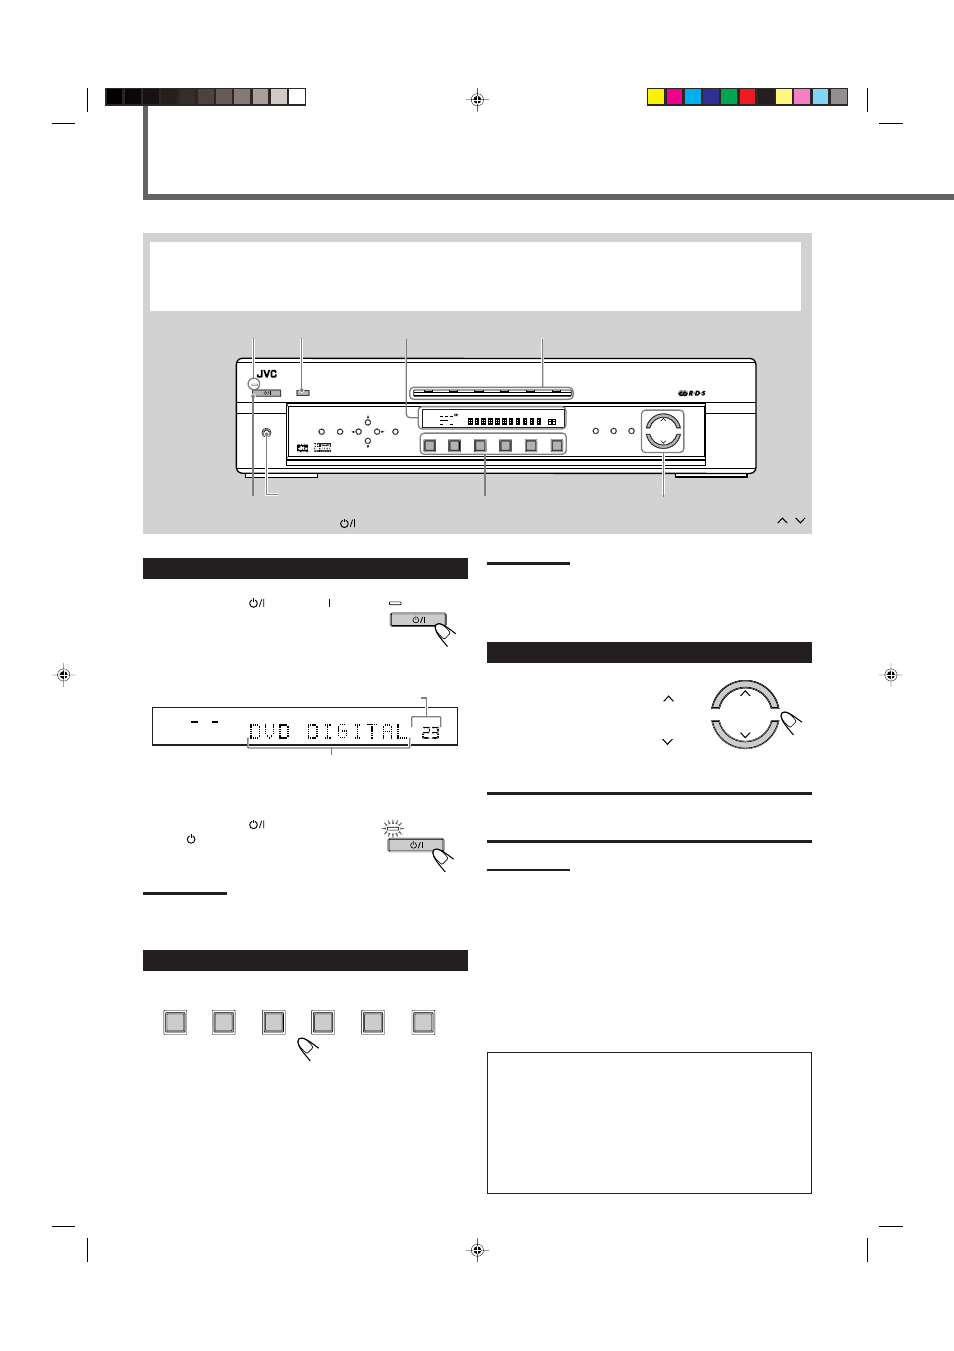
Basic Operations
Source indicators
Display
TV DIRECT
STANDBY lamp
PHONES jack
STB
VCR
TV
TAPE
FM/AM
TV DIRECT
DVD
MEMORY
CONTROL
ADJUST
SETTING
STANDBY
INPUT
ANALOG/DIGITAL
INPUT ATT
MASTER VOLUME
SURROUND
ON/OFF
SURROUND
MODE
ANALOG
PL
ΙΙ
SUBWFR LFE
SLEEP
MODE TA
ST
TUNED
INFO
HEWS
AUTO MUTING
MH
Z
KH
Z
VOL
AUTO
AUTO SR
INPUT ATT
DSP
L
C
R
LS
S
RS
LPCM
DOLBY D
DTS
DVD
STB
VCR
TV
TAPE
FM/AM
HOME CINEMA CONTROL CENTER
STANDBY/ON
PHONES
RDS
HP
1
2
3
STANDBY/ON
Source selecting buttons
MASTER VOLUME
/
STANDBY
STANDBY/ON
1
Turn On the Power
Press STANDBY/ON
(or AUDIO on the
remote control).
The STANDBY lamp goes off. The current
source indicator lights green. The name of the
current source (or station frequency) appears on
the display.
To turn off the power (into standby)
Press STANDBY/ON
again (or
AUDIO
on the remote control).
The STANDBY lamp lights up.
Note:
A small amount of power is consumed in standby mode. To turn the
power off completely, unplug the AC power cord.
2
Select the Source to Play
Press one of the source selecting buttons.
DVD
: Select the DVD player.
STB
: Select the STB.
VCR
: Select the VCR.
TV
: Select the TV tuner.
TAPE
: Select the cassette recorder.
FM/AM : Select an FM or AM (MW/LW) broadcast.
The selected source indicator lights green.
VOL
L
R
LPCM
Current source name appears.
Current volume level is shown here.
Note:
When you have connected some digital source components using the
digital terminals (see page 7), see “Basic Settings” on pages 13 and
14 to finish the digital input terminal setting and digital input mode
setting correctly before use.
3
Adjust the Volume
To increase the volume,
press and hold MASTER VOLUME
(or VOLUME + on the remote control).
To decrease the volume,
press and hold MASTER VOLUME
(or VOLUME – on the remote control).
CAUTION:
Always set the volume to the minimum before starting any sources. If
the volume is set at its high level, the sudden blast of sound energy
can permanently damage your hearing and/or ruin your speakers.
Notes:
• The volume level can be adjusted within the range of “0” (minimum)
to “70” (maximum).
• Each time you press the button, the volume level changes by
2 steps from “0” (minimum) to “14,” and by 1 step from “14” to “70”
(maximum).
Listening with headphones
Connect a pair of headphones to the PHONES jack on the front
panel. This cancels the Surround mode currently selected,
deactivates speakers, and activates the HEADPHONE mode. The
HP indicator lights up on the display.
• Disconnecting a pair of headphone from the PHONES jack
cancels the HEADPHONE mode and activates speakers.
HEADPHONE mode
When using the headphones, following signals are output
regardless of your speaker setting:
— For 2 channel sources, the front left and right channel signals
are output directly from the left and right headphones.
— For multichannel sources, the front left and right, center and
rear channel signals are down-mixed and then output from the
headphones without missing bass element.
You can enjoy multichannel sound source using the
headphones.
MASTER VOLUME
STANDBY
STANDBY/ON
STB
VCR
TV
TAPE
FM / AM
DVD
EN10-19.RX-E111&112RSL[B]_f
02.2.6, 7:32 PM
10