Printing to a shared printer – LOOQS MeeBox Router User Manual
Page 33
Page 33
User Guide LOOQS MeeBox Router
Adding a shared printer as a network printer
1. On the Start menu, click Run. The Run dialog box opens.
2. Type control printers and press Enter. The Printers and Faxes window opens.
3. Click Add a printer or double-click the Add Printer icon. The Add Printer Wizard dialog
box opens. Click Next.
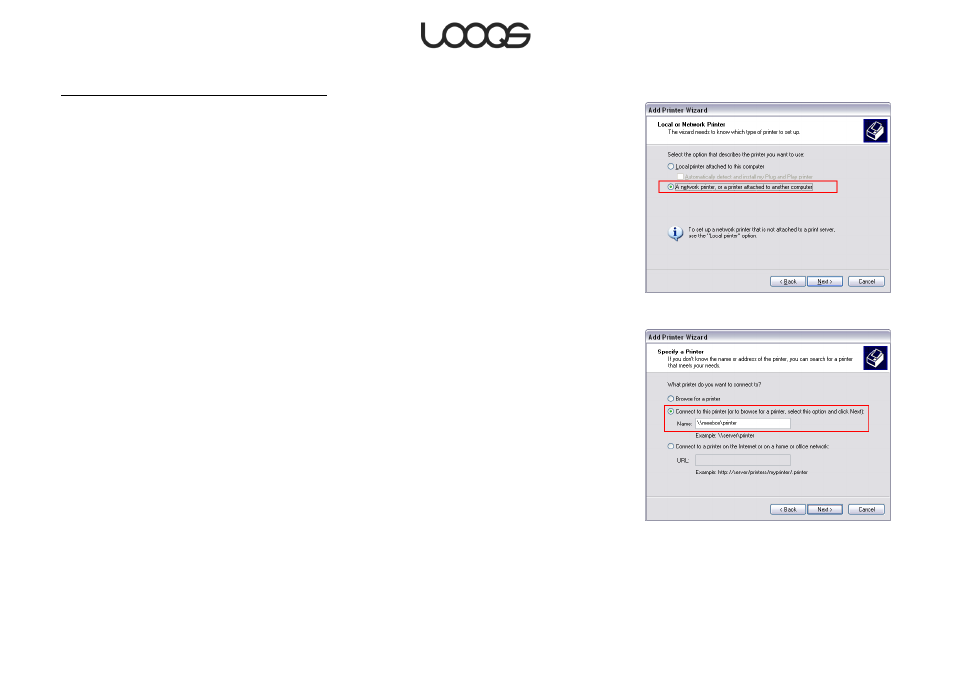
4. Select A network printer, or a printer attached to another computer (see Figure 14).
Click Next.
5. Select Connect to this printer and then, in the provided field, type \\meebox\printer
(see Figure 15). Click Next. The Connect to Printer dialog box opens.
6. Click Yes. The Connect to Printer dialog box opens again. Click OK. A second Add
Printer Wizard dialog box opens.
7. If the correct printer driver is already installed on the computer, select the printer
manufacturer and model, click OK, and skip to Step 10.
8. Click Have Disk. The Install From Disk dialog box opens.
9. Click Browse. Locate the folder containing the appropriate printer driver and click
Open. Click OK. A third Add Printer Wizard dialog box opens.
10. Select the correct printer, and then click OK.
11. If a Software License Agreement dialog box appears, click Yes.
12. Click Finish to close the Add Printer Wizard.
When you finish the Add Printer Wizard, the shared printer will appear in the Printers and
Faxes window as printer on MeeBox.
Printing to a shared printer
Before using a printer that is shared through your MeeBox, make sure the printer is
connected and turned on, and that your MeeBox is turned on. Then, simply print as if the
printer were directly connected to your computer. For example, in a Windows application,
select the shared printer in the Print dialog box and click Print.
Figure 14
Figure 15