Setup – Marantz SR5004 User Manual
Page 34
NAMES AND
FUNCTIONS
32
BASIC
CONNECTIONS
BASIC
OPERA
TION
ADV
ANCED
CONNECTIONS
SETUP
ADV
ANCED
OPERA
TION
TROUBLESHOOTING
OTHERS
SETUP
ENGLISH
SETUP
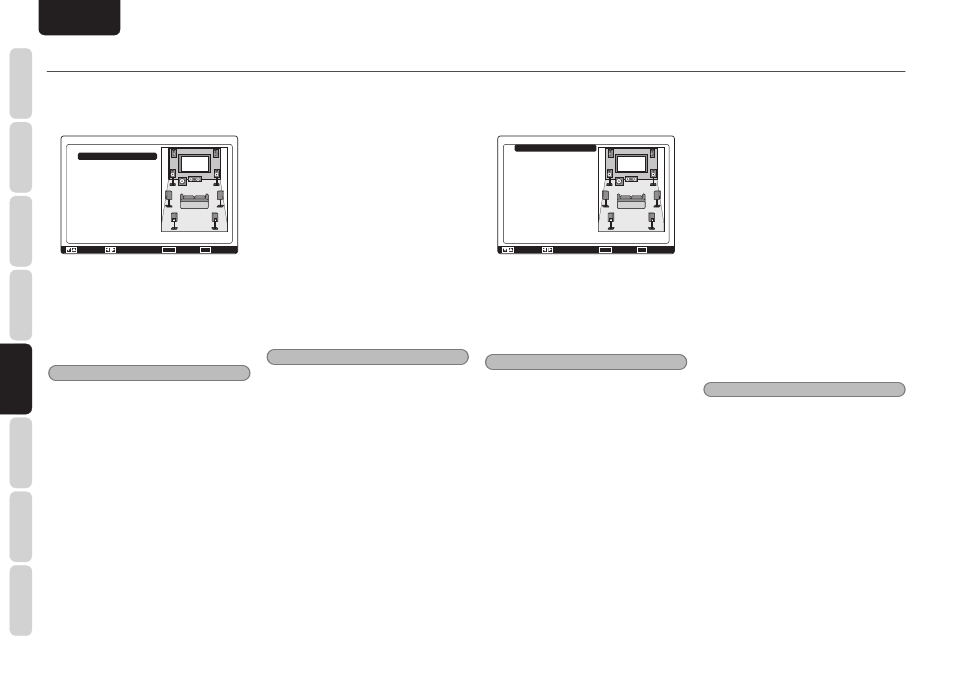
9.
Select Speaker Distance with the
3 or
4 cursor button from the Manual Setup
menu, and press the ENTER button.
Speakers Distance
Unit
Front Left
Front Height Left
Center
Front Height Right
Front Right
Surround Right
Surround Back Right
Surround Back Left
Surround Left
Subwoofer
Return
: Feet
: 10.0 ft
: 10.0 ft
: 10.0 ft
: 10.0 ft
: 10.0 ft
: 10.0 ft
: 10.0 ft
: 10.0 ft
: 10.0 ft
: 10.0 ft
: Up / Down
: Change
Enter :
Exit : Exit
Use this menu to specify the distance of each
speaker’s position from the listening position. The
delay time is automatically calculated according to
these distances.
Begin by determining the ideal or most commonly
used seating position in the room.
This is important for the timing of the acoustics to
create the proper sound space that the unit and
today’s sound systems are able to produce.
Note
• For speakers for which you have selected
“None”, the speaker configuration sub-menu
will not appear here.
10.
Select either Meters or Feet for Unit with
the
1 or 2 cursor buttons.
11.
Select each speaker with the
3 or 4 cursor
buttons.
12.
Set the distance for each speaker , press the
1 or 2 cursor buttons.
Front Left:
Set the distance from the front left speaker to your
normal listening position.
Front Height Left:
Set the distance from the front height left speaker
to your normal listening position.
Center:
Set the distance from the center speaker to your
normal listening position.
Front Right:
Set the distance from the front right speaker to your
normal listening position.
Front Height Right:
Set the distance from the front height right speaker
to your normal listening position.
Surround Left:
Set the distance from the surround left speaker to
your normal listening position.
Surround Right:
Set the distance from the surround right speaker to
your normal listening position.
Subwoofer:
Set the distance from the subwoofer to your normal
listening position.
Surround Back Left:
Set the distance from the surround back left speaker
to your normal listening position.
Surround Back Right:
Set the distance from the surround back right
speaker to your normal listening position.
Notes
• Set the distance to each speaker in meters (m) or
feet (ft) as follows.
m: 0.03 - 9.15 m in 0.03 m steps
ft: 0.1 - 30.0 ft in 0.1 ft steps
(The values appearing on the FL display are
approximate.)
• For the speakers that you have selected “No” the
speaker size menu will not appear.
• The setting for Surround Back Left and Surround
Back Right appears if it is set, two surround back
speakers in the Speaker Size menu.
• The setting of Surround Back appears if it is set
for one surround back speaker in the Speaker Size
menu.
13.
After you complete this portion of the
setup, move the cursor to “Return” with
the
3 or 4 cursor buttons and press the
ENTER button to display the Manual Setup
screen.
14.
Select Speakers Level with the
3 or 4
cursor button from the Manual Setup
menu, and press the ENTER button.
Speakers Level
Test Mode
Front Left
Front Left
Front Height Left
Center
Front Height Right
Front Right
Surround Right
Surround Back Right
Surround Back Left
Surround Left
Subwoofer
Return
: Manual
: 0.0dB
: 0.0dB
: 0.0dB
: 0.0dB
: 0.0dB
: 0.0dB
: 0.0dB
: 0.0dB
: 0.0dB
: 0.0dB
: Up / Down
: Change
Enter :
Exit : Exit
Here you can set the volume for each speaker so
that they are all heard by the listener at the same
level. We recommend holding a dB SPL (Sound
Pressure Level) meter at the listening position, at
arms length, and pointing straight up at the ceiling,
adjust the level of each speaker in turn unit it reads
75dB SPL when the meter is set to “C” weighting
and Slow responce.
Note
• The speaker level settings are not available in
7.1 Channel Input mode, Pure Direct mode and
Source Direct mode.
Test tone:
Select “Manual” or “Auto” generation of the test
tone with the
1 or 2 cursor buttons.
If you select “Auto”, the test tone will be cycled
through in a circular pattern beginning at Front
Left → Front Height Left → Center → Front
Height Right → Front Right → Surround Right
→ Surround Back Right → Surround Back Left
→ Surround Left → Subwoofer → Front Left, in 2
seconds increments for each channel.
Using the
1 or 2 cursor buttons, adjust the volume
level of the noise from the speaker so that it is the
same level for all the speakers.
If you select “Manual”, adjust the output level of
each speaker as listed below.
15.
Move the cursor to Front Left by pressing
the
4 cursor button. This unit will emit a
pink noise from the front left speaker.
Remember the level of this noise and then
press the
4 cursor button.
(Note that this can be adjusted to any
level between -12 and +12 dB in 0.5 dB
increments.)
This unit will now emit the pink noise from
the center speaker.
16.
Using the
1 or 2 cursor buttons, adjust the
volume level of the noise from the center
speaker so that it is the same level as the
front left speaker.
17.
Press the
4 cursor button again. This unit
will now emit the pink noise from the front
right speaker.
18.
Repeat steps 17 and 18 for the front right
and other speakers until all speakers are
adjusted to the same volume level.
After you complete this portion of the setup,
press the ENTER button to move the cursor
to “Return”. Press the ENTER button to go to
“Manual Setup”.
Notes
• Speakers for which you selected “None” in the
Speaker Size menu will not appear.
• Surround Back Left and Surround Back Right
appear if it is set for two surround back speakers
in the Speaker Size menu.
• Surround Back appears if it is set for one surround
back speaker in the Speaker Size menu.
• To adjust the speaker levels for 7.1 channel input
sources, you will need to use the 7.1 ch Input sub
menu. (See page 26)
• Subwoofer can be set from –18dB to +12dB.