D.3 master and slave system connection – AMETEK SLH Series RevB User Manual
Page 73

Sorensen SLH-Series AC High Power Electronic Load
Appendix D
M540073-01 Rev C
D-3
D.3 Master and Slave System Connection
Only qualified personnel are to perform system assembly.
D.3.1 System
Assembly
Handles
1.
Place the master on top of the slave unit.
2.
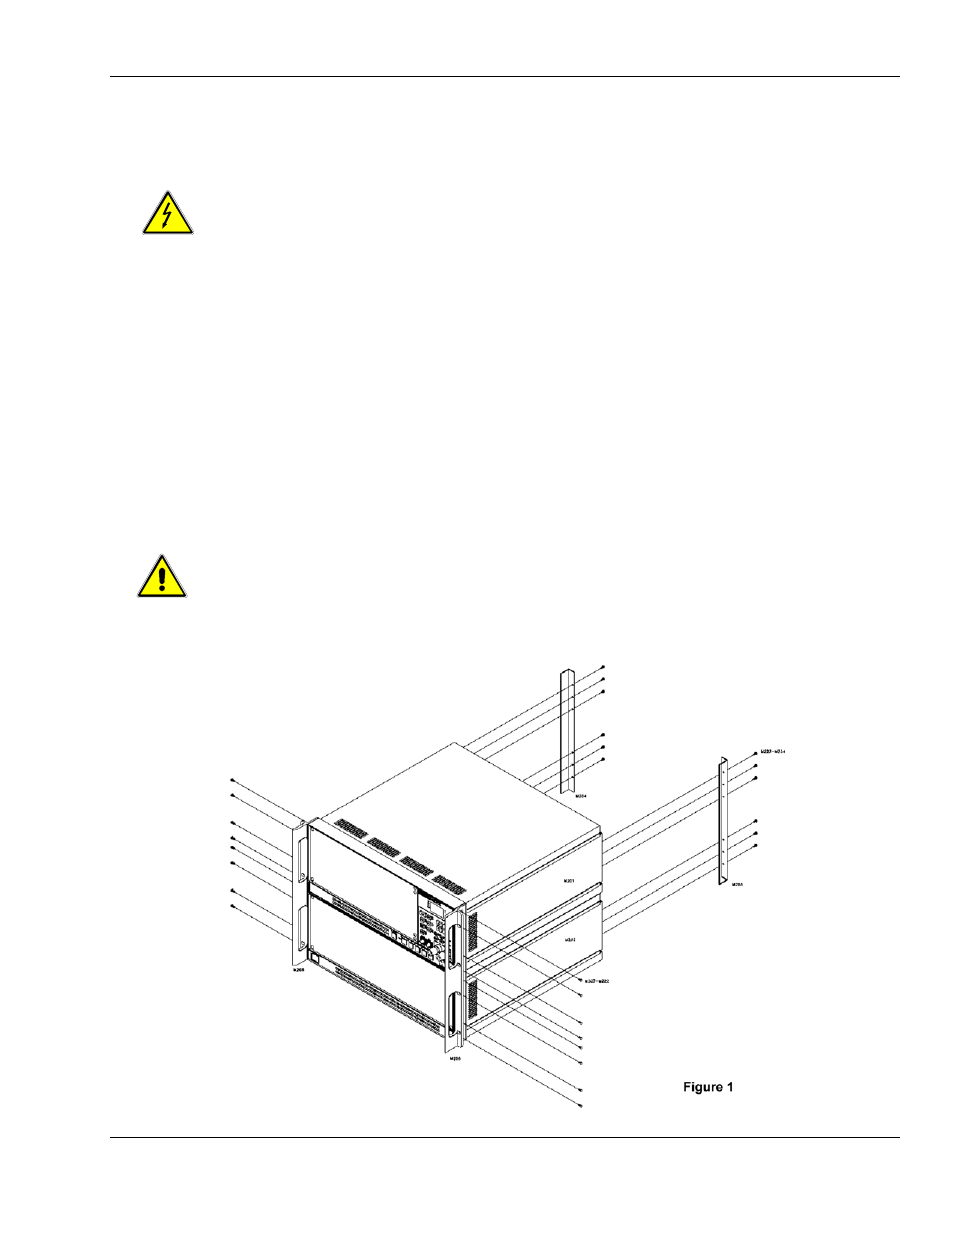
Attach the handles to the left and right sides (Figure 1) using the screws provided.
The handles should protrude forward from the front of the units.
Rear Supports (applies to a two-unit configuration only)
1. From each unit, remove the six (6) screws on the rear panel (3 screws on the left and
3 screws on the right). Figure 1 shows the six screws for each of two units.
2. Align the holes of the rear supports (vertical angle brackets) with the screw taps on
the rear panels and screw into place (Figure 1).
Two people are required to lift the combined unit for a rack/cabinet installation.
The rear supports are for a 2-unit configuration only. Any system comprised of
three or more units must be installed into a cabinet.
CAUTION
WARNING
- CW-M (48 pages)
- CW-M Corrected Table 4-2 in (1 page)
- CW-P (62 pages)
- Lx Series (205 pages)
- CW Series Programming Manual (25 pages)
- Ls Series II Programming Manual (242 pages)
- Compact i/iX Series (157 pages)
- Compact IX 2253 (157 pages)
- Compact i/iX Series Software Manual (203 pages)
- ASD Series Quick Start (5 pages)
- ASD Series (120 pages)
- i-iX Series II Programming Manual (226 pages)
- DLM 600W Series Programming Manual (24 pages)
- M131 Programming Manual (99 pages)
- DLM Series (74 pages)
- DLM 600W Series (82 pages)
- BPS Series (153 pages)
- DLM600 Series (16 pages)
- DCS-E 1.2kW Series (65 pages)
- DLM-E 4kW Series Programming Manual (32 pages)
- M136 (8 pages)
- DCS-E 3kW Series (94 pages)
- CTS 3.0 (166 pages)
- CSW Series (174 pages)
- 2003RP (126 pages)
- 2001RP (131 pages)
- MX CTSH (151 pages)
- MXCTSL Administrator Manual (27 pages)
- MX CTSL (157 pages)
- RS Series (228 pages)
- MX Series Installation Manual (35 pages)
- Ls AC source (2 pages)
- MX15 Series (184 pages)
- Ls Series II (226 pages)
- Lx Series Driver Manual (275 pages)
- MX Series Rev: AY (257 pages)
- iX Series (341 pages)
- i-iX Series II (258 pages)
- GUPS 2400A-108 (36 pages)
- HPD Series (58 pages)
- HPD Series Operation Manual (41 pages)
- HPD Series GPIB-Multichannel (134 pages)
- PLA-PLW Programming Manual (74 pages)
- ReFlex Mating Connnectors for Controller (3 pages)
- LPDC-16V (4 pages)
