Fitting the canopy, Fitting the extraction duct (ducting fitting), Installation des abluftrohres (abluftversion) – Zanussi NH 100 EAX User Manual
Page 22: Installatle van de wasemkap, Installazione cappa
Attention! The text in this document has been recognized automatically. To view the original document, you can use the "Original mode".
с
INSTALLATION
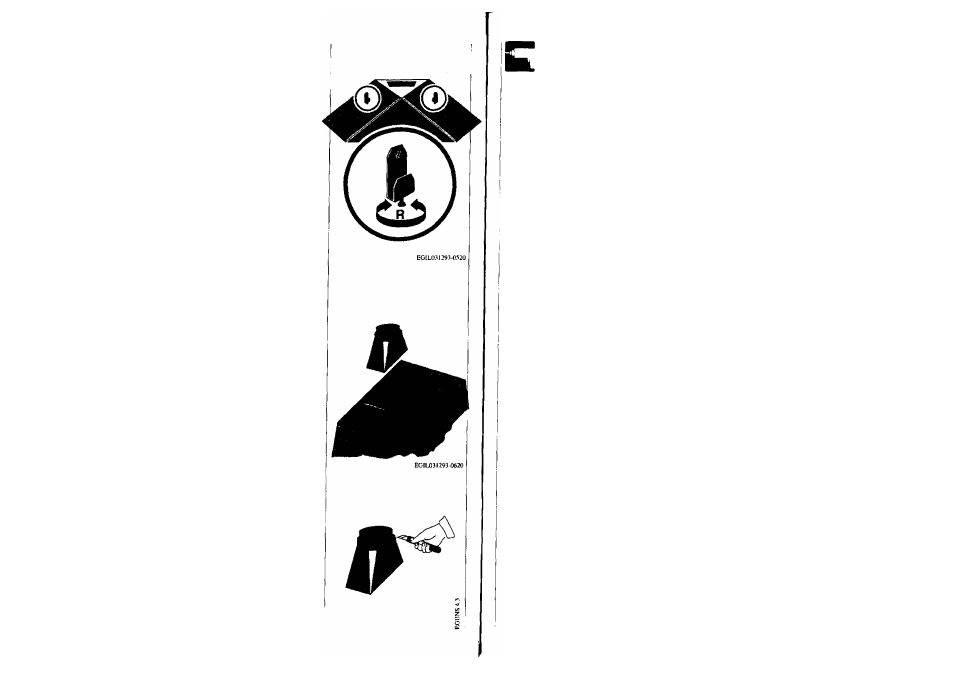
Fitting the canopy
At least 2 people are required to
carry out the installation work;
• Rotate halfway the two screws
R located in the hanging lugs of
the canopy.
• Hook the canopy onto the wall
I
bracket S fixed to the wall.
• The canopy can be aligned or
adjusted in height using the two
adjustment screws
R.
Fitting the extraction duct
(ducting fitting)
(The cooker hood can be ducted
to the outside using either a
rigid or a flexible duct of
0100
or
0120
mm diameter. The choice
shouldbe made by the installer).
• Fit the plastic spigot applying
slight pressure checking that the
internal lugs of the spigot fit
properly in the metal keyholes.
T
0
adapt the spigot to a
0120
mm
duct, cut along the slotted line,
• Connect the rigid or flexible
ducting to the spigot and fix it
using a suitable clamp (not pro
vided).
• Remove the charcoal filter.
C
INSTALLATION
Installation der Haube
Von wenigstens zwei Personen
durchzuführen:
• Die beiden Schrauben
R,
die
sich an den Aufhängeösen des
LCifterteils befinden, werden
zunächst etwa in Mittelstellung
gedreht.
• Das hintere Teil der Haube
wird am Wandblech S ein
gehakt.
• Durch Verdrehen der beiden
Schrauben
R
kann das Lüfterteil
senkrecht und waagerecht re
guliert werden.
Installation des Abluftrohres
(Abluftversion)
(Die Haube kann je nach Wahl
durch den Installateur mittels
eines festen oder flexiblen Roh
res von
0
lOOoder
0
l
2
Omm an
die Außenrohrleitung ange
schlossen werden.)
• Kunststoffadapter auf Druck
montieren, wobei sichergestellt
werden muß daß die interne
Laschen des Adapters in die
Blechösen einrasten.
Umdas Anschlußteil an ein Rohr
von
0120
mm anzupassen, ent
fernt man mit einem geeigne
ten Schneidwerkzeug das
Endstück, indem man dieses
längs der gekennzeichneten
Kerbe durchtrennt.
• Das feste oder flexible Rohr
wird mit einer Rohrschelle (im
Fachhandel erhältlich) am
Adapter befestigt.
• Eventuell eigesetzter Aktiv
kohlefilter ist zu entfernen.
42
INSTALLATION
Installation de la hotte
A effectuer par deux personnes
au moins:
• Régler les deux vis
R
(situées
sur les points d'accrochage de
la hotte) environ en position
médiane.
• Accrocherlapartiepostérieure
de la hotte à la bride de support
S ancrée au mur.
• Agir sur les vis
R
pour régler
verticalement et niveler horizon
talement la hotte.
Installation du conduit d’éva
cuation (version évacuation
vers l’extérieur)
(La hotte peut être branchée à
un conduit extérieur, à travers
un tuyau rigide ou flexible de
0
IOO ou
0
l
2
Omm; le choix est
laissé à l’installateur).
• Monterle raccord en plastique
pour le conduit en exerçant une
légère pression; vérifier que les
languettes internes du raccord
s’insèrent dans les boutonnières
métalliques.
Pour adapter le raccord à un
conduit
0120
mm il est néces
saire de le couper avec un tran-
chet tout au long de la rainure.
• Fixer le tuyau rigide ou flexible
avec des colliers (pas fournis)
au raccord.
• Retirer l’éventuel filtre à char
bon actif.
C
INSTALLALE
Installatle van de wasemkap
De installatie van de кар vereist
de medewerking van ten min-
ste twee mensen:
• De twee
R
schroeven (ze be-
vinden zieh op de haken van de
wasemkap) halverwege los-
draaien.
• De achterkant van de wasem
kap aan bevestigingsbeugel S
(aan de muur hangend) vast-
haken.
• De
R
schroeven bewerken om
de wasemkap loodrecht te re-
gelen en op gelijk horizontaal
peil te brengen.
Montage van de afvoerkanal
(aansluiting op een buitenaf-
voer)
(De wasemkap kan zowel op
een flexibele of harde afvoer-
buis van
0100
of
120
aangeslo-
ten worden. De keuze van de
afvoerbuis
kan
aan
de
installateur toevertrouwd wor
den).
•Monteer de luchtstroom-
geleider voor de buis met een
licht drukje; controleer of de
binnenlipjes van de luchîstroom-
geleider in de overeekomstige
metalen gaatjes geglipt zijn.
Om de luchtstroomgeleider aan
een
0120
mm buis aan te pas
sen, kan men het aangewezen
punt afsnijden.
• De harde of flexibele buis aan
de luchtstroomgeleider samen-
voegen en hem met de bepaalde
buisbandjes (niet meegeleverd)
bevestigen.
• De koolstoffilter verwijderen.
43
C
INSTALLAZIONE
Installazione cappa
Richiede almeno due persone:
• Regolare le due viti
R
(situate
sui punti di aggancio della cap
pa) airincirca a metà corsa.
• Agganciare la parte posteriore
delia cappa alle staffe di suppor
to S ancorate al muro.
• Agire sulle viti
R
per regolare
verticalmente la cappa e livel
larla orizzontalmente.
Installazione tubo evacuazio
ne (versione aspirante)
(Collegamento ad una tubazio
ne esterna tramite un tubo rigido
o flessibile di diametro
0100
0
0
120
a discrezione e a carico
deH'installatore).
• Montare il raccordo in plastica
per il tubo esercitando una leg
gera pressione: verificare che le
linguette interne del raccordo
abbiano agganciato le corrispon
denti asole in lamiera.
Per adattare il raccordo ad un
tubo
0
l
2
Omm si può tagliare,
nel punto indicato, in corrispon
denza di una gola di basso spes
sore.
• Collegare il tubo rigido
0
flessi
bile al raccordo e fissarlo con
apposite fascette stringitubo
(non in dotazione).
• Eliminare il filtro in carbone
attivo.