Fixing the wall brackets, Installatle der bevestigings- beugels, Installazione delle staffe di supporto – Zanussi NH 100 EAX User Manual
Page 21
Attention! The text in this document has been recognized automatically. To view the original document, you can use the "Original mode".
c
INSTALLATION
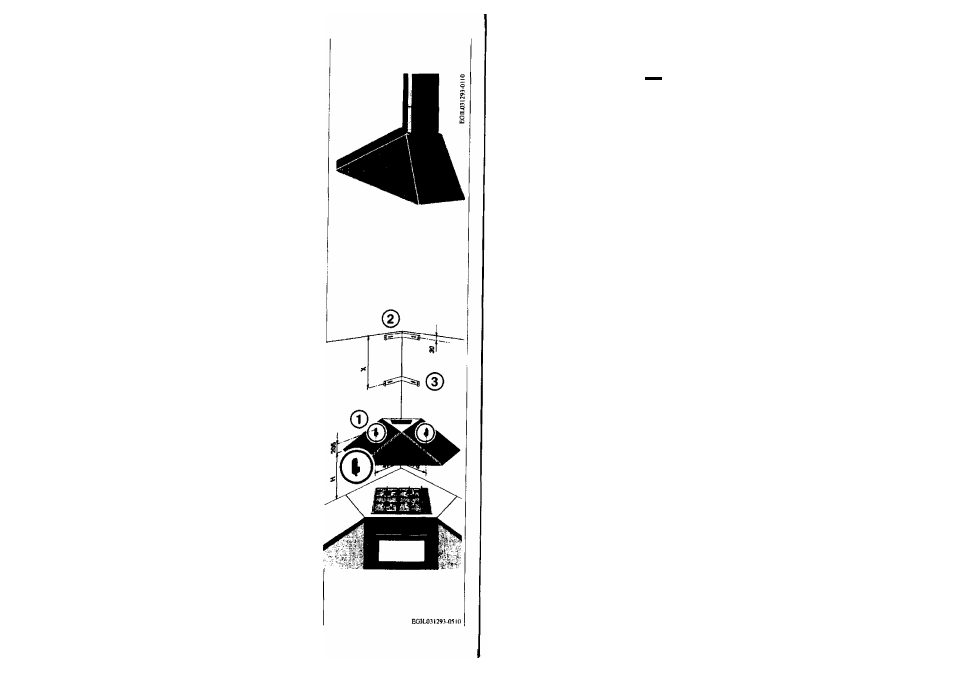
Fixing the wall brackets
(cooker hood with chimney)
Brackets (1)
• See the preceeding para
graphs
Bracket (2)
Place bracket (2) on the wall
aligning its centre at a distance
of
30mm
from the ceiling.
• Mark on the wall the centre of
the two holes.
Bracket (3)
• Proceed as with bracket (
2
)
but refer to the distance X from
the ceiling which corresponds
to the height of the upper chim
ney.
• Pilot drill the hole positions
with a
08mm
drill and fix the
brackets using the screws and
plugs provided.
C
INSTALLATION
Installation der Wand bleche
(Haube mit Kamin)
Wandbfeche (1)
•
Siehe vorige Abschnitte.
Wandblech (2)
• Wandblech (
2
) an der Wand
anlegen mit einem Abstand von
der Decke von
30mm.
• Der jeweilige Mittelpunkt der
zwei ösenförmigen Löcher wird
auf der Wand markiert.
Wandbtech (3)
•
Wie bezüglich Wandblech (
2
)
verfahren aber mit einem Ab
stand X von der Decke, der der
Höhe des oberen Teleskopteils
entsprechen soll.
• Wand mit einem Bohrer
08mm
bohren und Laschen
unter Verwendung der mit
gelieferten Schrauben und
Dübel befestigen.
40
C
INSTALLATION
c
INSTALLATIE
Installation des brides de sup<
port
(hotte avec cheminée)
Installatle der bevestigings-
beugels
(wasemkap met schouw)
Brides (1)
• Voir paragraphes précédents.
Bride (2)
• Placer la bride (2) au mur en
alignant son centre à une dis
tance de
30mm
du plafond.
• Marquer sur le mur les deux
trous boutonnière.
Bride (3)
• Procédercommepourla bride
2 mais se référer à la distance X
du plafond qui correspond à la
hauteur de la partie supérieure
de la cheminée.
• Percer les trous avec un foret
diam.
08mm
et fixer les brides
avec vis et chevilles fournies.
Beugels (1)
• Zie de voorafgaande Paragra
fen.
Beugels (2)
• Plaats de beugel op de wand
en bepaal het midden, op een
afstand van
30mm
vanaf het
plafond.
• Geef op de wand de twee ga-
ten aan.
Beugel (3)
• Zoais bij beugel 2, maar men
moet de afstand vanuit het pla
fond in acht nemen, dat met de
hoogte van het bovendeel van
de schouw overeenkomt.
• Boor gaten in de muur met
een boortje van
08mm
en be-
vestig de beugels met de
schroeven en de pluggen die
zieh in de verpakking bevinden.
41
c
INSTALLAZIONE
Installazione delle staffe di
supporto
(cappa con camino)
Staffe (1)
• Vedi paragrafi precedenti.
Staffa (2)
• Appoggiare la staffa (2) alla
parete allineando il suo centro,
ad una distanza
30mm
dal sof
fitto.
•Segnare, sulla parete i due
fori asolati.
Staffa (3)
• Agire come per la staffa 2 ma
riferirsi alladistanza Xdal soffit
to che corrisponde all'altezza
del componente superiore del
camino.
• Forare il muro con una punta©
8mm
e fissare ie staffe con le
viti e tasselli acclusi alla confe
zione.