Fixing the wall brackets, Installatie van de bevestigingsbeugels, Installazione staffe di supporto – Zanussi NH 100 EAX User Manual
Page 19
Attention! The text in this document has been recognized automatically. To view the original document, you can use the "Original mode".
c
INSTALLATION
Before commencing the installa'
tfon,
consideration
should
be
given to the difficulties to be found
during installation and to the bulky
weight of the hood. The installa
tion work must be undertaken by
a qualified and competent person
observing the requirements of the
authorities concerned relating to
the discharge of exhaust air. The
manufacturer disclaims all liabil
ity for any damage or injury
caused as a result of not follow
ing the Instructions for installa
tion contained In the following
text
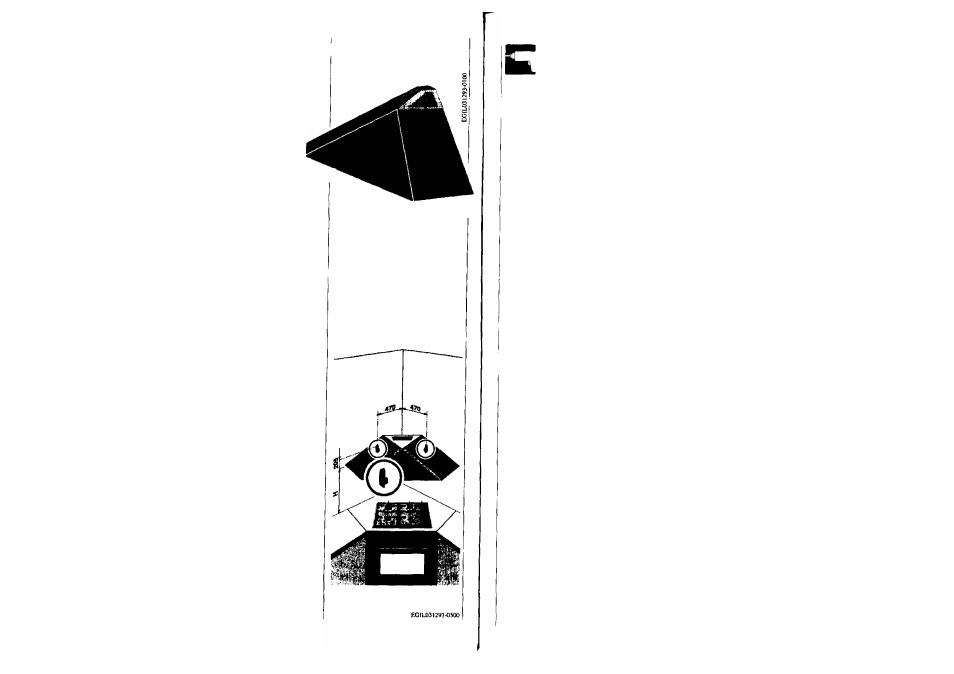
Fixing the wall brackets
(cooker hood without chimney)
• Draw the fixing point of each
bracket on the wall with a dis
tance of 470mm from the cor
ner and a height of H+205mm
where H is the hieght of the
visible part of the splashback
(if bought).
Height H is to be measured
directly on the splashback.
If the hood is to be installed
without a splashback it must
not be less than 650mm (mini
mum distance).
• Pilot drill the hole positions
using a
06
mm drill and fix the
bracket using the rawl plugs
and screws supplied.
C
INSTALLATION
Wegen des notwendigen Montage-
aufwandes und des beträchtlichen
Eigengewichtes
dieses
Gerätes
empfiehlt es sich, die Anbringung
von geschultem Personal durch
führen zu lassen, wobei alle
behördlichen
Bestim
mungen bezüglich der Ab
leitung von Abluft zu be
achten sind. Für Schäden, die
durch
nicht
vorschriftsmäDige
oder unsachgemäße Anbringung
verursacht werden, lehnt der Her
steller Jegliche Haftung ab.
Anbringung dar Wandbleche
(Haube ohne Kamin)
•Befestigungspunkt der La
schen mit einem Abstand von
470mm von der Ecke und einer
Höhe von H+205mm an der
Wand markieren, wo Hdie Höhe
des sichtbaren Teils des
Rückwandpaneels bedeutet
(falls vorhanden).
Das Maß H muß direkt auf der
Rückwand gemessen werden.
Falls die Haube ohne Rückwand
installiert wird, muß der Abstand
H nicht weniger als 650mm be
tragen (Mindestabstand).
•Mit einem Bohrer Durchm.
08
mm werden die markierten
Punkte gebohrt. Unter Verwen
dung dermitgelieferten Schrau
ben und Dübel werden die
Wandbleche fest verankert.
36
INSTALLATION
A cause de la complexité et du
poids de l’appareil il est préfé
rable que l’installation soit effec
tuée par un spécialiste en re
spectant
les
prescriptions
des
autoritées compétente gs en re
lation avec la décharge de l’air à
évacuer.
La responsabilité du construc
teur ne saurait être engagée pour
tout incident ou accident provo
qué par une installation défec
tueuse.
Montage des brides de
support
(hotte sans cheminée)
• Marquer sur le mur le point de
fixation de chaque bride; à
470mm du coin et à une hau
teur de H+205mm où H corres
pond à la cote de la partie visi
ble du panneau mural (si
acheté).
La cote H doit être mesurée
directement sur le panneau.
Si la hotte est installée sans
panneau, la cote H ne doit pas
être inférieure à 650mm (va
leur minimum).
• Percer les trous avec un foret
diam.
08mm
et fixer les brides
avec vis et chevilles fournies.
E
l
INSTALLATIE
Gezion dezwaarte van de wasem-
kap bevelen wlj de installatie door
een vakman aan, aile voorschrif-
ten van de bevoegde autoriteiten
in acht te nemen voorwat betreff
de lucht uitlaat.
Indien
de
montage
van
deze
wasemkap onfuist en niet vol-
gens de regels is uitgevœrd, wîjst
de
producent
elke
verantwoor-
delijkheid
voor
eventueel
ont-
stane schade af.
Installatie van de
bevestigingsbeugels
(wasemkap zonder schouw)
Geef op de wanden de beves-
tigingspunten van de diverse
beugels aan: op 470mm van de
rand en op een hoogte van
H+205mm, waar H Staat voor
de grootte van het zichtbare
gedeelte van het achterpaneel
(Indien aangeschaft).
De grootte van H moet direct op
het achterpaneel worden ge-
meten.
Als het achterpaneel niet wordt
geinstalleerd, dient de grootte
van H niet minder te bedragen
dan 650mm (minimumwaarde).
• Boor met een boortje van
08
mm gaten in de wanden en
bevestig de beugels met de bij-
geleverde ptuggen en schroe-
ven.
37
c
INSTALLAZIONE
A causa della complessità e del
peso deirapparecchio, si racco
manda che l'installazione venga
effettuata da personale specia
lizzato, rispettando tutte le pre
scrizioni delle autorità compe
tenti, relativamente allo scarico
deiraria da evacuare.
Il produttore declina qualsiasi re
sponsabilità per danni dovuti ad
instailazione non corretta
0
non
conforme alla regola deirarte.
Installazione staffe
di supporto
(cappa senza camino)
• Tracciare, sulle pareti, il punto
di fissaggio di ciascuna staffa; a
470 mm dallo spigolo e ad una
altezza di H+205mm dove H è
la quota della parte visibile del
fondale (se acquistato).
La quota H deve essere rilevata i
direttamente sul fondale.
I
Se il fondale non viene installa-
j
to, la quota H deve essere non |
inferiore a 650mm (valore mini-,
mo).
I
• Forare con una punta
0
8
mm |
le pareti e fissare le staffe con ì |
tasselli e viti acclusi nella dota- [
zione.
I