How to establish needle entry point, Int h j, Press start/stop lubutton – SINGER XL1000 Quantum User Manual
Page 99: Decide next step, Иишш, R r ^e00
Attention! The text in this document has been recognized automatically. To view the original document, you can use the "Original mode".
i
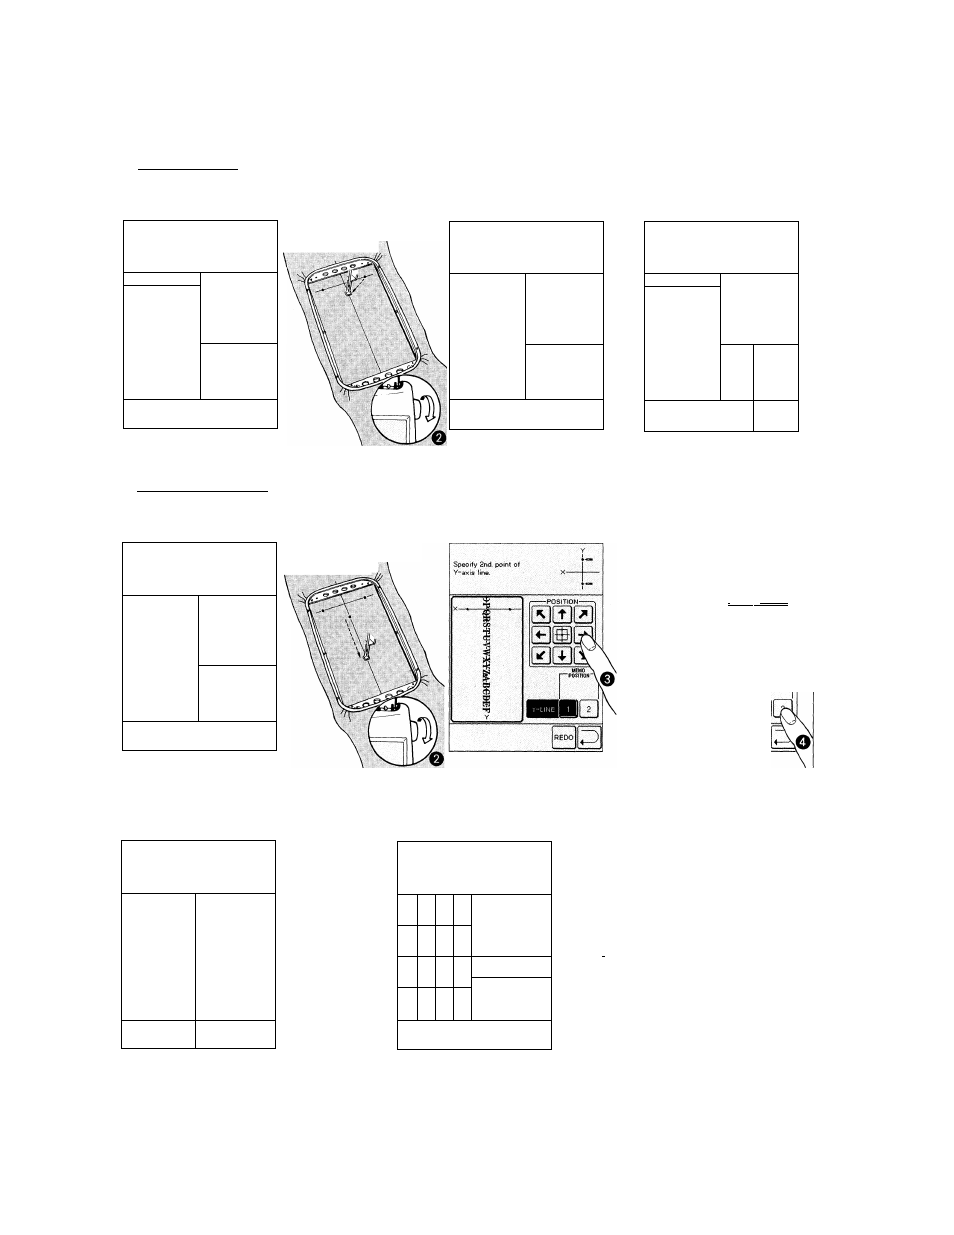
How to establish
needle entry point
h
Л
int g у
Press touch-screen in
upper center portion and
a marker dot will appear.
Specify 1st. point of
Y-axis line. X
f—POSITION---------------
ВШ0
0®S
000
1
MEMO
j"-POSITION “j
ИИШШ
Embroidery frame
will automatically
shift placing needle
above vertical line.
Turn handwheel to
ascertain that needle
rests above vertical
marker line.
[ Press needle position key
to adjust so that needle
is directly above line.
After adjusting with needle
position keys, turn handwheel
to check needle position.
Specify 1st. point of
Y-axis line. X——------------------------------------------
1
1
1
-------
POSITION
--------
000
0®0l
000^
MEMO
POSITION
r r
^E00
f Once needle entry point
^ is properly established
on Y-axis line, press
first- point position
memory key.
Specify 1st. point of
Y-axis line. X
------------ u;----------------- -
^
----- -POSITION---------
000
0®0
000
Ф
I
cp
frij
I
Y
MEMO
“POSITION—1
I ]r\2 1
■:
F
tEDoV
^
—
How to establish
needle entry point
int h
J
Press touch-screen in
lower center portion and
a marker dot will appear.
Y '
Specify 2nd point of
Y-axis line. X
ii
------POSITION-—
000
0®0
000
MEMO
|“POSIIION—j
pind
Embroidery frame
will automatically
shift placing needle
above vertical line.
OTurn handwheel to
^ ascertain that needle
rests above vertical
marker line.
O Press needle position key
^ to adjust so that needle
is directly above line.
After adjusting with needle
position keys, turn handwheel
to check needle position.
fOnce needle entry point
^ is properly established
on Y-axis line, press
second- point position
memory key.
Specify 2nd point of
-38-
I
I
S
ts
■ " ruol HUiM--------------*
sSs
0Ш0
г
^Press
start/stop
lUbutton.
QRSTUVWXYZAB
i
1
■■
' Y ■ ,
0-T
001 min 00 1 min
f—X-Y-----------
02X02
cm cm
Start sewing.
NEXT
REV
uc.
n
PHTTERN
m
I
m
help
uf.ki
STOP ■—
N
1 W SEWING .
4
—y
17i
Decide next step.
0
0
Sewing machine
is embroidering
second part of
design.
<
Sewing completed
Go back to layout
screen?
SEW
CiK
AGAIN
* If you want to embroider same
key.
design again, press
* If you want to embroider additional/
subsequent letters of alphabets, w
(or names, words or patterns)
press I key,prepare
material, shift position appropriately
and re-secure it in embroidery frame,
(see pages 99~101 for procedure to
follow to extend sewing beyond
2 frames)
98