Figure 1 – Tuffy Security 157 User Manual
Page 3
Page 3 of 10 - 01/23/2012 – Rev05192008
PLEASE READ ALL INSTRUCTIONS THOROUGHLY BEFORE STARTING INSTALLATION.
1.
IMPORTANT! Make sure the vehicle is parked on a flat surface and place stops behind the wheels to prevent it from rolling.
During the installation the vehicle will need to have the emergency brake deactivated, and the 4wd transfer case, Automatic, and
manual transmission placed in neutral.
2.
The installation will be much easier if the passenger side and/or drivers side seat(s) are unfastened by removing the (4) mounting
bolts per seat (Slide the seat forward and reverse for access to bolts). Leave the seatbelts attached and wiring but maneuver the
seat to the side making more room for the console removal and installation. The wiring harness may come unplugged (Especially
on the driver side); don’t forget to reattach it when refastening the seats or the Jeep will beep constantly.
.
3.
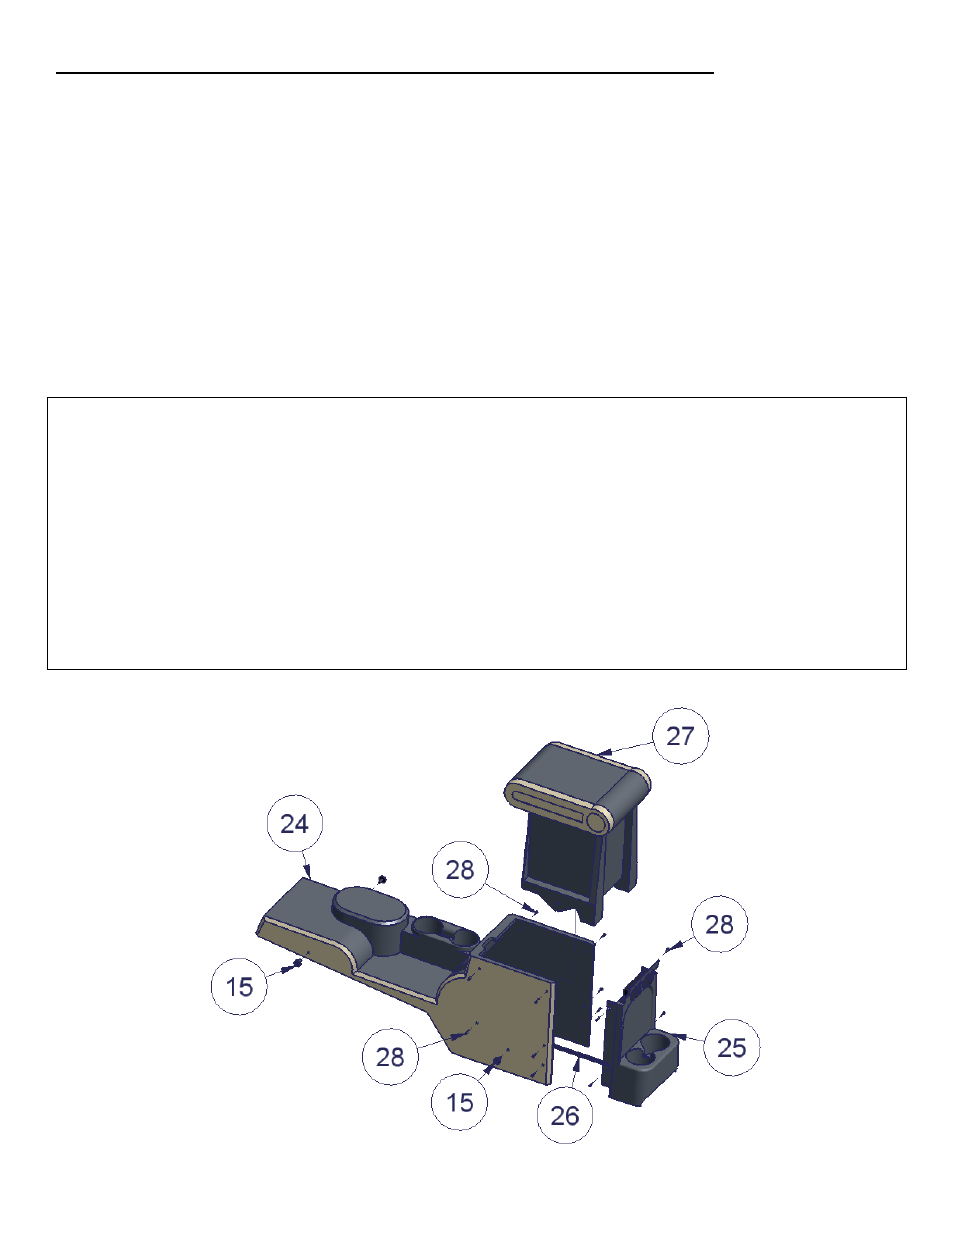
On the OEM console detach the original insert (#27 - Fig 1) by removing the (4) original torx mounting screws (#15 – Fig 1, these
will be reused) and (10) original torx side screws (#28 – Fig 1, these will not be reused). Some of these torx side screws may
instead be push fasteners which can be removed with pliers.
4.
Maneuver the original insert (#27 – Fig 1) out of the original console (#24 – Fig 1) by popping it down and out of the tabs on the
inside top front of the original console. If the vehicle has electric window switches in the rear panel follow the below instructions
to remove the original insert.
If the vehicle has electric window switches mounted in the rear panel: (#26 – Fig 1)
5.
Vehicles with rear electric windows which have switches mounted in the rear panel (#25 – Fig 1) with a wiring harness (#26 – Fig
1) will need them removed. Unfasten the (4) original torx screws (#28 – Fig 1, These are accessed behind the OEM console sides
and will not be reused). Detach the original rear panel from the insert (#25 – Fig 1).
6.
Then unplug the switch harness and remove the switch from the rear panel.
7.
Remove the support clamps which attach the wiring harness to the bottom of the original insert (#27 – Fig 1) by popping them out
with a flat head screwdriver. (These may break when removed but they will not be reused).
8.
Maneuver the original insert (#27 – Fig 1) out of the original console (#24 – Fig 1) by popping it down and out of the tabs on the
inside top front of the original console.
9.
Remove the harness plugs (#26 – Fig 1) where they are connected to the underside of the main console (#24 – Fig 1). This can be
done by sliding the harness plugs off the retaining clip or completely popping the clip out. Be careful, the pop-in clip has a weak
attachment to the harness plug and when it is popped out, if the harness plug is used for leverage, it can be damaged. (This pop-in
fastener will not be reused)
10.
Unplug the harness (#26 – Fig 1) which should completely disconnect it from the vehicle. Set it aside it will be reused.
FIGURE 1