Top Flite TOPA0160 User Manual
Page 55
MAKE THE BELLY PAN
❏
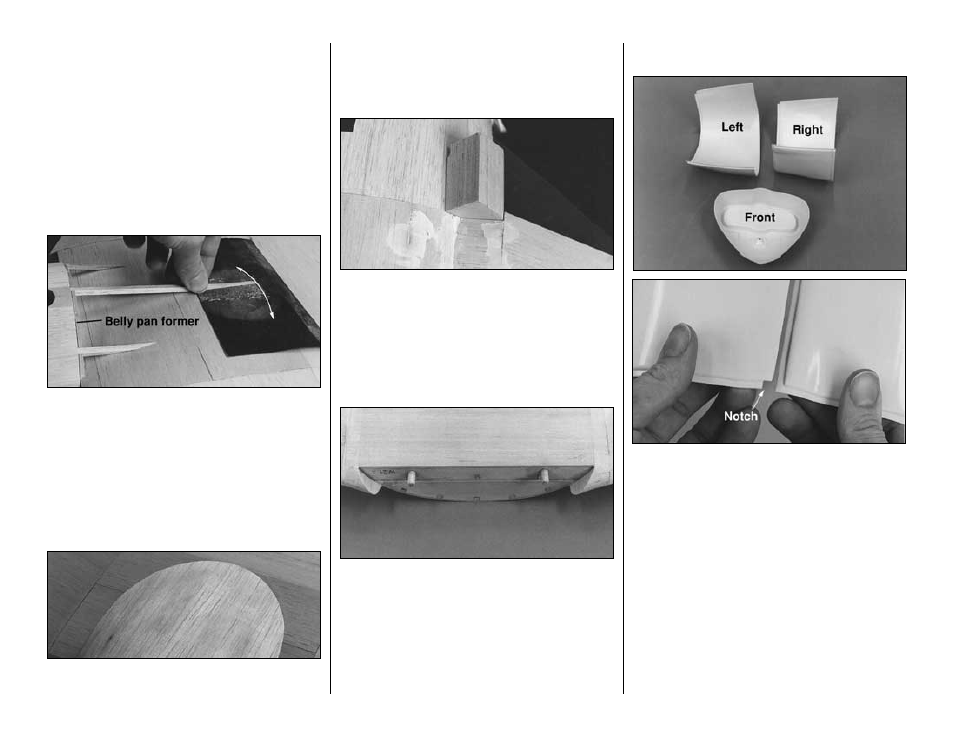
1. Bolt the wing to the fuselage. Place the die-cut
1/8” [3.2mm] plywood belly pan former F2W on the
front of the wing so it is resting against fuse former
F2. Trim the bottom of F2W so it sits 3/32” [2.4mm]
below the bottom fuselage sheeting (to
accommodate the belly pan sheeting). Carefully glue
F2W to only the wing. Note: When you glue F2W
into place, use some cardboard from a cereal box
between F2 and F2W to create a slight space
between the formers.
❏
2. From a 3/16” x 3/16” x 30” [4.8 x 4.8 x 762mm]
balsa stick, cut one 6-1/2” [165.1mm] piece, two 4-
3/4” [120.7mm] pieces and two 2-1/4” [57.2mm]
pieces to make the belly pan stringers. Sand one
end of the stringers so they conform to the shape of
the bottom of the wing. Glue them in position.
Hint: Place a piece of sandpaper on the bottom of
the wing and move the stringers back and forth,
sanding them to the correct shape.
❏
3. Sheet the belly pan with leftover 3/32” [2.4mm]
balsa sheeting. Sand the belly pan to blend with the
fuselage. Feather the edges where the belly pan
meets the wing sheeting with lightweight hobby filler.
After the filler dries, remove the wing and sand the
belly pan to blend with the wing.
❏ ❏
4. With the wing off the fuse, sand one of the 1-
3/8” x 1-3/8” x 1-1/2” [35 x 35 x 38.1mm] wing
fairing blocks to match the curvature of the right
side of the fuse at the leading edge of the wing. Bolt
the wing to the fuse. Sand the side and rear of the
wing fairing block so it fits between the wing and the
fuse as shown in the photo. Glue the wing fairing
block to the wing only.
❏ ❏
5. Remove the wing and sand the wing fairing
block to match the shape of the top of the wing. The
fairing block extends below the bottom sheeting, so
blend it to the belly pan and the bottom of the wing
with filler. Shape and fit the other fairing block the
same way.
❏
6. Use lightweight hobby filler to blend the belly
pan to the wing and sand it smooth after it dries.
BUILD THE COWL
❏
1. Cut the molded ABS cowl left side, right side,
and front along the cutlines (seen from the inside).
Cut a
notch in the top of the right cowl half and the
bottom of the left cowl half so the lap joints do not
interfere. On the aft edges of the right and left cowl
sides, cut about 1/8” [3.2mm] aft of the cutlines. This
gives you a little extra material to work with so you
can accurately fit the cowl to the fuse. Cut the
openings in the front of the cowl. If you have one, use
a rotary hand tool with a cutting burr followed by a
sanding drum. Sand the edges so they are straight
and even.
❏
2. Thoroughly sand all areas that are to be glued,
including a 1/2” [12.7mm] strip along the inside
edges of the cowl, so the fiberglass reinforcement
tape will stick.
-55-