Build the wing – Top Flite TOPA0160 User Manual
Page 18
What a nice piece of workmanship! Put the stab and
fin in a safe place, clean off your workbench, vacuum
the floor, then read the following T34 Fact.
BUILD THE WING
MAKE THE WING SKINS
❏
1. Glue three 3/32” x 3” x 36” [2.4 x 76 x 914mm]
balsa sheets together to make an aft wing skin. Trim
a
wedge from the aft wing skin. Glue it back onto the
skin as shown in the sketch.
❏
2. Glue two 3/32” x 3” x 30” [2.4 x 76 x 762mm]
(not 36” [914mm]) balsa sheets together to make the
forward outer wing skin.
Note: You will need a total of
four aft wing skins and
five forward outer wing skins (one of the forward wing
skins will be cut into four pieces to make the forward
inner skins).You can make all the wing skins now in an
assembly line fashion or make them as needed.
❏
3. After the glue dries, remove the masking tape
and mark the best side of each skin as the top. Sand
the bottoms of both wing skins so they are flat (or
almost flat). Sand the tops of the skins so they are
flat and smooth.
PREPARATIONS
❏
1. Unroll the wing plan. Roll it inside out so it will
lie flat. Cut the right wing panel with the center
section from the wing plan. Position it on your flat
building board and cover the plan with Plan Protector
or waxed paper.
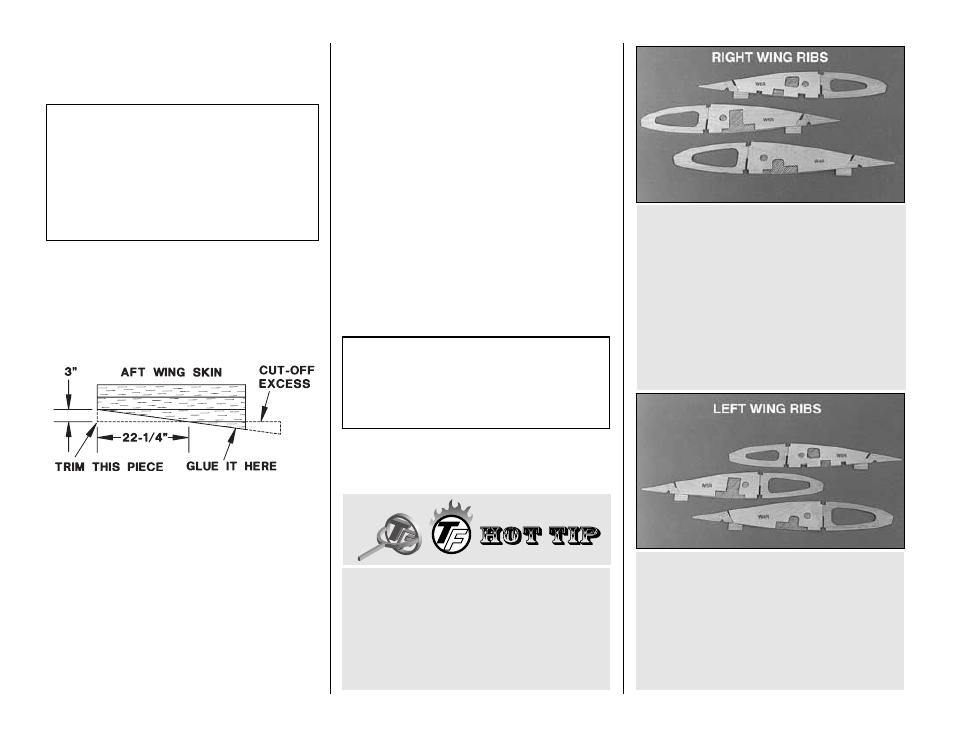
Perform steps R2 through R6 if you are installing
retractable landing gear.
R3. Prepare a set of left wing ribs the same way
but use the photo above to make sure you glue
the doublers to the correct side of the ribs.
R4. Remove the shaded area of balsa shown in the
previous two photos after the epoxy is fully cured.
R2. Prepare a set of right wing ribs by using
30-minute epoxy to glue the die-cut 1/16” [1.6mm]
plywood retract landing gear rib doublers
W4R, W5R and W6R to the die-cut 3/32” [2.4mm]
balsa ribs W4, W5 and W6
exactly as shown in
the photo. Make sure the doublers are on the side
of the ribs as shown in the photo and on the right
wing plan.
Have you purchased your retracts yet? If you
have (or as soon as you do), take the neoprene
air lines out of the package and hang them from
a hook somewhere in your shop, letting them
dangle under their own weight. This will get all the
kinks out and make them easier to work with
when it’s time to install them.
During construction of the wing and fuselage,
some steps refer to fixed gear installation and
other steps refer to retractable gear installation.
Steps for fixed gear start with “F” and steps for
retractable gear start with “R”.
T34 Fact: The Model 45 made its first test flight
on December 2, 1948. After the U.S. Air Force
was shown the prototypes, they ordered three test
aircraft under the designation YT-34. The Model
45 made its’ public debut at the 1949 Cleveland
Air Races and was flown by Bevo Howard and
Betty Skelton. Bevo Howard’s Hawthorn Aviation
later became the Air Force’s first contract flight
school to use the T-34.
-18-