Top Flite TOPA0160 User Manual
Page 13
❏
19. After the glue has thoroughly dried, remove all
the T-pins you can reach. Carefully lift the stab (with
the elevators) from your building board. Trim the jig
tabs from the ribs and take out the rest of the T-pins.
❏
20. Use a razor plane or a #11 blade to trim the
bottom of the LE so it is the same size as the front
of the ribs and matches the airfoil shape.
❏
21. Sand the bottoms of the ribs, leading edges,
stab spars, elevator spars and the TE brace so they
smoothly blend.
❏
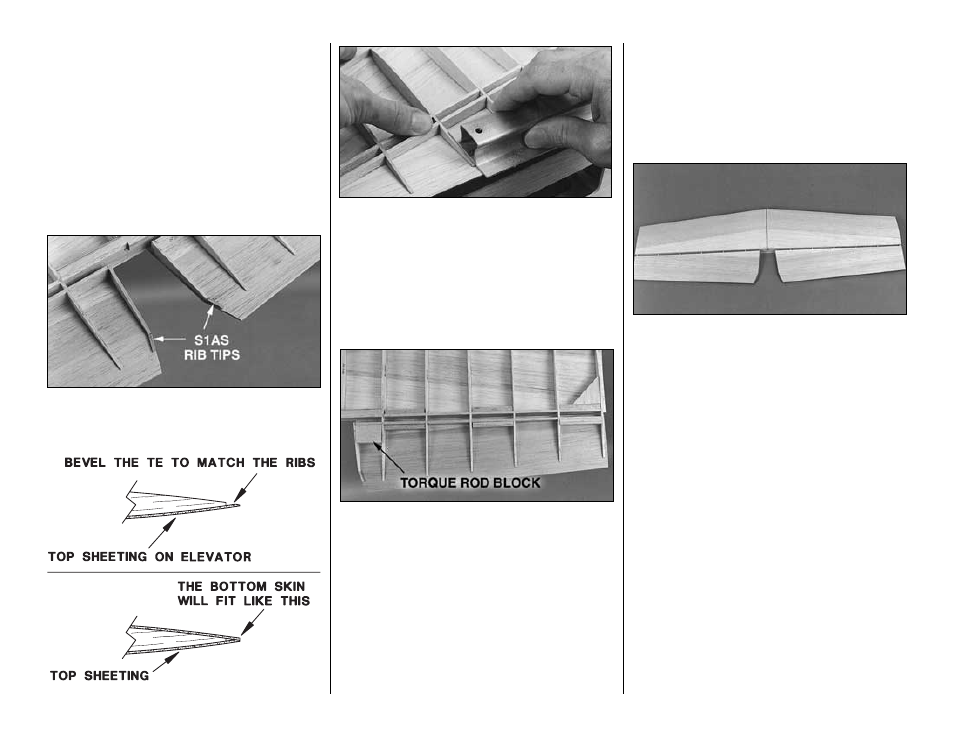
22. Glue the little tips you cut off the end of the
S1AS ribs to the sheeting and S1AS.
❏
23. Use a bar sander and 150-grit sandpaper to
bevel the trailing edge of the top elevator skin so it will
accommodate the bottom skin. While you sand, apply
pressure only to the sheeting and use the ribs to set
your sander at the correct angle. Do not bevel the
trailing edge to a
sharp edge but leave about 1/32”
[0.8mm]
squared off. Hint: Support the TE with the
edge of your workbench or a platform while you sand.
❏
24. Glue four die-cut 1/8” [3.2mm] balsa elevator
torque rod blocks between both sets of ribs S1AS
and S2S.
❏
25. Cut twelve 1-7/8” [47.6mm] long hinge blocks
from the 1/4” x 3/8” x 36” [6.4 x 9.5 x 914mm] balsa
stick. Glue them evenly spaced vertically to the stab
TE spar and the elevator LE spar where shown on
the plan. Glue the die-cut 1/8” [3.2mm] balsa stab
gusset to the hinge block and rib S7S as shown on
the plan. Position the gusset so it is even with the
bottom of the hinge block so you do not break it
when you cut the hinge slot.
❏
26. Trim the elevator torque rod blocks and any
protruding hinge blocks so they are even with the
bottoms of the ribs.
❏
27. Reinforce any glue joints that do not look strong.
Use this photo for the next two steps.
❏
28. Glue the elevator skins to the bottom of the
elevators so the trailing edges align.
Optional: Use the die-cut 1/8” [3.2mm] balsa stab
cradles S2T and S7T to hold the stab flat on your
workbench while you glue the bottom skins on. Use
the stab cradles the same as the wing cradles shown
in steps 1-5 on page 28.
❏
29. Glue the stab skins to the bottom of the stab.
If you have not used any accelerator on the stab you
may glue the skins on with thick or medium CA.
Otherwise, use aliphatic resin. Work over a flat work
surface and be careful not to add any twist into the
stab as you press the skins to the stab frame.
❏
30. After the glue dries, use a bar sander with 150-
grit sandpaper to sand the sheeting even with the
ends of the stab and elevators.
❏
31. Cut the ribs and separate the elevators from
the stab. Sand the excess sheeting and rib stubs
from the TE of the stab and the LE of the elevator.
Sand the elevator sheeting even with rib S1AS.
-13-