Top Flite TOPA0160 User Manual
Page 27
PREPARE THE BOTTOM OF THE WING
FOR SHEETING
❏
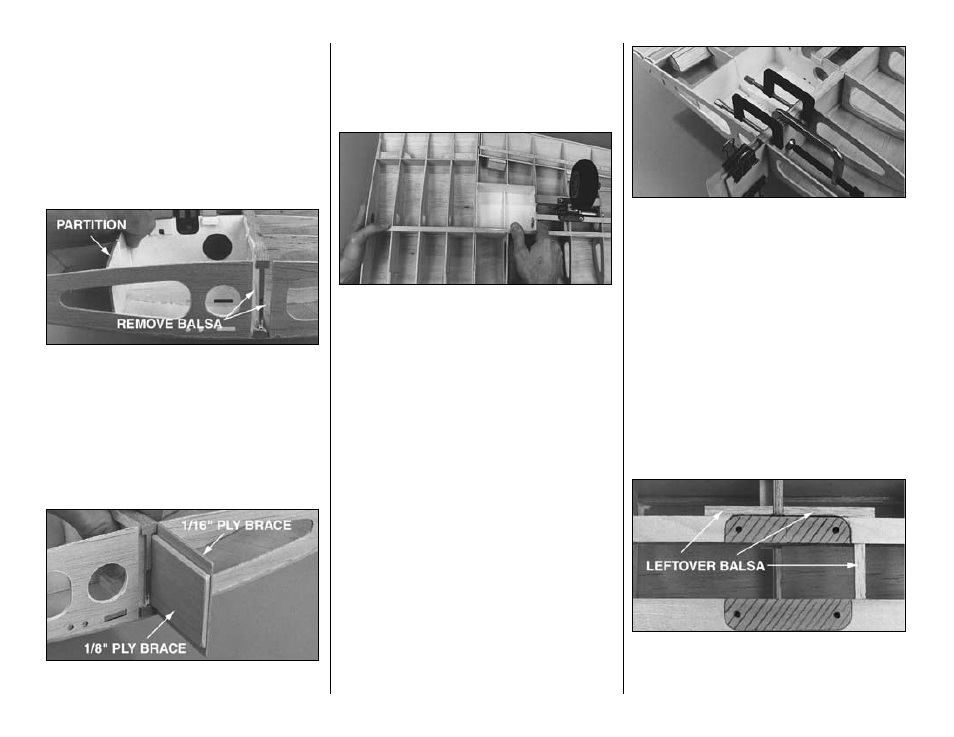
1. If you are installing retracts, build a
partition on
both wing panels from leftover 3/32” [2.4mm] balsa
to seal the wing aft of the wheel well compartment.
Fuelproof the
nooks and crannies of the wheel well
inside the wing that you will not be able to reach after
the bottom sheeting is in place. You can see the
partitions in the following photo.
❏ ❏
2. Remember where you cut partway through
ribs W2 on both wing panels 1/16” [1.6mm] ahead of
and behind the spar notches? Use a hobby knife or
a fine razor saw to cut the rest of the way through rib
W2 on the right wing panel and remove the balsa
within the area you cut.
❏ ❏
3. Cut away the portion of balsa on rib W1
between the spars on the right side of the center
section the same way.
❏ ❏
4. Test fit the die-cut 1/16” [1.6mm] plywood
dihedral braces W23 and the die-cut 1/8” [3.2mm]
plywood dihedral braces W22 in the outer wing
panel. If necessary chamfer the corners of the
braces to accommodate small glue fillets in the wing.
Note: Make certain you fit the braces
right side up
the same as the dihedral of wing.
❏ ❏
5. Temporarily join the center section to the right
wing panel with the dihedral braces to make sure
everything fits. Make adjustments where needed so the
center section fully contacts the right panel. Separate
the wing sections and remove the dihedral braces.
Read the following five steps before you actually use
any glue so you understand the procedure and can
gather the items you will need.
❏ ❏
6. Mix a batch of 45- or 30-minute epoxy.
Spread a film of epoxy in the outer wing panel
everywhere it contacts the dihedral braces. Spread a
film of epoxy on the 1/8” [3.2mm] and 1/16” [1.6mm]
ply dihedral braces except where they will contact
the center section wing panel. Fit the dihedral
braces into the right wing panel. Make certain you
fit the braces
right side up.
❏ ❏
7. Remove excess epoxy from the parts of the
dihedral braces that will contact the center section.
❏ ❏
8. Set the dihedral braces by temporarily
joining the center section to the right wing panel.
Clamp the dihedral braces to the right wing panel
only. Carefully remove the center section and wipe
away excess epoxy with a paper towel.
❏ ❏
9. Insert two approximately 2” x 2” [50.8mm]
pieces of waxed paper between the dihedral braces
where they protrude from the right panel, then insert
a piece of 1/8” [3.2mm] balsa between the two
pieces of waxed paper. Clamp the outer 1/16”
[1.6mm] ply dihedral braces to the inner 1/8” [3.2mm]
ply dihedral braces.
❏ ❏
10. Use small balsa sticks and small pieces of
paper towel to wipe away all excess epoxy so it will
not interfere with the center section when it is time to
join it to the right wing panel.
❏ ❏
11. After the epoxy cures, glue the inside of W2
to the 1/16” [1.6mm] dihedral braces.
❏
12. Return to step 2 and glue the dihedral braces
in the left wing panel.
❏
13. If you’re installing retracts, glue leftover 3/16”
or 1/4” [4.8 or 6.4mm] balsa to the front of the
forward landing gear rail and between the rails to
support the sheeting. Use a ballpoint pen or a pencil
-27-