Top Flite TOPA0415 User Manual
Page 54
Carefully view the stripes from all angles, making
sure they are vertical and parallel with each
other. This is a total “eyeball” procedure, so
taking your time now will show when your model
is done.
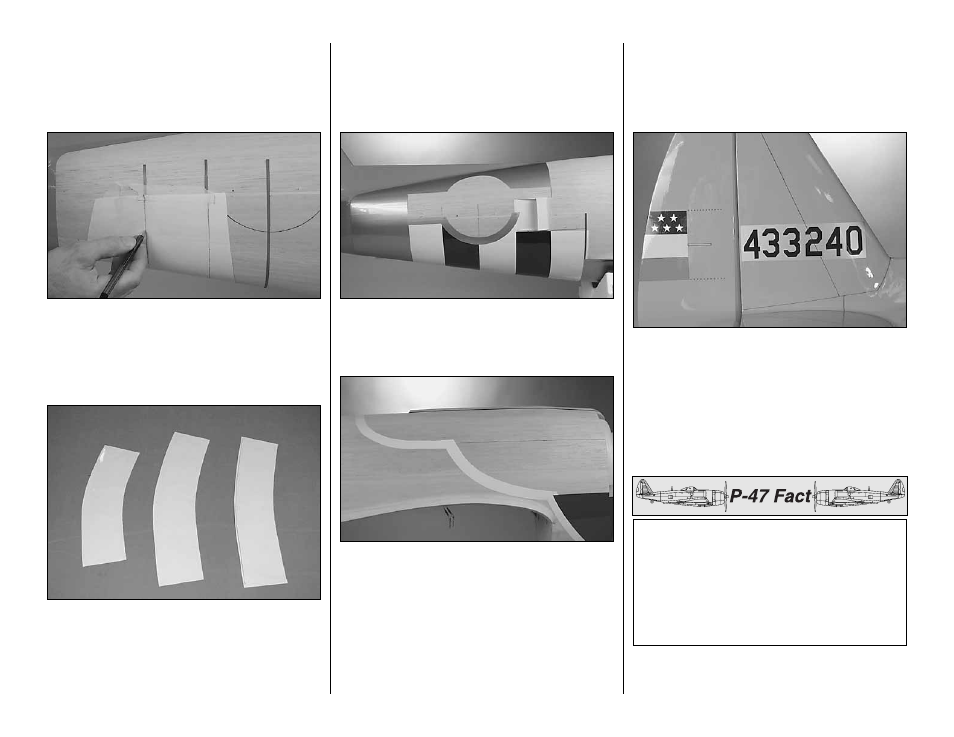
D. Peel the backing off a piece of white MonoKote film
and tape it to the fuse tightly over the first invasion
stripe. As you can see, the 1/8" wide tape on the
fuse will show through the covering. Using the
tape underneath to guide your pen, mark both
edges of the invasion stripe on the covering.
E. Remove the covering and cut the stripe along the
guidelines you drew (making the white invasion
stripes 1/8" wider on both sides to allow for
overlapping). Use a tissue dampened with denatured
alcohol to remove any ink left on the covering. Cut the
rest of the stripes the same way.
F. Before you remove the 1/8" wide tape from the
fuse, use a fine pencil or a ballpoint pen to lightly
mark the stripes directly on the fuse. These will
serve as guidelines for positioning the MonoKote
stripes when you iron them on.
G. Iron the invasion stripes to the fuse. As can be seen
in the photo, we are planning to make the stars and
bars from MonoKote (though your kit comes with decals
which can be applied directly over the covering).
❏
4. The red, white and blue “scallops” on the front of
the fuse were done the same as the invasion
stripes–using 1/8" wide vinyl tape on the fuse as a
guide to draw the outlines directly onto the covering.
Note that the blue was applied in three strips. The
photo shows the white outline and the bottom blue
strip already ironed into position. Don’t forget to lightly
mark the pattern on the fuse before you remove the
tape. The aluminum on the fuse was applied after the
white and blue scallops, followed by the flat black anti-
glare in front of and behind the cockpit on the top. The
red pinstripes between the white scallops and
aluminum are cut from red MonoKote using a Top Flite
Smart Stripe
™
and then are ironed into position
carefully, curving them as you go.
❏
5. Cover the elevators and rudder. The blue, yellow
and red flag on the rudder is made from MonoKote
and ironed into position after the rudder is covered in
orange. The stripes are 1-1/8" wide (meaning the
yellow one in the middle is 1-1/4" to allow for overlap)
and extend to 2-1/2" from the trailing edge of the fin.
❏
6. After the fuse is covered, fuelproof the cowl
mounts and then glue them into position.
The final variant of the P-47 was the P-47N-25
rolling off the Republic Farmingdale production line
in 1945. The “N” featured squared-off clipped wing
tips and an increased wingspan to accommodate
four additional 50-gallon internal wing tanks. The
goal of increasing range to fulfill the roll of bomber
escort (and to become more competitive with the
P-51 Mustang) was accomplished.
-54-