Build the stabilizer – Great Planes Giant Aeromaster Kit - GPMA0502 User Manual
Page 8
D 1. Unroll the plan sheets. Reroll the plans inside out to
make them lie flat.
D 2. Remove all parts from the box. As you do, determine
the name of each part by comparing it with the plans and
the parts list included with this kit. Using a felt-tip or
ballpoint pen, lightly write the part name or size on each
piece to avoid confusion later. Use the die-cut patterns
shown on pages 6 & 7 to identify the die-cut parts and mark
them before removing them from the sheet. Save all
scraps. If any of the die-cut parts are difficult to remove, do
not force them! Instead, cut around the parts. Use your
Easy-Touch Bar Sander or sanding block to lightly sand the
edges to remove any die-cutting irregularities.
D 3. As you identify and mark the parts, separate them
into groups, such as fuse (fuselage), wing, fin, stab
(stabilizer) and hardware. Zipper-top food storage bags
are handy to store your parts as you sort, identify and
separate them into subassemblies.
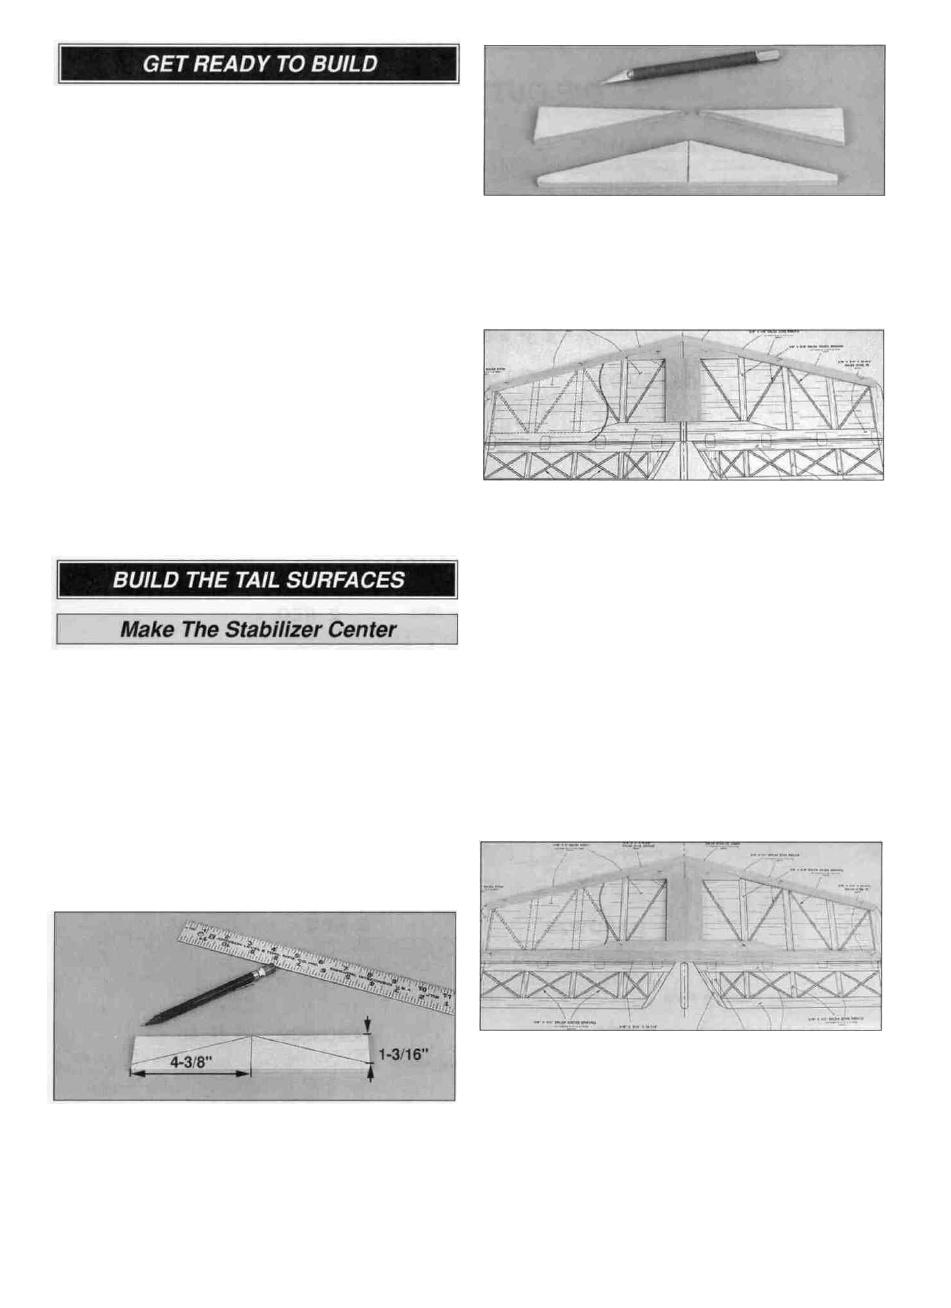
D 1. Begin making the stab LE joiner by accurately
cutting the 3/8" x 1-1/2" x 11-7/8" balsa sheet so it is
8-3/4" long and 1 -3/8" wide.
D 2. Use a ballpoint pen and a model building square to
accurately mark the centerline of the stab LE joiner
(4-3/8" from the end). Use your pen to mark another line
on both ends of the stab LE joiner 1-3/16" from one edge.
The following photo shows the locations of these marks.
D 3. Use a straightedge to draw a line connecting the
centerline of the stab LE joiner with the marks on
the ends.
D 4. Use a hobby knife with a sharp #11 blade or razor
saw to cut along the lines you drew. If necessary, use a
bar sander to true the leading edges you just cut.
Build The Stabilizer
D 1. Place a piece of wax paper over the stab plan so the
glue won't stick to it. Pin the stab LE joiner in position
over the plan. Glue the 3/8" x 2-3/4" x 5-1/8" balsa stab
center to the stab LE joiner. Cut two 3/8" x 1/2" x 30"
balsa sticks 15-3/4" long to make the stab leading
edges. Sand an angle on one end of both sticks to match
the centerline of the stab. Don't cut the tips of the LE'S
yet. Cut and square them with the end of the stab after
you remove it from the plan at step 5. Glue the stab LE'S
to the stab LE joiner with medium CA and pin them in
position over the plan.
Note: Refrain from using excessive accelerator. Even
hours after it's sprayed on, residual accelerator can
prematurely, and unexpectedly, cure the CA you use
later on nearby glue joints. Unless you must handle or
remove the part from your building board right away,
we recommend using no accelerator at all.
D 2. Cut and sand the angle at both ends of the 3/8" x
3/4" x 14-7/8" balsa stab sub TE. Glue the stab sub TE to
the stab center and pin it in position over the plan. Glue
the 3/8" x 3/4" x 30" balsa stab TE to the stab sub TE and
pin it in position over the plan. Use the plans or a
straightedge as a guide to make sure the stab TE is
straight as you glue and pin it in position.
8