Great Planes Giant Aeromaster Kit - GPMA0502 User Manual
Page 28
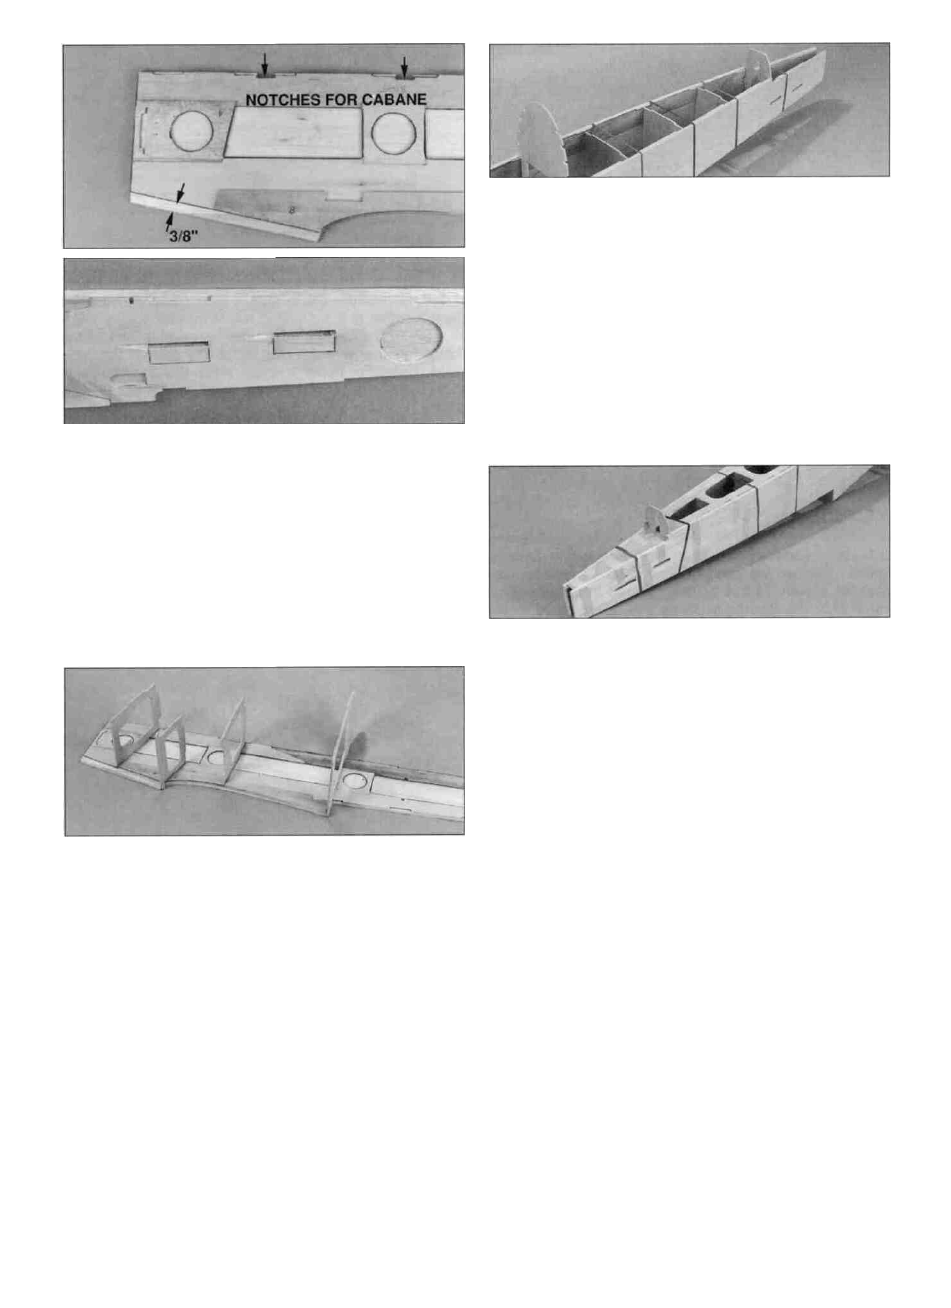
D 7 Draw a line 3/8" from the edge of the fuselage side
doubler in front of the wing saddle Using a hobby knife (or
razor plane and sanding bar), trim the fuselage sides to this
line Trim and sand the remainder of the fuselage side flush
with the outer edge of the fuselage doubler Cut-out the
notches for the cabanes Cut the slots for the pushrod exits
at the aft end of the fuselage and use a round file to bevel
the ply doubler at the front of the notch.
D 10 Without using any glue, insert the die cut 1/8" ply
formers (F), (G), (H) and (J) in their locations with the
large round hole in the former on the bottom Formers (H)
and (J) are installed with the embossed letters facing
forward Formers (F) and (G) are installed so that the small
single hole that is off center is on the opposite side From
the rudder pushrod exit hole in the fuselage side Use
rubber bands placed around the fuselage sides to hold the
formers in place
D 11 Use medium CA to glue the die-cut 1/8" ply bottom
rear plate doubler (BD) to the aft end of the die-cut 1/8"
ply bottom rear plate (BR) Refer to die GARF05 on page
6 and the bottom of the fuselage tail section on the
fuselage plan
D 8 Use thin CA to glue the die-cut 1/8" ply formers (B),
(C), (D) and (E) into position perpendicular to the right
fuselage side The large tabs on formers (B), (C) and (D)
face the top of the fuselage A notch will need to be cut in
the 1/4" balsa fuselage side in front of the wing saddle, to
allow former (C) to fit flush with the front of the wing saddle
D 9. Position the right fuselage side over the top fuselage
plan Attach the left fuselage side to the formers and align
both fuselage sides with the plan Wood clamps work great
for holding the fuselage together while checking the
alignment When aligned, use thin CA to glue the formers
perpendicular to the left fuselage sides
D 12 Install the die-cut 1/8" ply top rear plate (TR), the
bottom rear plate (BR) and then the stab plate (SP)
between the fuselage sides Note: The tabs on the top rear
plate may require trimming for a perfect fit in the fuselage
doublers Use masking tape to hold the fuselage sides to
the top, bottom and stab plates
D 13. With the aft end of the fuselage flat against your
building board, use thin CA to begin tack gluing the
following pieces checking alignment as you go Glue the
top rear plate to the fuselage sides Then glue formers (E),
(F), (G), (H) and (J) to the fuselage sides, top rear plate
and bottom rear plate Glue the bottom rear plate to the
sides Do not glue the stab plate at this time
D 14 Remove the stab plate / hope you didn't glue it in'
Use a round file or a hobby knife to bevel the pushrod exit
holes to allow the guide tubes to slide through Carefully
sand the outside of the 36" outer pushrod guide tubes
with coarse sandpaper so the glue will adhere better.
D 15. Install two of the guide tubes in the forward pushrod
exit holes The guide tubes pass through the outer holes in
former (H) through the middle holes in former (G) and
cross each other before passing through the middle holes
of former (F) (see photo at step 16) Approximately 1" of the
guide tubes should protrude past the exit holes in the
fuselage sides Insert a 4-40 x 36" pushrod into each tube
Check that they slide smoothly through the tube without
any restrictions.
28